Help Correcting an Interesting Paint Defect

ZeroSkill

New member
Joined
Mar 16, 2026
Messages
4
Reaction score
3
Points
3
Location
Nevada
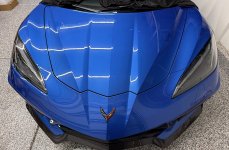
Hey Mike and the foum at large - I'm having an interesting issue with the hood(frunk) on my 2022 C8 Corvette and was hoping the collective knowledge here could help to correct it.

During my prep to coat the car with Dr Beasley's plasma coat I noticed the hood had a large number of what appeared to be marring or scratches. That defect is completly flat, wont catch your fingernail.

So far I've tried the Flex 24v Dual Action Random Orbital polisher loaded with orange and yellow pads with Wolfgang Uber Compound.

I've also tried Koch Chemie heavy cut on a white pad and i cannot get these imperfections to disappear.

I have a gear drive Flex 24v as well but, before i load it up and try the same combinations from above, I thought i would post here and see if there was any guidance on how to correct this hood in the correct way.

Far medium and close pics below to help illustrate what ive described above.

Thanks in advance for any help.

img_6721-jpeg.11978
IMG_6723.jpegIMG_6722.jpeg
 

Attachments

  • IMG_6721.jpeg
    IMG_6721.jpeg
    1,002.9 KB · Views: 40
During my prep to coat the car with Dr Beasley's plasma coat I noticed the hood had a large number of what appeared to be marring or scratches.

That defect is completely flat, wont catch your fingernail.

Defects tend to fall into one of two categories.

1: Above surface

2: Below surface


What speed are you running the FLEX 15mm free spinning polisher? These are a tick on the weak side if you ask me and the only way this type of tool is going to do much is if you have BOTH good pad oscillation and pad rotation.

Then you need to push down on the head of the polisher with around 5 pounds of pressure.

I would suggest taking a Sharpie marker and put a few marks on the outer edge of the pad. Then run the polisher. The marks will make it easy to see of the pad is in fact rotating/oscillating and/or just vibrating against the paint.

If it were me? I wouldn't waste my time with this type of tool and would jump right up to the 8mm gear-driven polisher. And, you don't need to mark the pad because it's going to rotate and oscillate and give you some correction power.


Mike
 
Also, while it's kind of hard to do with tiny or short marks as shown in your pictures, the way I would normally troubleshoot a stubborn defect is to,

Only buff on a portion of the defect. In most cases, I'm placing a piece of painter's tape right across the middle of the defect I'm struggling to remove and then buff on only one side of the tape line.

This help to visually show you if you're having an effect or no effect at all as you can easily compare the results from the side you buffed to the side you didn't buff.

But with tiny marks, this would be difficult to do. But this is how I troubleshoot paint problems.

You can either AFFECT the paint/defect or you can't. And testing will show you.

My guess is, if you use the gear-driven orbital polisher and foam polishing or foam cutting pad with a quality compound, then you should be able to remove these marks.


Mike
 
I had a young detailer visit the Dr. Beasley's booth at Mobile Tech Expo this last January. He told me he struggles to get the same type of correction speed and results that I show.

I sanded the demo hood in our booth and then said,

“Watch how I remove these sanding marks and check to see if I’m doing anything different than what you do?”

After the demo he said,

“I’m not pushing as hard”
 
Thank you so much Mike! I knew you would have some sage wisdom for me. Appreciate the help! On the dual action im pushing down with some force. In my last session with it - i was pushing enough to deform the pad while i was running the tool. Currently Im running at either a 3.5 or 4 out of 6 speed setting. I've tried both just to try to make sure i had enough speed. I can grab the tool and get what that setting translates to in RPM's if thats helpful? The marks on the pad are a great tip and ive seen that reviewing your advice on other threads here as well. I'll probably try the gear polisher this afternoon. The working plan is to use a 5.5" Orange CCS pad and some Uber Compound to see if that will lift it first. If not i can jump to a yellow CCS pad with the same compound. Ill post an update once ive tried. Thank you again! :)
 
In my last session with it - i was pushing enough to deform the pad while i was running the tool. Currently

This is not a super great indicator. If using a foam polishing or finish pad, they can deform just from the weight of the tool. Marking your backing plate works better.


Im running at either a 3.5 or 4 out of 6 speed setting.

On any FREE SPINNING, random orbital polisher, in order to maintain GOOD pad rotation and pad oscillation you'll be on the 6 speed setting. RUPES says their tools are designed for max performance using the 4 speed setting, but last Tuesday I buffed out this old 2-door European job using the RUPES Cordless BigFoot 15 and I had it on the 6 speed setting for the entire car, especially when buffing into the rear air intake scoops. (right behind the door panels)

full


The marks on the pad are a great tip and ive seen that reviewing your advice on other threads here as well.

Here's a video on marking the side of your backing plate, (you can also mark the side of pads), from September 1st, 2011 LOL


And here's a very in-depth, detailed video from last summer that shows pretty much everything a person needs to know to use a simple DA to buff out their car. Gets a lot of good comments.

There's also a section on marking your backing plates and buffing pads.


Mike
 
Back
Top