


- Admin
- #1
- Joined
- May 21, 2021
- Messages
- 1,467
- Reaction score
- 798
- Points
- 113
- Location
- Stuart, Florida
- Website
- themikephillipsforum.com
The definition of a Section Pass by Mike Phillips - How to do paint correction by machine
Years ago, when trying to figure out how to teach a person how to buff out a car using a keyboard I came up with the term Section Pass or Section Passes.
The definition of a pass
There are two definitions of the word pass as it relates to machine polishing with any type of machine.
Single Pass
A single pass is just that. It's when you move the polisher from one side of the section you're buffing to the other side of the section you're buffing. That's a single pass.
Section Pass
A section pass is when you move the polisher back and forth, or front to back with enough single overlapping passes to cover the entire section one time. That's a section pass.
How many section passes to make to one area of paint
In most cases if you're removing any substantial below surface defects, you're going to make 8-10 section passes to the section you’re working before you either feel comfortable you've removed the defects or you're at the end of the buffing cycle for the product you're using.
After buffing a section, turn the polisher off, carefully remove any product residue from the surface and inspect. If the results look great, move onto a new section and be sure to overlap a little into the previous section for good UMR or Uniform Material Removal.
If the defects are not removed to your satisfaction, re-apply fresh product and buff this section a second time.
Optional: Switch to a more aggressive pad, product or tool. Or increase the number of section passes until you have removed the defects to your satisfaction or your comfort level.
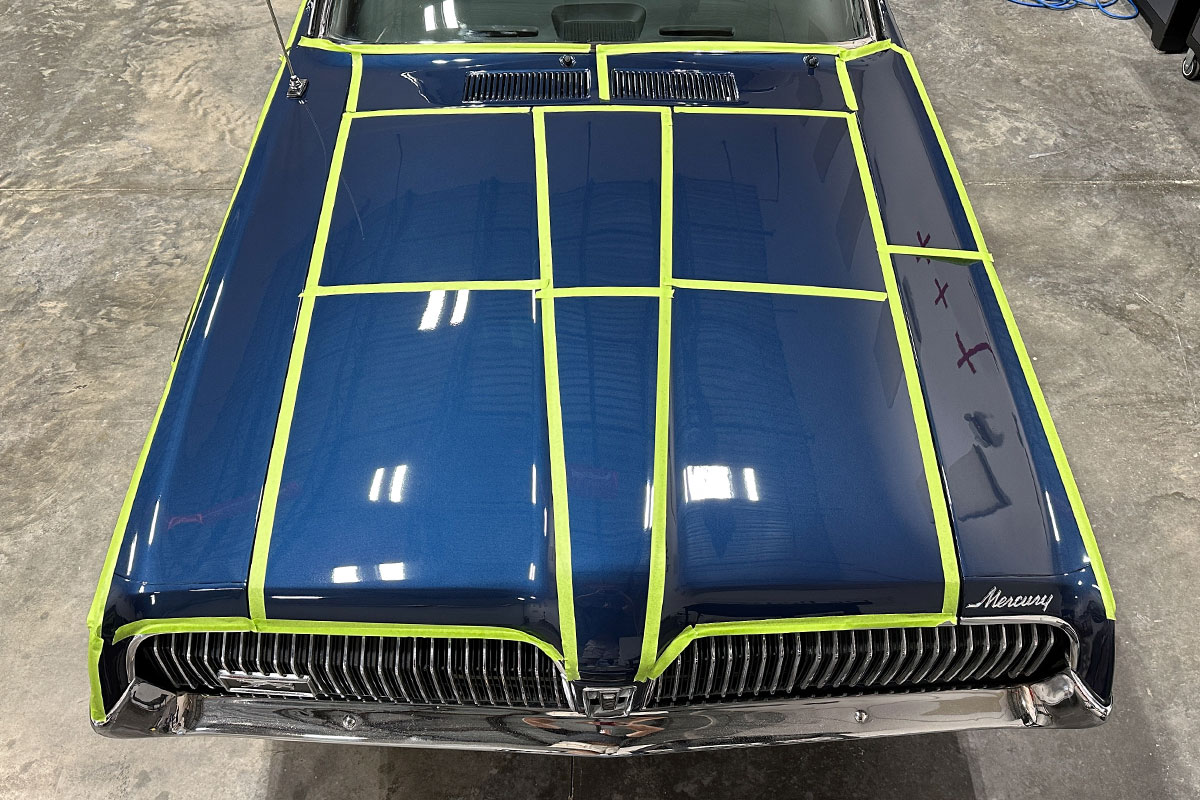
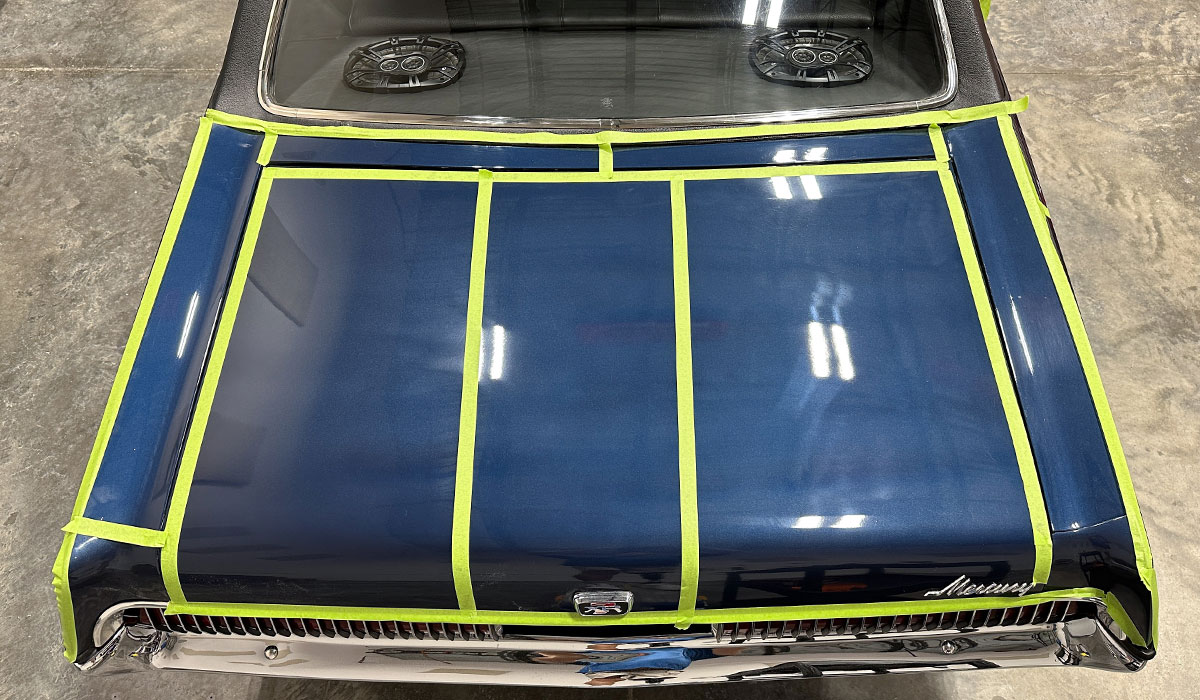
Dividing large panels into smaller sections
Making section passes refers to the way you move a polisher over the paint to buff out a single section of paint. You can't buff out entire panels at a time as paint is too hard and many panels are too large to actually buff out an entire panel at one time. So you take larger panels and divide them up into smaller section like you see in this picture.

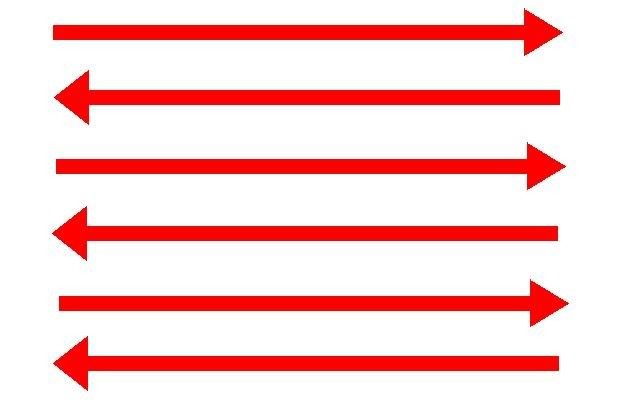
Crosshatch pattern
Doing section passes is doing a crosshatch pattern over a section of paint.
Polish first going left to right.
Make a second pass over the working area using overlapping “up to down, down to up” strokes.
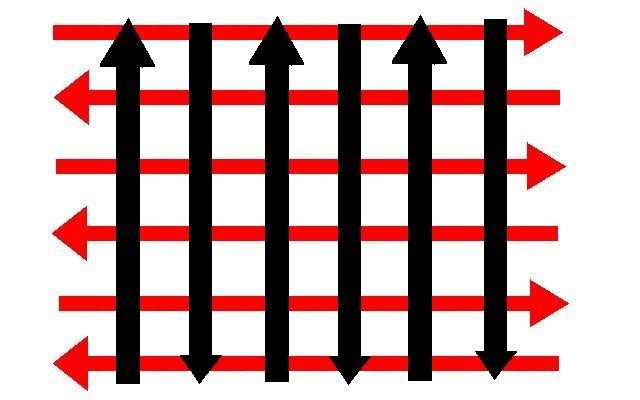
The above is an example of 2 section passes, this means going over a section with overlapping passes side to side until you have buffed over the entire section, followed by buffing front-to-back, until you have buffed over the entire section. To buff this section for 8 section passes, you would repeat the above 2 section passes 6 more times. Make sense?
Mike
Years ago, when trying to figure out how to teach a person how to buff out a car using a keyboard I came up with the term Section Pass or Section Passes.
The definition of a pass
There are two definitions of the word pass as it relates to machine polishing with any type of machine.
Single Pass
A single pass is just that. It's when you move the polisher from one side of the section you're buffing to the other side of the section you're buffing. That's a single pass.
Section Pass
A section pass is when you move the polisher back and forth, or front to back with enough single overlapping passes to cover the entire section one time. That's a section pass.
How many section passes to make to one area of paint
In most cases if you're removing any substantial below surface defects, you're going to make 8-10 section passes to the section you’re working before you either feel comfortable you've removed the defects or you're at the end of the buffing cycle for the product you're using.
After buffing a section, turn the polisher off, carefully remove any product residue from the surface and inspect. If the results look great, move onto a new section and be sure to overlap a little into the previous section for good UMR or Uniform Material Removal.
If the defects are not removed to your satisfaction, re-apply fresh product and buff this section a second time.
Optional: Switch to a more aggressive pad, product or tool. Or increase the number of section passes until you have removed the defects to your satisfaction or your comfort level.
Dividing large panels into smaller sections
Making section passes refers to the way you move a polisher over the paint to buff out a single section of paint. You can't buff out entire panels at a time as paint is too hard and many panels are too large to actually buff out an entire panel at one time. So you take larger panels and divide them up into smaller section like you see in this picture.
Crosshatch pattern
Doing section passes is doing a crosshatch pattern over a section of paint.
Polish first going left to right.
Make a second pass over the working area using overlapping “up to down, down to up” strokes.
The above is an example of 2 section passes, this means going over a section with overlapping passes side to side until you have buffed over the entire section, followed by buffing front-to-back, until you have buffed over the entire section. To buff this section for 8 section passes, you would repeat the above 2 section passes 6 more times. Make sense?
Mike
")
