- Admin
- #1
- Joined
- May 21, 2021
- Messages
- 1,467
- Reaction score
- 798
- Points
- 113
- Location
- Stuart, Florida
- Website
- themikephillipsforum.com
1970 Plymouth Superbird — Part 2 — Machine Sanding & Polishing Rare Back Window with NSP GL by Mike Phillips
WARNING: Machine sanding, especially when dealing with glass, is an aggressive process and should only be undertaken by an experienced individual, whether enthusiast or professional. Proceed with caution if attempting.
In Part 1, 1970 Plymouth Superbird – Paint Correction with Dr. Beasley’s, I shared the process I used to do all the paint correction and final polishing to create a true show car finish on the Superbird’s intense Vitamin C paint color. The fact of the matter is, I actually did Part 2 (the glass polishing) first, followed by the paint correction. During this time, we were still testing different formulas for Dr. Beasley’s Nano Surface Primer GL, their new polish for glass. For this reason, I could not share the glass polishing aspect of this project until AFTER the Dr. Beasley’s NSP GL become public knowledge, which it is now — you can buy it right here!
Down below, you’ll see pictures of 3 different beta formulas I was testing for Jim Lafeber and this was actually before I was offered the position of CEO – Chief Education Officer for Dr. Beasley’s. The timing was 100% coincidence. I was asked to remove the scratches out of the back glass window on the 1970 Superbird at the same time Jim was creating his new glass polish formulation with its patented abrasive technology.
The timing of all this is almost supernatural! And the best news is, the final and approved formula for the new glass polish saved the day, or more specifically, saved the glass! I’ll tell the story below, so if you’re ever in a position where you have a super cool car that’s 100% finished with exception to an original and super rare back window filled with deep scratches — well, here’s your prescription for restoring that glass back to factory new condition.
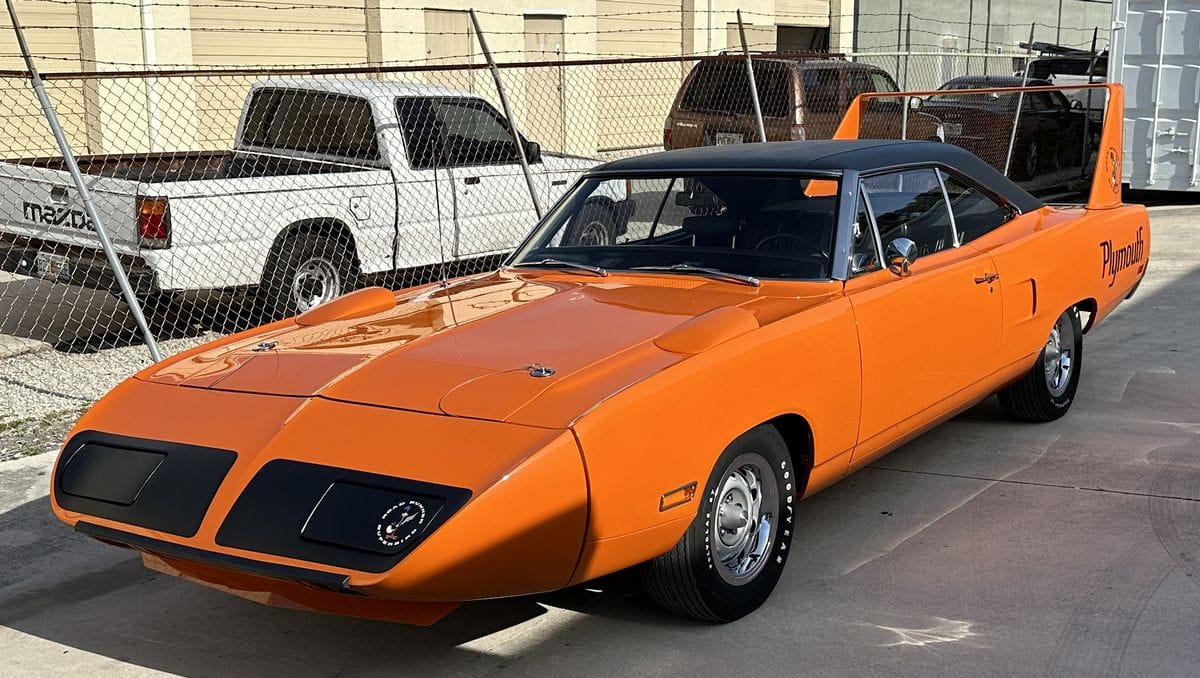
In the below picture, this is how the Superbird looked when I first arrived. The restoration was complete and except for the back glass window, the rest of the car looked amazing! The problem? The back glass window looked so horrible, it simply could not be installed onto the car. It ruined an otherwise flawless restoration.

If you look closely at the picture below, you can see the back window has been set into place, but the rubber window gasket is not installed and the chrome trim that surrounds the glass is also not installed.

See the scratches in the glass?

Now do you see them? These are like RIDS in paint (Random Isolated Deeper Scratches) only in the glass.


The backstory about this rare 1970 Plymouth Superbird: This is a 10-year rotisserie restoration project with everything restored to 100% factory original. Part of the process for restoring the car was removing all the glass to have access to all the sheetmetal. While the back window was out, over the years it was likely placed on multiple work tables, benches, or who knows where, and the results from this are a multitude of random, deeper scratches throughout the entire glass window.
Believe it or not, this is actually a common problem. About a year ago I was hired to do this same thing to a 1967 Ferrari. The back window on the Ferrari was removed for the restoration process and during the time it was out of the car it was probably laying on a work bench or table of some sort, resulting in similarly random deeper scratches throughout the glass.
Polishing the scratches out of the back window of a 1967 Ferrari after a full restoration.


After looking at the glass, I was asked, can you fix it? I said, “Yes!” So with the help of one of the shop technicians, we carefully removed the glass from it’s frame and placed it on a fender stand.

Over the years, I’ve learned the MOST important pictures for any detailing project, are the BEFORE pictures. Without great before pictures or videos, how can anyone know what you started with? The answer is, they can’t. So my normal practice for any project is to photo-document the heck out of it!

The depth of the scratches you see in the pictures below are so deep that your fingernail easily catches into the scratch when you drag it over the surface. While machine polishing will improve the overall appearance of the glass, it will not remove scratches that are this deep, at least not without days of machine polishing.


To capture some of the deeper scratches, I placed a clay detailing mitt under the glass. The polymerized rubber surface being black makes it easier to see the scratches in the glass over the top of it.


All the deeper scratches I photo-documented are simply too deep to remove effectively via only machine polishing. This means the only way to remove them will be to put the glass through a serious of machine dry sanding steps, followed by machine polishing to remove the final sanding marks.

Before joining the Dr. Beasley’s team, Jim had reached out to me to ask me if I could do some product testing? I love Jim, and I have a long-time background in testing car care products including glass polishes, so I said sure! Jim sent me his initial formula, which I tested on a 1969 GTO windshield, and it worked great with faster results than any other glass polish I had used to date. But the formula needed some tweaking. Below is the link to my write-up for this project in case you missed it.
Removing Windshield Swirls, Scratches & Wiper Marks on a ’69 GTO with Dr. Beasley’s NSP GL
Yours truly restoring a clear view to the glass windshield on a very rare and collectible 1969 GTO
These other ingredients not only hold the abrasive technology in suspension, but provide features like lubrication, low or zero dusting, open time, or how long a product can be buffed, (moved over the surface), before it becomes difficult to work with or wipe-off. The key thing is, both components are important because they affect the performance of the product and the user experience and Jim wants everyone to have a GREAT experience when using ANY Dr. Beasley product.
After providing Jim with feedback from the real-world testing on the glass windshield on the 1969 GTO Convertible, Jim re-formulated and sent me 3 new formulas to test out. The abrasive technology was spot-on, all that is left to do is dial-in the best formula for maximum performance and user experience.
If you look carefully, you can see where Jim wrote some letters and number on the sides of the NSP GL tubes, looks like gibberish to me, but I know it means something important about the formula to Jim. My job, put the product to the test. The last bottle on the right has the code, 560BMP and the MP stands for Mike Phillips and is a formula that Jim especially created for me based upon not just my feedback from testing the original formula, but with some included changes I knew from experience were needed to perfect the final product. In the end, the 560MP did in fact go into production.
Back when I was asked, can you fix it? My answer was yes with one requirement. Because there are NO other factory made replacements for this exact piece of glass, I told the car owner I was happy to take this project on BUT – if something goes wrong, I want to be released from any responsibility or liability from a whoops! By this I mean, I have the utmost confidence in my own knowledge base and skill sets to do this job right the first time, but if circumstances out of my control, like for any reason the glass cracks, I don’t want be the bad guy. Of course I’ll do everything in my power to avoid any mistakes, but this isn’t Simple Simon type stuff, this is a hardcore specialized procedure.
I fully understand there are NO other available replacement back windows on Earth for this car and the pressure on my shoulders to not only fix the glass but also have no mistakes is enormous but at the same time, I’m comfortable with the pressure because I follow the correct procedures and always use the highest quality products, tools and supplies. In other words, bring it on!
To do this safely, we needed to support the middle face of the glass and avoid creating pressure on the outer edges of the window. In the picture below is a soft, fluffy couch blanket my wife Stacy gave me for car detailing projects. Normally I’m using this blanket to lay onto the hood of a car to protect it from splatter from either glass polishing or paint correction. It also worked great folded up and placed under the window to support the major flat area of the glass as I sand and polish.

The old cliche Don’t try this at home! came about from people trying to duplicate stunts they saw on TV at home, resulting in injury and sometimes death. This cliche holds true for what you’re about to see. When it comes to sanding glass in an effort to level the glass surface and thus visually and physically remove the defects, sanding is the easy part. Anyone can sand glass, that’s putting scratches INTO the glass.
The tricky part is getting them out. And in the car detailing industry, when your name is Mike Phillips, you tend to be held not only your own standards, but everyone else’s standards and this means, 100% defect removal. I’m good with this.

Here’s how this works: In order to score the glass and break-through the smooth outer surface, you typically need a low grit sanding disc on a high speed rotary polisher. I’ve used #360 grit for the initial cut with good luck, but from experience, the scratches in the glass on the Superbird back window are so deep, starting with #180 grit will be needed to effectively remove enough glass to level the top most upper surface with the lowest depths of the scratches in the glass. This is called leveling the surface.
Great question, especially since most people know when sanding on car paint or boat gelcoat we’re using some form of orbital sander. Glass is hard, and an orbital polisher is simply not aggressive enough, nor powerful enough, especially for the initial cut.
Good question. The reason to machine dry sand versus machine wet sand is because when using a rotary polisher, the natural centrifugal force created by the high speed rotation of the sanding disc will cause any water to sling out. Besides any water you apply slinging out, the heat from the sanding action will evaporate any remaining water.
Just as important, water provides lubrication and while this works for some sanding procedures when using an orbital sander or orbital polisher, we need to circle back to glass is hard and thus a LOT more difficult to abrade compared to car paint and boat gelcoat. So for this type of work, machine sanding dry, using a high-speed rotary polisher, is the fastest and most effective way to level the glass surface to remove the below surface defects.
This is key! I learned this from another glass sanding expert and after putting their recommendation into practice, I was a believer in the pattern method they recommended. Here’s the technique and why to do it: When sanding with a rotary polisher, technically you’re not sanding — you’re grinding. When using a aggressive grit sanding disc like #180 grit, if you were to simply move the polisher in front-to-back, side-to-side pattern, you would risk leaving a pattern or ruts in the glass and this causes visual distortion.
Instead, as you’re moving the polisher from side-to-side and front-to-back, guide the polisher in such a way as to make the spinning sanding disc (at the same time it’s spinning), make an orbital motion. This spreads the sanding action outward to a greater area and because this will be a continual RANDOM sanding action, you eliminate the risk of taking too much glass off in back-and-forth lines thus maintaining a even or flat surface. Hard to explain with a keyboard, so stay tuned for a how-to video in the future.
In the same way you want to avoid high temperatures when machine polishing glass, you want to do the same when machine sanding glass. The general consensus is to stay under temperatures of 160 degrees Fahrenheit, which is around 70 degrees Celsius.
The sanding action will create fine particles of glass dust that become airborne and while this type of Amorphous Silica (Non-Crystalline Silica), is not dangerous to get into your eyes or lungs, it’s still important and basic common sense to avoid breathing in glass dust. For more information, see this very well written article on the topic.
Here’s yours truly making the initial and most important cut to this glass back window using #180 grit sanding disc on the FLEX PE 14-3 125 High Speed Rotary Polisher. This polisher has an RPM range of 1100 RPM to 3700 RPM, which makes it perfect for both machine sanding glass followed by machine polishing glass. The recommended RPM for machine sanding glass is in the 2400 to 2800 RPM range.

My comments…
When you first start sanding, it will look like NOTHING is happening. Have patience Grasshopper. Remember, glass is HARD, it’s not going to give itself up without a fight. As you move the spinning sanding disc over the glass, tiny scratches or scoring is taking place at the surface level that simply doesn’t stand out like a sore thumb to your eyes. Just keep sanding, moving the polisher slowing over the surface and at some point the abrasive particles on the sanding disc will start biting into the glass and once this starts to happen, sanding becomes VERY visible.
You will also find out that after you break through the outer skin of the glass and have a section that is now frosty in appearance, sanding from this sanded or frosty looking patch into clear unsanded glass is easier. You can actually feel the sanding disc grabbing onto the glass as it abrades away at the surface. In essence, once you breakthrough in any area, you then continually work outward from the area you’ve broken through to new territory.
Breaking through the top surface of the glass and then subsequently sanding the entire surface is the slowest part of this type of process. So have patience and stick with it.
After sanding for about 15 minutes, we stopped and inspected. IMPORTANT: Any deeper scratches or other below surface defects you want removed must be removed at this first sanding step. Glass is NOT forgiving like car paint and boat gelcoat. With cars and boats, if you don’t get the finish perfect with the first compounding step, you can kind of clean up the results with the next polishing step because car paint and gelcoat are a lot softer and more easily abraded than glass. So remove any unacceptable defects at this first sanding step whether you’re using #180 grit or #360 grit as your first cutting step.
In the picture below, you see the majority of the glass is now sanded and has a frosty, opaque appearance. It’s a good best practice to only sand where you feel comfortable machine polishing in the next step. A good rule-of-thumb is to stay about an inch or more away from edges. It’s easy to sand right up to the outer edge of the glass window, but buffing hard next to and ON the side edge of the glass window is more difficult to do and also more time-consuming to remove 100% of the sanding marks.
Another great question. This is the original, factory glass window for all numbers matching 426 Hemi engine, 4-speed Plymouth Superbird. The value is established and maintained by keeping the car 100% original. Where you see the yellow tape is the Mopar imprint either on or in the glass. At the time, the staff at the shop believed the Mopar insignia to be inside the glass. I for one could not feel the design of the letters for Mopar with my sense of touch. But as an extra step of precaution, the shop technician covered over the Mopar insignia and asked me to avoid sanding over it or near it. If the insignia is or was on the outer surface, and if I were to sand over it, it would only take seconds to sand it complete off and thus remove the only easy way to identify this as the factory glass window for this car back in 1970.

Below is a close-up of the section you see in the above picture, what the darker areas are – are sections of glass that are below the surface. What looks to be darker sections of glass is simply just clear, unsanded glass.

Here’s a closer look. The surrounding glass is opaque because it’s all been sanded. The darker section is below the overall surface of the glass and thus has not been abraded yet. The cure to the problem is to keep on sanding. You can also see some deeper scratches still remaining to the right of this darker patch of unsanded glass. Same thing holds true for removing these scratches and that is to continue sanding until your inspection reveals 100% of the defect is removed.


In the close-up shots I took, what you’re seeing are the deeper scratches in the glass after the initial first sanding step.


After sanding the glass completely flat with the first #180 grit disc, I felt this first disc was worn out and wasn’t sanding as faster as it did when it was new, so I switched to a second #180 grit disc and continued sanding until all but one tiny scratch remained – you’ll see it in the pictures below.
My comment
How far you sand really comes down to your comfort level with the process and end results. For some people, removing 90% of the scratches would be good enough for them and thus their comfort level. I like to aim for 100% defect removal for any type of project, but if I hit 90% to 95% and I haven’t made a mistake, I call this success.
Sometimes the difference between a professional and a hack is knowing when to stop. The road to hell, or in this context, the road to a cracked 1970 Superbird back window is paved with good intentions. Taking on specialty projects like this is your chance to be the hero or the zero – I much prefer to be the hero.
That said, when it comes to some other guys’ muscle car, I’m going to re-sand and thus refine my sanding marks multiple time in my effort to make the polishing process as easy as possible, as fast as possible and as safe as possible by keeping temperatures low. The deeper the sanding marks you must remove, the longer you must polish, therefore the more you risk overheating the glass. The more shallow the sanding marks, the less polishing required and thus the less heat generated.


Hmmm…. I wonder what’s for dinner tonight?

While sanding, if you lift the spinning disc off the glass surface for a few seconds, most of the glass polish residue will spin off the disc, but not all of it. For more thorough cleaning of the face of the disc, use a nylon detailing brush or even a toothbrush against the face of the sanding disc as you run the polisher and this will remove about 95% of the glass dust that builds-up on the face of the sanding disc.


Hmm…. I wonder what’s on TV tonight?


Hmm… did I leave the oven on?
(Apologies, my mind tends to wander when buffing or typing)


#4000 will be the last sanding or refining step. I didn’t have any #3000 discs or I would have used them after the #2000 sanding discs. Regardless, the #4000 did such a great job of refining the #2000 grit sanding marks the glass basically looked polished.
Hmm… did I leave my car keys in my car with the doors unlocked? Seriously, look at the glass? Look how it’s starting to look fairly clear?

Some experts might say there’s no need to do the last 2 sanding steps. They would recommend to start polishing after the #1000 grit sanding step and I agree they are correct. You or I could start the polishing process after sanding with a #1000 grit sanding disc but not this time. This isn’t some glass window you can get at the local Safelite glass company — this is a rare bird. I’m going to refine and then refine again – ANYTHING that gives me the best chance of working all the way through the process to success – not a broken chunk of glass I’ll have to show the owner of the car.
I beg to differ and can prove these higher grit sanding discs do in fact sand or abrade glass and this means they REFINE the previous sanding disc scratches to a more shallow and uniform scratch pattern that will be easier, faster and safer to polish-out.
Look at the face of the sanding disc. See the whitish color? That’s GLASS particles the #4000 grit sanding disc sanded off the glass thus refining #2000 grit sanding marks to more shallow #4000 grit sanding marks and my nylon detailing brush is going to prove it.

See the sanding disc cleaning up? #4000 grit sanding discs do sand glass when used in progression like I shared here. Of course, #4000 is never going to work as the first or initial cutting disc as glass is too hard.


Sanded with #180 grit
Sanded with #4000 grit – no polishing yet – HUGE difference!


I machine sanded the entire glass window using two #180 grit sanding discs and focused on this area without overdoing it, which could cause a visual imperfection. At some point I said to myself, “It is finished.” And below you can see, just as I said previously, if you don’t remove the defect during the first or initial cutting process, it’s very likely it will be there at the final process.

Pretty insignificant considering the overall look of the glass before we started and so far – no mistakes – no cracked glass.

Look closely… do you see any sanding marks in the glass? Not really. The more you refine, the faster, easier and safer it will be for the polishing step.


Now the fun begins. For the glass polishing process, follow all the directions I shared here,
Removing Windshield Swirls, Scratches & Wiper Marks on a ’69 GTO with Dr. Beasley’s NSP GL

Process
1: Mist one side of glass windshield with water – use the Buddy System (see below)
2: Apply Dr. Beasley’s NSP GL directly onto face of rayon pad.
3: Press rayon pad against glass before turning on polisher.
4: Turn polisher on to a slow speed and spread the polish over glass.
5: Bring speed up to around 2600 RPM on a rotary polisher and the highest speed setting for any orbital polisher.
6: Apply 5-10 pounds of downward pressure and begin polishing the glass using an overlapping passes.
7: Polish the windshield using a crosshatch pattern, always overlapping each pass by 50%
8: Have buddy mist a spray of water onto glass as needed to keep film of glass polish wet on surface.
9: As needed or after approximately 6-8 section passes over the section of glass being polished – add more product. And repeat the polishing process with your buddy misting water onto glass as needed to keep glass polish film wet on surface.


After removing all the sanding marks over the majority of the back glass window, there were still some sanding marks next to the edges that remained. This is why you want to stay about an inch from the outer perimeter – it’s EASY to sand right next to and edge – it’s more difficult to polish right next to the edge, at least with larger 5″ rayon glass polishing pads. For this type of work, I like to switch over to a 3″ rayon glass polishing pad, a 3″ backing plate and a 3″ interface pad.

For focused work to a small area, simply place a little dab of the Dr. Beasley’s NSP GL onto the area you want to polish, then place the face of the rayon pad onto the dab of polish, slowly bring the speed up on your rotary polisher and then massage this area being careful not to buff too long and create too much heat. What I will normally do is find all the remaining small areas of scratches, usually around the perimeter of the glass window, and then place a dab of polish in each area and the move from area to area, only buffing for about a minute or so. When doing this, because you’re moving around and not staying in one small focused area for too long, you naturally avoid higher temperatures when doing spot polishing.


Success is mine! (and Dr. Beasley’s)

If you need to jog your memory as to how this glass started out, scroll back to the top of this article and look at the before pictures.


We, Paul and I, did the glass polishing on a Friday, from start to finish it took around 5 hours of constant sanding and polishing – no breaks. When I left, there was still a huge air hole in the back of the Superbird, the glass installer Paul, won’t be able to get to his part, installing the back window until next week.


I had to come back to see the completed Superbird and inspect the final results after installation.


Taking on this type of project takes nerves of steel and confidence in both yourself and just as important the glass polish. I strongly NEVER recommend others to sand glass like I did for this project. That said, for most people and most glass polishing projects, you don’t need to sand, all you need to do is machine polish using the best, fastest and safest glass polish on the market, Dr. Beasley’s NSP GL Glass Polish.
After rigorously testing multiple abrasive types, Jim sourced a unique, ultra-hard nanoparticle abrasive with diverse applications. This patented technology is used by the Air Force to polish F-35 fighter jet canopies for crystal clear in-flight visibility. Through careful engineering, Jim adapted the technology for automotive glass. Testing the technologies side-by-side, he found the patented nanoparticle abrasive to be superior to cerium oxide in speed, efficiency and clarity. Formulated with a patented ultra-hard nanoparticle abrasives, it cuts faster and finishes smoother than traditional cerium oxide glass polishes.

Not only did I do the glass polishing for this old 2-door Plymouth, I also did the paint correction and ceramic coating. You can see what I used and how I did it by clicking the link below.
1970 Plymouth Superbird – Paint Correction with Dr. Beasley’s

After sharing some pictures of the glass sanding project online, the pictures received a lot of “Likes” including a Like from my old friend Sam Memmolo! Sam, along with Dave Bowman, are two guys that are credited with being the guys that STARTED the entire car guy TV shows. Sam and Dave started and starred in, Crank & Chrome, Shade Tree Mechanic, Two guys Garage, and Motorhead Garage, just to name a few and some of these shows continue on with new hosts, but it was Sam and Dave that started it all.
Here’s a screenshot from my phone.

Here’s yours truly on the set of Motorhead Garage with Dave Bowman, (on my left), and Sam Memmolo on my right)

Sam and Dave are the kind of guys that have forgotten more than I’ll ever know so to get a “Like” from Sam for my lowly glass polishing project is a real complement – thank you Sam!
Dr. Beasley’s NSP GL
Dr. Beasley’s Rayon Glass Polishing Pad – 5”
Dr. Beasley’s Rayon Glass Polishing Pad – 3”
Besides detailing cars professionally, teaching classes on both car and boat detailing and writing articles and making videos sharing tips and techniques on these topics, I also love answering questions and helping others to success for their projects in their shop or garage. If you have any car or boat detailing questions, as well as glass polishing questions, feel free to reach out and I’ll do my best to help.
Mike Phillips
760-515-0444
mike@drbeasleys.com
")
WARNING: Machine sanding, especially when dealing with glass, is an aggressive process and should only be undertaken by an experienced individual, whether enthusiast or professional. Proceed with caution if attempting.
In Part 1, 1970 Plymouth Superbird – Paint Correction with Dr. Beasley’s, I shared the process I used to do all the paint correction and final polishing to create a true show car finish on the Superbird’s intense Vitamin C paint color. The fact of the matter is, I actually did Part 2 (the glass polishing) first, followed by the paint correction. During this time, we were still testing different formulas for Dr. Beasley’s Nano Surface Primer GL, their new polish for glass. For this reason, I could not share the glass polishing aspect of this project until AFTER the Dr. Beasley’s NSP GL become public knowledge, which it is now — you can buy it right here!
Down below, you’ll see pictures of 3 different beta formulas I was testing for Jim Lafeber and this was actually before I was offered the position of CEO – Chief Education Officer for Dr. Beasley’s. The timing was 100% coincidence. I was asked to remove the scratches out of the back glass window on the 1970 Superbird at the same time Jim was creating his new glass polish formulation with its patented abrasive technology.
The timing of all this is almost supernatural! And the best news is, the final and approved formula for the new glass polish saved the day, or more specifically, saved the glass! I’ll tell the story below, so if you’re ever in a position where you have a super cool car that’s 100% finished with exception to an original and super rare back window filled with deep scratches — well, here’s your prescription for restoring that glass back to factory new condition.
Stuck in gear – cannot move forward!
In the below picture, this is how the Superbird looked when I first arrived. The restoration was complete and except for the back glass window, the rest of the car looked amazing! The problem? The back glass window looked so horrible, it simply could not be installed onto the car. It ruined an otherwise flawless restoration.
If you look closely at the picture below, you can see the back window has been set into place, but the rubber window gasket is not installed and the chrome trim that surrounds the glass is also not installed.
See the scratches in the glass?
Now do you see them? These are like RIDS in paint (Random Isolated Deeper Scratches) only in the glass.
10 year restoration project
The backstory about this rare 1970 Plymouth Superbird: This is a 10-year rotisserie restoration project with everything restored to 100% factory original. Part of the process for restoring the car was removing all the glass to have access to all the sheetmetal. While the back window was out, over the years it was likely placed on multiple work tables, benches, or who knows where, and the results from this are a multitude of random, deeper scratches throughout the entire glass window.
Believe it or not, this is actually a common problem. About a year ago I was hired to do this same thing to a 1967 Ferrari. The back window on the Ferrari was removed for the restoration process and during the time it was out of the car it was probably laying on a work bench or table of some sort, resulting in similarly random deeper scratches throughout the glass.
Polishing the scratches out of the back window of a 1967 Ferrari after a full restoration.
Can you fix it?
After looking at the glass, I was asked, can you fix it? I said, “Yes!” So with the help of one of the shop technicians, we carefully removed the glass from it’s frame and placed it on a fender stand.
The power in the after shots are created in the before shots!
Over the years, I’ve learned the MOST important pictures for any detailing project, are the BEFORE pictures. Without great before pictures or videos, how can anyone know what you started with? The answer is, they can’t. So my normal practice for any project is to photo-document the heck out of it!
Swirls and scratches everywhere!
The depth of the scratches you see in the pictures below are so deep that your fingernail easily catches into the scratch when you drag it over the surface. While machine polishing will improve the overall appearance of the glass, it will not remove scratches that are this deep, at least not without days of machine polishing.
Creative photography
To capture some of the deeper scratches, I placed a clay detailing mitt under the glass. The polymerized rubber surface being black makes it easier to see the scratches in the glass over the top of it.
Too deep to polish out – glass must be machine dry sanded!
All the deeper scratches I photo-documented are simply too deep to remove effectively via only machine polishing. This means the only way to remove them will be to put the glass through a serious of machine dry sanding steps, followed by machine polishing to remove the final sanding marks.
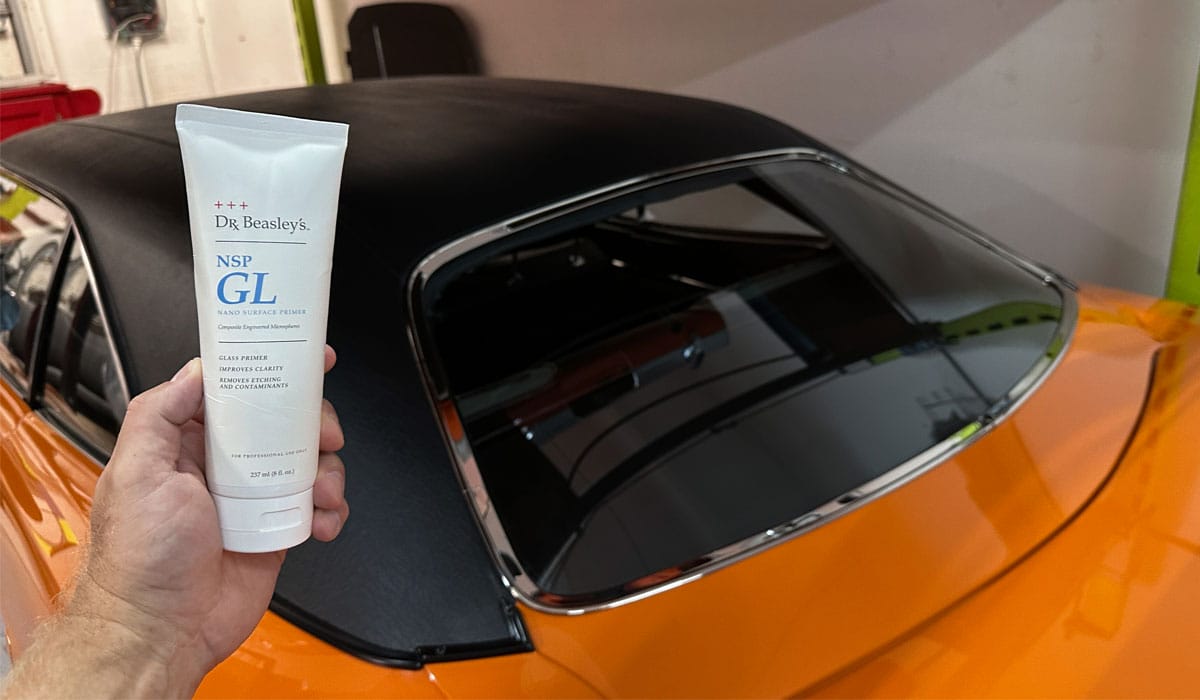
Dr. Beasley’s NSP GL Glass Polish
Before joining the Dr. Beasley’s team, Jim had reached out to me to ask me if I could do some product testing? I love Jim, and I have a long-time background in testing car care products including glass polishes, so I said sure! Jim sent me his initial formula, which I tested on a 1969 GTO windshield, and it worked great with faster results than any other glass polish I had used to date. But the formula needed some tweaking. Below is the link to my write-up for this project in case you missed it.
Removing Windshield Swirls, Scratches & Wiper Marks on a ’69 GTO with Dr. Beasley’s NSP GL
Yours truly restoring a clear view to the glass windshield on a very rare and collectible 1969 GTO
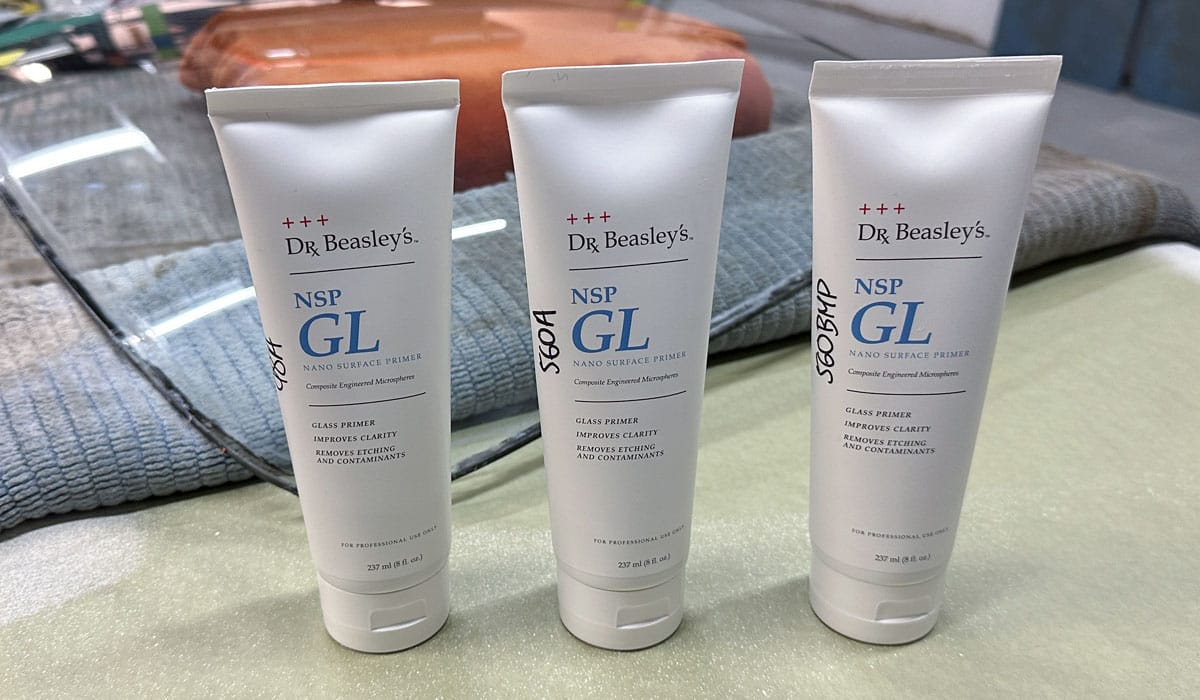
Chemistry 101
When talking about these types of products, there are 2 primary components, there’s the abrasive technology, then there’s the carrier. The abrasive technology is fairly self-explanatory, it’s the powders or the grains that actually cut at the surface and remove material to level defects. For those that are not familiar with geek-speak or chemistry lingo, the carrier is the liquid portion of a product that suspends and carries the abrasive technology onto the surface.These other ingredients not only hold the abrasive technology in suspension, but provide features like lubrication, low or zero dusting, open time, or how long a product can be buffed, (moved over the surface), before it becomes difficult to work with or wipe-off. The key thing is, both components are important because they affect the performance of the product and the user experience and Jim wants everyone to have a GREAT experience when using ANY Dr. Beasley product.
Testing, testing and more testing…
After providing Jim with feedback from the real-world testing on the glass windshield on the 1969 GTO Convertible, Jim re-formulated and sent me 3 new formulas to test out. The abrasive technology was spot-on, all that is left to do is dial-in the best formula for maximum performance and user experience.
If you look carefully, you can see where Jim wrote some letters and number on the sides of the NSP GL tubes, looks like gibberish to me, but I know it means something important about the formula to Jim. My job, put the product to the test. The last bottle on the right has the code, 560BMP and the MP stands for Mike Phillips and is a formula that Jim especially created for me based upon not just my feedback from testing the original formula, but with some included changes I knew from experience were needed to perfect the final product. In the end, the 560MP did in fact go into production.
Risky business
Back when I was asked, can you fix it? My answer was yes with one requirement. Because there are NO other factory made replacements for this exact piece of glass, I told the car owner I was happy to take this project on BUT – if something goes wrong, I want to be released from any responsibility or liability from a whoops! By this I mean, I have the utmost confidence in my own knowledge base and skill sets to do this job right the first time, but if circumstances out of my control, like for any reason the glass cracks, I don’t want be the bad guy. Of course I’ll do everything in my power to avoid any mistakes, but this isn’t Simple Simon type stuff, this is a hardcore specialized procedure.
I fully understand there are NO other available replacement back windows on Earth for this car and the pressure on my shoulders to not only fix the glass but also have no mistakes is enormous but at the same time, I’m comfortable with the pressure because I follow the correct procedures and always use the highest quality products, tools and supplies. In other words, bring it on!
Support the glass
To do this safely, we needed to support the middle face of the glass and avoid creating pressure on the outer edges of the window. In the picture below is a soft, fluffy couch blanket my wife Stacy gave me for car detailing projects. Normally I’m using this blanket to lay onto the hood of a car to protect it from splatter from either glass polishing or paint correction. It also worked great folded up and placed under the window to support the major flat area of the glass as I sand and polish.
180 Grit Sanding Discs – Don’t try this at home!
The old cliche Don’t try this at home! came about from people trying to duplicate stunts they saw on TV at home, resulting in injury and sometimes death. This cliche holds true for what you’re about to see. When it comes to sanding glass in an effort to level the glass surface and thus visually and physically remove the defects, sanding is the easy part. Anyone can sand glass, that’s putting scratches INTO the glass.
The tricky part is getting them out. And in the car detailing industry, when your name is Mike Phillips, you tend to be held not only your own standards, but everyone else’s standards and this means, 100% defect removal. I’m good with this.
Machine Dry Sanding Glass
Here’s how this works: In order to score the glass and break-through the smooth outer surface, you typically need a low grit sanding disc on a high speed rotary polisher. I’ve used #360 grit for the initial cut with good luck, but from experience, the scratches in the glass on the Superbird back window are so deep, starting with #180 grit will be needed to effectively remove enough glass to level the top most upper surface with the lowest depths of the scratches in the glass. This is called leveling the surface.
Why use a rotary polisher instead of an orbital polisher?
Great question, especially since most people know when sanding on car paint or boat gelcoat we’re using some form of orbital sander. Glass is hard, and an orbital polisher is simply not aggressive enough, nor powerful enough, especially for the initial cut.
Why dry sanding?
Good question. The reason to machine dry sand versus machine wet sand is because when using a rotary polisher, the natural centrifugal force created by the high speed rotation of the sanding disc will cause any water to sling out. Besides any water you apply slinging out, the heat from the sanding action will evaporate any remaining water.
Just as important, water provides lubrication and while this works for some sanding procedures when using an orbital sander or orbital polisher, we need to circle back to glass is hard and thus a LOT more difficult to abrade compared to car paint and boat gelcoat. So for this type of work, machine sanding dry, using a high-speed rotary polisher, is the fastest and most effective way to level the glass surface to remove the below surface defects.
Move the polisher in an orbital pattern while making an overlapping crosshatch pattern.
This is key! I learned this from another glass sanding expert and after putting their recommendation into practice, I was a believer in the pattern method they recommended. Here’s the technique and why to do it: When sanding with a rotary polisher, technically you’re not sanding — you’re grinding. When using a aggressive grit sanding disc like #180 grit, if you were to simply move the polisher in front-to-back, side-to-side pattern, you would risk leaving a pattern or ruts in the glass and this causes visual distortion.
Instead, as you’re moving the polisher from side-to-side and front-to-back, guide the polisher in such a way as to make the spinning sanding disc (at the same time it’s spinning), make an orbital motion. This spreads the sanding action outward to a greater area and because this will be a continual RANDOM sanding action, you eliminate the risk of taking too much glass off in back-and-forth lines thus maintaining a even or flat surface. Hard to explain with a keyboard, so stay tuned for a how-to video in the future.
Avoid high temperatures
In the same way you want to avoid high temperatures when machine polishing glass, you want to do the same when machine sanding glass. The general consensus is to stay under temperatures of 160 degrees Fahrenheit, which is around 70 degrees Celsius.
PPE or Personal Protection Equipment needed
The sanding action will create fine particles of glass dust that become airborne and while this type of Amorphous Silica (Non-Crystalline Silica), is not dangerous to get into your eyes or lungs, it’s still important and basic common sense to avoid breathing in glass dust. For more information, see this very well written article on the topic.
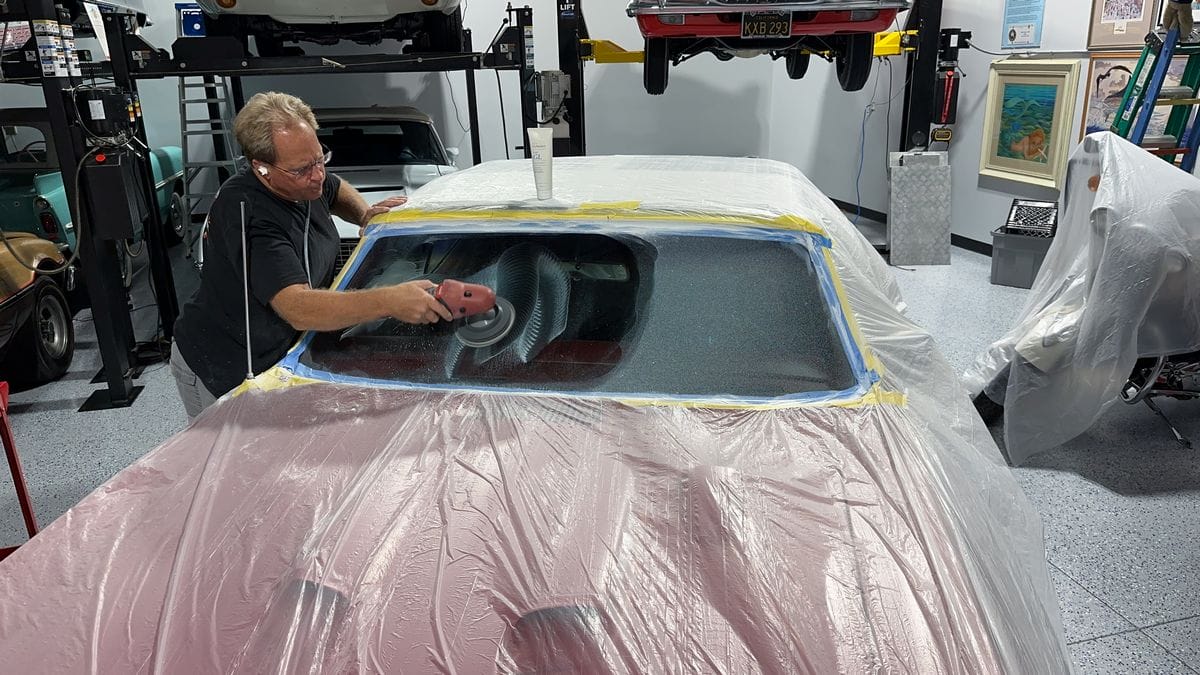
Here’s yours truly making the initial and most important cut to this glass back window using #180 grit sanding disc on the FLEX PE 14-3 125 High Speed Rotary Polisher. This polisher has an RPM range of 1100 RPM to 3700 RPM, which makes it perfect for both machine sanding glass followed by machine polishing glass. The recommended RPM for machine sanding glass is in the 2400 to 2800 RPM range.
My comments…
When you first start sanding, it will look like NOTHING is happening. Have patience Grasshopper. Remember, glass is HARD, it’s not going to give itself up without a fight. As you move the spinning sanding disc over the glass, tiny scratches or scoring is taking place at the surface level that simply doesn’t stand out like a sore thumb to your eyes. Just keep sanding, moving the polisher slowing over the surface and at some point the abrasive particles on the sanding disc will start biting into the glass and once this starts to happen, sanding becomes VERY visible.
You will also find out that after you break through the outer skin of the glass and have a section that is now frosty in appearance, sanding from this sanded or frosty looking patch into clear unsanded glass is easier. You can actually feel the sanding disc grabbing onto the glass as it abrades away at the surface. In essence, once you breakthrough in any area, you then continually work outward from the area you’ve broken through to new territory.
Breaking through the top surface of the glass and then subsequently sanding the entire surface is the slowest part of this type of process. So have patience and stick with it.
Stop and inspect
After sanding for about 15 minutes, we stopped and inspected. IMPORTANT: Any deeper scratches or other below surface defects you want removed must be removed at this first sanding step. Glass is NOT forgiving like car paint and boat gelcoat. With cars and boats, if you don’t get the finish perfect with the first compounding step, you can kind of clean up the results with the next polishing step because car paint and gelcoat are a lot softer and more easily abraded than glass. So remove any unacceptable defects at this first sanding step whether you’re using #180 grit or #360 grit as your first cutting step.
In the picture below, you see the majority of the glass is now sanded and has a frosty, opaque appearance. It’s a good best practice to only sand where you feel comfortable machine polishing in the next step. A good rule-of-thumb is to stay about an inch or more away from edges. It’s easy to sand right up to the outer edge of the glass window, but buffing hard next to and ON the side edge of the glass window is more difficult to do and also more time-consuming to remove 100% of the sanding marks.
What’s that yellow piece of tape?
Another great question. This is the original, factory glass window for all numbers matching 426 Hemi engine, 4-speed Plymouth Superbird. The value is established and maintained by keeping the car 100% original. Where you see the yellow tape is the Mopar imprint either on or in the glass. At the time, the staff at the shop believed the Mopar insignia to be inside the glass. I for one could not feel the design of the letters for Mopar with my sense of touch. But as an extra step of precaution, the shop technician covered over the Mopar insignia and asked me to avoid sanding over it or near it. If the insignia is or was on the outer surface, and if I were to sand over it, it would only take seconds to sand it complete off and thus remove the only easy way to identify this as the factory glass window for this car back in 1970.
See the strange area around the middle?
Uneven surface from the glass mold
Below is a close-up of the section you see in the above picture, what the darker areas are – are sections of glass that are below the surface. What looks to be darker sections of glass is simply just clear, unsanded glass.
Here’s a closer look. The surrounding glass is opaque because it’s all been sanded. The darker section is below the overall surface of the glass and thus has not been abraded yet. The cure to the problem is to keep on sanding. You can also see some deeper scratches still remaining to the right of this darker patch of unsanded glass. Same thing holds true for removing these scratches and that is to continue sanding until your inspection reveals 100% of the defect is removed.
Close-ups of deeper scratches
In the close-up shots I took, what you’re seeing are the deeper scratches in the glass after the initial first sanding step.
Sanded twice using two #180 grit sanding discs
After sanding the glass completely flat with the first #180 grit disc, I felt this first disc was worn out and wasn’t sanding as faster as it did when it was new, so I switched to a second #180 grit disc and continued sanding until all but one tiny scratch remained – you’ll see it in the pictures below.
My comment
How far you sand really comes down to your comfort level with the process and end results. For some people, removing 90% of the scratches would be good enough for them and thus their comfort level. I like to aim for 100% defect removal for any type of project, but if I hit 90% to 95% and I haven’t made a mistake, I call this success.
Sometimes the difference between a professional and a hack is knowing when to stop. The road to hell, or in this context, the road to a cracked 1970 Superbird back window is paved with good intentions. Taking on specialty projects like this is your chance to be the hero or the zero – I much prefer to be the hero.
Next step – machine dry sanding with #360 grit
When sanding anything with the intentions of following the sanding process with some type of polishing process to remove the sanding marks – sanding out to a very high grit is best as it makes the polishing process faster and easier. This is true for car paint and boat gelcoat, and even MORE true for glass. With a great polish, the right pad, tool and technique, an experienced person can stop sanding after #500 grit and believe it or not, remove their sanding marks. I’ve done it.That said, when it comes to some other guys’ muscle car, I’m going to re-sand and thus refine my sanding marks multiple time in my effort to make the polishing process as easy as possible, as fast as possible and as safe as possible by keeping temperatures low. The deeper the sanding marks you must remove, the longer you must polish, therefore the more you risk overheating the glass. The more shallow the sanding marks, the less polishing required and thus the less heat generated.
Hmmm…. I wonder what’s for dinner tonight?
Clean the face of the sanding disc often
While sanding, if you lift the spinning disc off the glass surface for a few seconds, most of the glass polish residue will spin off the disc, but not all of it. For more thorough cleaning of the face of the disc, use a nylon detailing brush or even a toothbrush against the face of the sanding disc as you run the polisher and this will remove about 95% of the glass dust that builds-up on the face of the sanding disc.
Next step – machine dry sanding with #500 grit
Hmm…. I wonder what’s on TV tonight?
Next step – machine dry sanding with #1000 grit
Next step – machine dry sanding with #2000 grit
Hmm… did I leave the oven on?
(Apologies, my mind tends to wander when buffing or typing)
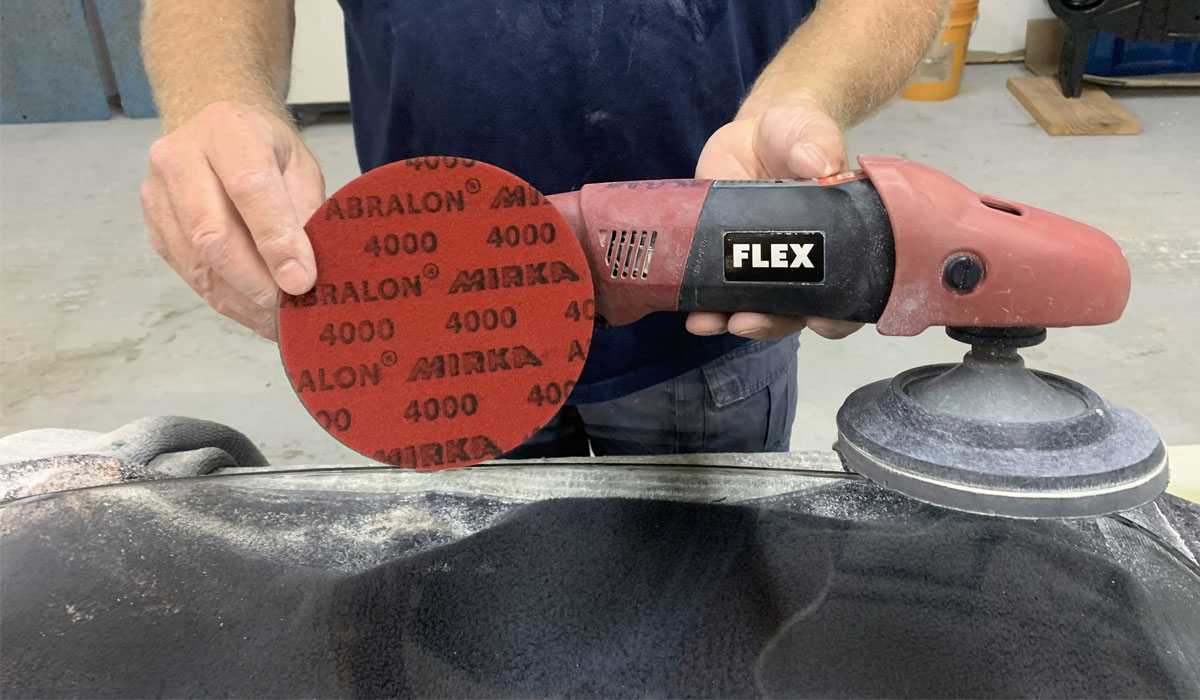
Next step – machine dry sanding with #4000 grit
#4000 will be the last sanding or refining step. I didn’t have any #3000 discs or I would have used them after the #2000 sanding discs. Regardless, the #4000 did such a great job of refining the #2000 grit sanding marks the glass basically looked polished.
Hmm… did I leave my car keys in my car with the doors unlocked? Seriously, look at the glass? Look how it’s starting to look fairly clear?
For the experts
Some experts might say there’s no need to do the last 2 sanding steps. They would recommend to start polishing after the #1000 grit sanding step and I agree they are correct. You or I could start the polishing process after sanding with a #1000 grit sanding disc but not this time. This isn’t some glass window you can get at the local Safelite glass company — this is a rare bird. I’m going to refine and then refine again – ANYTHING that gives me the best chance of working all the way through the process to success – not a broken chunk of glass I’ll have to show the owner of the car.
Some might say #3000 and #4000 don’t really sand glass.
I beg to differ and can prove these higher grit sanding discs do in fact sand or abrade glass and this means they REFINE the previous sanding disc scratches to a more shallow and uniform scratch pattern that will be easier, faster and safer to polish-out.
Look at the face of the sanding disc. See the whitish color? That’s GLASS particles the #4000 grit sanding disc sanded off the glass thus refining #2000 grit sanding marks to more shallow #4000 grit sanding marks and my nylon detailing brush is going to prove it.
See the sanding disc cleaning up? #4000 grit sanding discs do sand glass when used in progression like I shared here. Of course, #4000 is never going to work as the first or initial cutting disc as glass is too hard.
Look at the before and after difference?
Sanded with #180 grit
Sanded with #4000 grit – no polishing yet – HUGE difference!
One tiny scratch remains…
I machine sanded the entire glass window using two #180 grit sanding discs and focused on this area without overdoing it, which could cause a visual imperfection. At some point I said to myself, “It is finished.” And below you can see, just as I said previously, if you don’t remove the defect during the first or initial cutting process, it’s very likely it will be there at the final process.
Pretty insignificant considering the overall look of the glass before we started and so far – no mistakes – no cracked glass.
Almost looks clear again?
Look closely… do you see any sanding marks in the glass? Not really. The more you refine, the faster, easier and safer it will be for the polishing step.
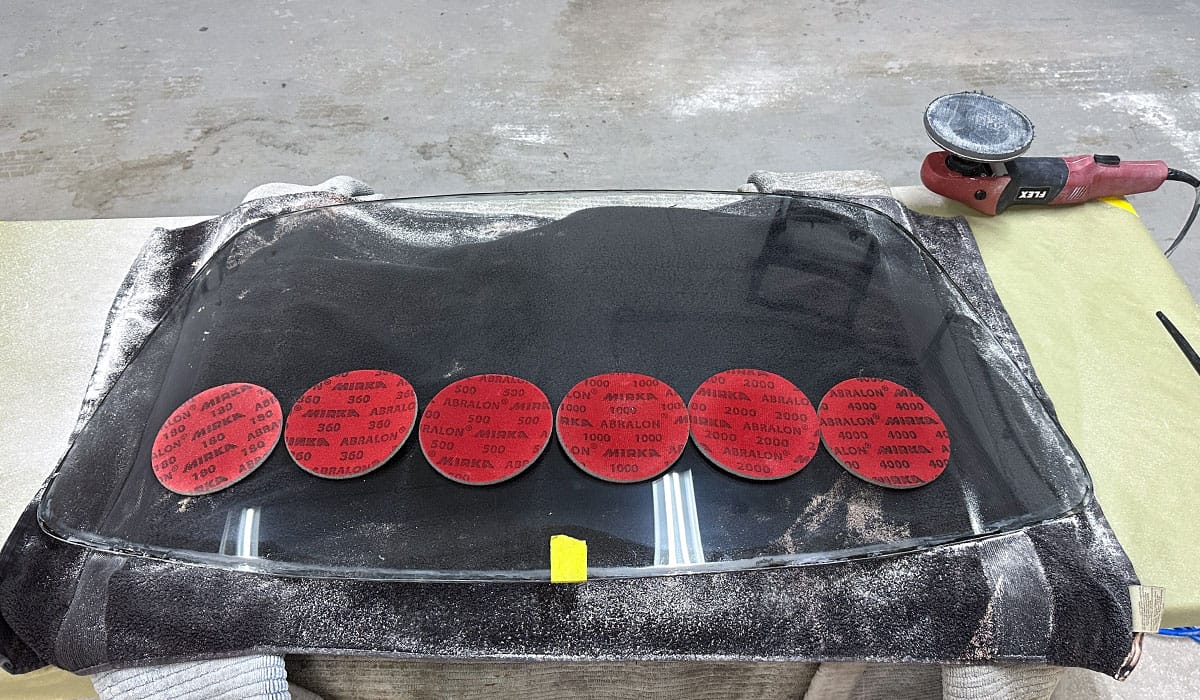
I used a total of 7 sanding discs – one of the #180 grit discs not shown.
Ready for Dr. Beasley’s NSP GL!
Now the fun begins. For the glass polishing process, follow all the directions I shared here,
Removing Windshield Swirls, Scratches & Wiper Marks on a ’69 GTO with Dr. Beasley’s NSP GL
Process
1: Mist one side of glass windshield with water – use the Buddy System (see below)
2: Apply Dr. Beasley’s NSP GL directly onto face of rayon pad.
3: Press rayon pad against glass before turning on polisher.
4: Turn polisher on to a slow speed and spread the polish over glass.
5: Bring speed up to around 2600 RPM on a rotary polisher and the highest speed setting for any orbital polisher.
6: Apply 5-10 pounds of downward pressure and begin polishing the glass using an overlapping passes.
7: Polish the windshield using a crosshatch pattern, always overlapping each pass by 50%
8: Have buddy mist a spray of water onto glass as needed to keep film of glass polish wet on surface.
9: As needed or after approximately 6-8 section passes over the section of glass being polished – add more product. And repeat the polishing process with your buddy misting water onto glass as needed to keep glass polish film wet on surface.
Misting water
All polishers, and especially rotary polishers, are going to create heat to the glass being polished. This acts to dry up the polish prematurely. It’s the nature of the process. With Dr. Beasley’s patented nanoparticle abrasive, the abrasives are still viable, but in order to leverage them and to also keep glass surface temperatures lowered, misting some water onto the surface as you are polishing will re-activate the polish as well as lubricate the glass surface, which creates SLIP, and this helps to keep temperature lower.3″ Rayon Glass Polishing pads for corners and/or isolated defects.
After removing all the sanding marks over the majority of the back glass window, there were still some sanding marks next to the edges that remained. This is why you want to stay about an inch from the outer perimeter – it’s EASY to sand right next to and edge – it’s more difficult to polish right next to the edge, at least with larger 5″ rayon glass polishing pads. For this type of work, I like to switch over to a 3″ rayon glass polishing pad, a 3″ backing plate and a 3″ interface pad.
A dab will do you…
For focused work to a small area, simply place a little dab of the Dr. Beasley’s NSP GL onto the area you want to polish, then place the face of the rayon pad onto the dab of polish, slowly bring the speed up on your rotary polisher and then massage this area being careful not to buff too long and create too much heat. What I will normally do is find all the remaining small areas of scratches, usually around the perimeter of the glass window, and then place a dab of polish in each area and the move from area to area, only buffing for about a minute or so. When doing this, because you’re moving around and not staying in one small focused area for too long, you naturally avoid higher temperatures when doing spot polishing.
Done!
Success is mine! (and Dr. Beasley’s)
If you need to jog your memory as to how this glass started out, scroll back to the top of this article and look at the before pictures.
Glass installer Paul comes next week…
We, Paul and I, did the glass polishing on a Friday, from start to finish it took around 5 hours of constant sanding and polishing – no breaks. When I left, there was still a huge air hole in the back of the Superbird, the glass installer Paul, won’t be able to get to his part, installing the back window until next week.
Glass install – final results!
I had to come back to see the completed Superbird and inspect the final results after installation.
Looks GREAT!
Not for the meek…
Taking on this type of project takes nerves of steel and confidence in both yourself and just as important the glass polish. I strongly NEVER recommend others to sand glass like I did for this project. That said, for most people and most glass polishing projects, you don’t need to sand, all you need to do is machine polish using the best, fastest and safest glass polish on the market, Dr. Beasley’s NSP GL Glass Polish.
Patented Nanoparticle Abrasives for a Faster, More Efficient Cut
After rigorously testing multiple abrasive types, Jim sourced a unique, ultra-hard nanoparticle abrasive with diverse applications. This patented technology is used by the Air Force to polish F-35 fighter jet canopies for crystal clear in-flight visibility. Through careful engineering, Jim adapted the technology for automotive glass. Testing the technologies side-by-side, he found the patented nanoparticle abrasive to be superior to cerium oxide in speed, efficiency and clarity. Formulated with a patented ultra-hard nanoparticle abrasives, it cuts faster and finishes smoother than traditional cerium oxide glass polishes.
What a beautiful old 2-door Plymouth!
Not only did I do the glass polishing for this old 2-door Plymouth, I also did the paint correction and ceramic coating. You can see what I used and how I did it by clicking the link below.
1970 Plymouth Superbird – Paint Correction with Dr. Beasley’s
Interesting side note – Sam Memmolo “Likes”!
After sharing some pictures of the glass sanding project online, the pictures received a lot of “Likes” including a Like from my old friend Sam Memmolo! Sam, along with Dave Bowman, are two guys that are credited with being the guys that STARTED the entire car guy TV shows. Sam and Dave started and starred in, Crank & Chrome, Shade Tree Mechanic, Two guys Garage, and Motorhead Garage, just to name a few and some of these shows continue on with new hosts, but it was Sam and Dave that started it all.
Here’s a screenshot from my phone.
Here’s yours truly on the set of Motorhead Garage with Dave Bowman, (on my left), and Sam Memmolo on my right)
Sam and Dave are the kind of guys that have forgotten more than I’ll ever know so to get a “Like” from Sam for my lowly glass polishing project is a real complement – thank you Sam!
Products used
Dr. Beasley’s NSP GL
Dr. Beasley’s Rayon Glass Polishing Pad – 5”
Dr. Beasley’s Rayon Glass Polishing Pad – 3”
What are you working on?
Besides detailing cars professionally, teaching classes on both car and boat detailing and writing articles and making videos sharing tips and techniques on these topics, I also love answering questions and helping others to success for their projects in their shop or garage. If you have any car or boat detailing questions, as well as glass polishing questions, feel free to reach out and I’ll do my best to help.
Mike Phillips
760-515-0444
mike@drbeasleys.com
Last edited: