- Admin
- #1
- Joined
- May 21, 2021
- Messages
- 1,467
- Reaction score
- 799
- Points
- 113
- Location
- Stuart, Florida
- Website
- themikephillipsforum.com
1970 Plymouth Superbird Paint Correction with Dr. Beasley’s by Mike Phillips
When it comes to buffing out cool cars, so cool that you might only get to work on one of these cars in your lifetime, I call these Bucket List Cars. This is such an instance. This is a 1970 Plymouth Superbird but not just any Superbird, this is one of 58 built that came from the factory with the 426 Hemi Engine mated to a 4-Speed Transmission. It’s the Hemi-factor, plus being a manual shifter car that makes this iconic muscle car, an example of pure Detroit Iron at the height of the muscle car wars between, Ford, Chevy and Mopar.
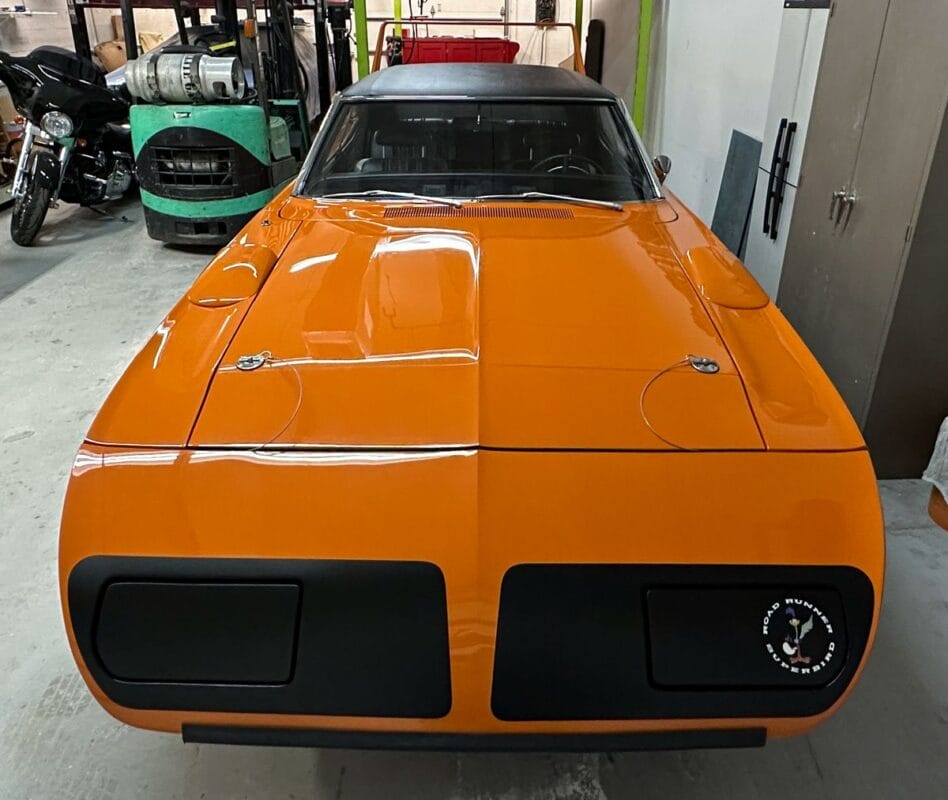
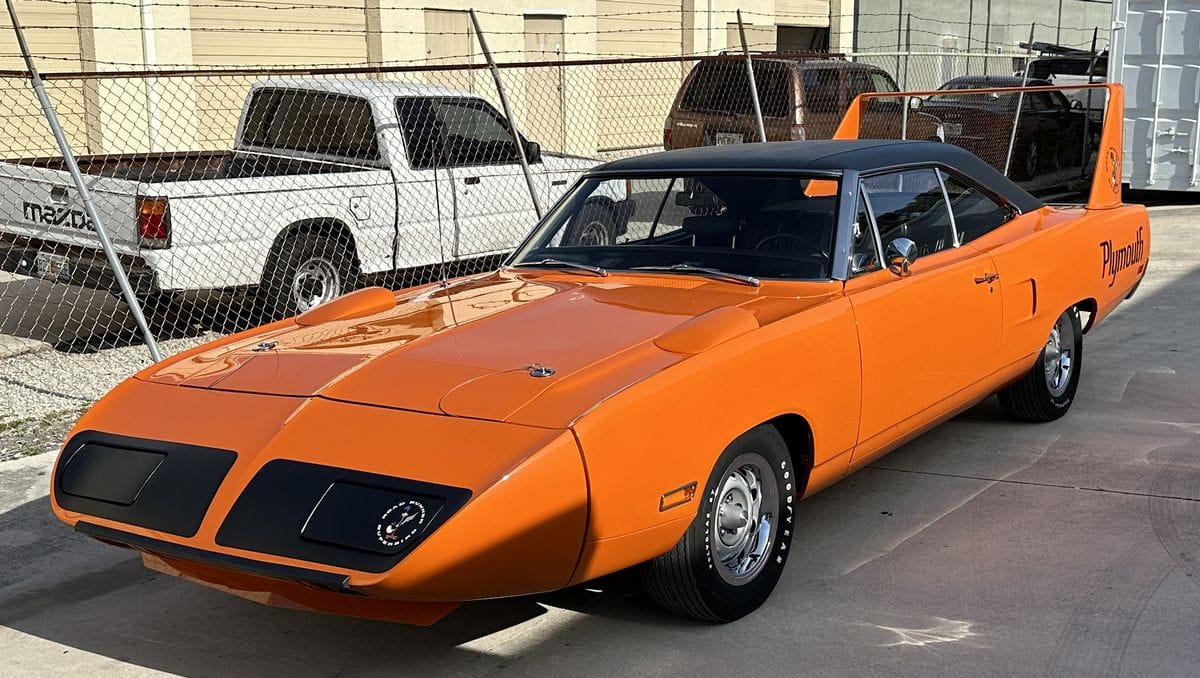
1970 Plymouth Superbird in Vitamin C Orange – 1 of 58 built with the optional 426 Hemi Engine and 4-Speed Transmission.

I’ve never personally detailed a real Superbird by myself. I have had 2 Superbirds as training cars in past detailing classes, once while I was at Meguiar’s in Irvine, California and a second time at Autogeek in Stuart, Florida. So while “yes” I did the Test Spot and then guided my students through the project, I didn’t personally buff out the entire car as in – by myself. So to me, these cars don’t count as true bucket list cars for me personally. Not so with this one, I did the entire project from start to finish by myself and while it was a lot of work, it was also incredibly rewarding – thus a Bucket List Car.
Note the chrome window trim is not attached? That’s because at the time I took this photo – this back window was a dilemma. No one, including the owner wanted to seal the glass in and attach the trim because the ENTIRE car looks so perfect except the back glass window.


The problem? There simply are ZERO available factory back windows anywhere on planet Earth. This scratched-up back window is as rare as Hen’s Teeth.

See all the random deep scratches IN the glass?

See all the whitish looking lines? These are random, deeper scratches and the only way to remove them is to machine sand the glass.

Here’s the Superbird looking great under normal garage lighting – this won’t be the case down this article a ways.

And keep in mind, I didn’t have a chemist like Jim Lafeber around to educate me on the types of harsh chemicals in glass cleaners, that while working for what I wanted to do, (a prep wash without running water), they were overkill and actually harmful to the paint surface I was prepping to make look beautiful. This is called, working backwards.
After watching me use a glass cleaner as a prep wash, instead of telling me I was wrong, Jim went back to his laboratory and solved the problem. The problem in my opinion is most, if not all waterless washes are to formulated with the focus on light cleaning, safe cleaning, which makes them perfect for a maintenance wash but not a prep wash. Jim created a formula that was focused on super cleaning without the need for running water.

Prep Wash

After getting the car clean, which was primarily removing a light layer of dust plus wiping all the fender lips and lowest body panels on the car, next it was time for The Baggie Test. Believe it or not, even here and now in the year 2023 I continually meet people that do not know what The Baggie Test is nor how or why to do one?
If you don’t know what the baggie test is or how and why we do done, here’s the explanation. The baggie test is where after first removing any loose dirt or dust off the paint of a vehicle, you place your hand in a clean sandwich baggie and lightly feel the various body panels of the car you’re planning to detail. The THIN film of plastic increases your sensitivity so that you can feel contamination on the paint that you cannot feel (in most cases), with just your skin and sense of touch.
The baggie test reveals whether or not the paint is contaminated, or clean and smooth and ready for the next step. The idea being, after you remove any loose dirt via washing and drying your car, or in this example, after I did a waterless prep wash, if the paint is uncontaminated it will feel smooth like brand new glass to the touch. If there’s any type of contamination bonded to the paint, contamination like overspray paint, industrial fallout, airborne pollution or even stubborn tree sap mist, the paint will have a bumpy feel to it. These tiny bumps you feel through the plastic sandwich baggie tells you two things:
If you discover via the baggie test the paint on your car or any car you plan to detail is in fact contaminated, then you will need to perform some type of mechanical decontamination to remove the contamination. Many of you might be wondering, “Won’t machine buffing remove the contaminants?”
Great question. When buffing with a wool pad and an aggressive compound the answer is yes/sometimes. When buffing with any type of foam buffing pads the answer is no, not usually and this is because foam pads tend to glide over the contamination, not remove it. So the most effective way to remove any above surface bonded contaminants is to use a mechanical method such as detailing clay or clay substitutes. For this car I used a clay mitt, which is a clay substitute.
For doing the baggie test – I recommend searching for simple, fold-top sandwich baggies – there’s no need for a zip locking option.


Yep… even the top of the iconic wing is contaminated.

When doing the baggie test, if the paint is contaminated it’s highly likely all the glass is contaminated too.


Using a clay mitt to mechanically decontaminate the paint and glass on this old bird.

Using a clean microfiber towel to remove the Prep Wash (clay lube in this example)

You clay glass the same way you clay paint – use plenty of clay lube then rub the clay mitt over the glass.


This is called a frame-up shot – I took a picture of the swirls in the paint next to the hood latch to provide geographical context.

This is the same shot as above only I’ve cropped out the fluff to focus directly on the swirl scratches while leaving just a portion of the hood latch in the picture so you can trust this is the same area of paint.


While some areas were better than other areas as far as the level of swirls go – for a car like this, no amount of swirls are acceptable – at least from my point of view, this is a 426 Hemi car after all.
Same area as the above picture, I left the top portion of the black matte paint for context.


If you look just below the passenger side wiper arm – you can see a dull section from light hand sanding using #2500 grit sanding paper to remove paint defect.
Here you can see I’ve placed some NSP 150 directly onto the sanded area.


The goal when doing this type of work on this type of car is to remove the sanding marks 100% and then when you turn you polisher over – you don’t want to see the orange color of the basecoat on the buffing pad.
Here’s yours truly surgically removing sanding marks.

People ask me, do you ever get nervous working on such rare cars? The answer is… hell yes!
Dr. Beasley's NSP 150
NSP 150
If the results from your first test spot don’t work, then you can do a second test spot to a different section of paint only this time, switch things up a bit. For the next test spot you can test a more aggressive product, or pad or tool and in some cases, maybe change all three options.
The benefit to using the Z1 is that it’s a one-and-done type product. That is, after wipe-off, if you like, you’re done. The Z1 will leave behind a layer of ceramic protection, which acts to seal the surface of the paint and protect it as well as creating a high gloss, slick, hydrophobic finish.
Dr. Beasley's NSP Z1

NSP Z1
I found using the Dr. Beasley’s micro-wool buffing pad on the 8mm gear-driven FLEX BEAST orbital polisher easily removed the deepest of swirls in the paint and left in my eyes what appeared to be a flawless show car finish. But, just to ensure there was no hidden micro-marring from the fibers that make up a micro-wool buffing pad, I re-polished each body panel with the same product, the Z1 but with a foam polishing pad. The results were perfection, even after stripping a section of paint and inspecting with the swirl finder light. Once I dialed in the process, it was just a matter of buffing out the entire car, panel-by-panel.
Dr. Beasley’s Microwool Heavy Cutting Pad
Dr. Beasley’s HDO Orange Polishing Pad
No pictures of me doing the work but please take my word for it, this car didn’t buff out itself.

This may be the largest car hood I’ve ever buffed out!


To say you’ve buffed out the wing on a 1970 Superbird is something only a few detailers can say in this day and age.


Machine perfecting the paint using Dr. Beasley’s NSP Z1, which seals the paint at the same time with a ceramic coating!
Me in my happy place! (I know, corny but true)


See my hand positions? When doing surgical buffing, sometimes it’s better to hold the tool by the body to get your arm and hand out of the way of you line of sight so you can see exactly where the pad is touching.


Carefully buffing around the vinyl letters and not buffing over them. In a perfect world I would have buffed out the paint where the graphics go before the graphics were installed. Next time.

Dr. Beasley’s Bead Hero

Bead Hero
Here’s a few pictures of the final results inside the shop where I did the work.


In case you didn’t notice – these are HUGE cars!

That’s overhead sunlight beaming down on the driver’s side of the hood and there are ZERO swirls.

You can see the car hauler in the background of the below picture. I had to move fast as this is a busy shop and it’s GO TIME!
Getting the sun shots on the deck lid was tricky with the wing in the way, but I call this, a great problem to have.


One more picture because this car is so freaking cool and a real piece of American car culture history.
Below are some pictures of the 426 Hemi Engine as well as some close-ups of the tops of the valve covers where you can see the spark plug wires disappear into the inside of the valve covers on their way to the hemispherical head.
Don’t forget to also notice just how perfectly clean and detailed the engine compartment looks.

BOOM! That be them! The tell-tell sign of a true hemi engine are the location of the spark plug wires.


See it?
Now do you see it? Both iconic and cool.


Besides detailing cars professionally, teaching classes on both car and boat detailing and writing articles and making videos sharing tips and techniques on these topics, I also love answering questions and helping others to success for their projects in their shop or garage. If you have any car or boat detailing questions, as well as glass polishing questions, feel free to reach out and I’ll do my best to help.
Mike Phillips
760-515-0444
Mike@drbeasleys.com
")
When it comes to buffing out cool cars, so cool that you might only get to work on one of these cars in your lifetime, I call these Bucket List Cars. This is such an instance. This is a 1970 Plymouth Superbird but not just any Superbird, this is one of 58 built that came from the factory with the 426 Hemi Engine mated to a 4-Speed Transmission. It’s the Hemi-factor, plus being a manual shifter car that makes this iconic muscle car, an example of pure Detroit Iron at the height of the muscle car wars between, Ford, Chevy and Mopar.
1970 Plymouth Superbird in Vitamin C Orange – 1 of 58 built with the optional 426 Hemi Engine and 4-Speed Transmission.
I’ve never personally detailed a real Superbird by myself. I have had 2 Superbirds as training cars in past detailing classes, once while I was at Meguiar’s in Irvine, California and a second time at Autogeek in Stuart, Florida. So while “yes” I did the Test Spot and then guided my students through the project, I didn’t personally buff out the entire car as in – by myself. So to me, these cars don’t count as true bucket list cars for me personally. Not so with this one, I did the entire project from start to finish by myself and while it was a lot of work, it was also incredibly rewarding – thus a Bucket List Car.
Glass Polishing
This project actually started out much differently than just another paint correction job. Before doing the paint correction, I was asked if I could polish-out the glass back window. The nutshell version of the glass polishing project was I was able to remove the scratches while preserving the original, factory back glass window – more about this project in Part 2 of this story. To whet your appetite, check out the scratches in the back window. Stay tuned to see a new product from Dr. Beasley’s for solving this type of problem.Note the chrome window trim is not attached? That’s because at the time I took this photo – this back window was a dilemma. No one, including the owner wanted to seal the glass in and attach the trim because the ENTIRE car looks so perfect except the back glass window.
The problem? There simply are ZERO available factory back windows anywhere on planet Earth. This scratched-up back window is as rare as Hen’s Teeth.
See all the random deep scratches IN the glass?
See all the whitish looking lines? These are random, deeper scratches and the only way to remove them is to machine sand the glass.
Before condition
Here’s the car before I started, the paint looks good under the garage lighting, but any seasoned detailer knows that in order to truly evaluate the paint you need a source of strong light, like bright overhead sunlight or a quality swirl finder light.Here’s the Superbird looking great under normal garage lighting – this won’t be the case down this article a ways.
Process
The process I used was simple, which is how I like to detail cars. I know a lot of detailers like to brag about how many steps they performed to detail a car. Me? I like to brag about how few steps I performed while still maintaining pro-quality results. Here’s the process from start to finish,- Waterless wash – Prep Wash
- Mechanical decontamination – Prep Wash & Clay Mitt
- Compounding with NSP 150 – Wool Pad – FLEX Cordless Rotary Polisher
- Polishing and sealing with NSP Z1 – Micro Wool and Foam Polishing pad – FLEX BEAST
- Final step – ceramic coating with Bead Hero
Waterless Wash
For the waterless wash I used the Dr. Beasley’s Prep Wash. Interestingly enough, this is a product Jim Lafeber formulated and then introduced to the market after watching me use a glass cleaner as a waterless prep wash in one of my big 3-day detailing classes. Jim watched me explain to the students in that class that there’s two types of car washing. There’s a Prep Wash and a Maintenance Wash. The Prep Wash as the name implies is for washing a dirty car to get it ready for detailing. A Maintenance Wash is for washing a dirty car AFTER it’s already been detailed and accordingly, needs to be washed carefully so as not to re-introduce any wash related marring or god forbid, wash induced scratching.Why use a glass cleaner to wash a car?
Great question. The obvious answer is because at that time, the Dr. Beasley’s Prep Wash didn’t exist, or I would have used it. The reason back then I was using and showing others why to use a glass cleaner was because a quality glass cleaner contains strong solvents that work better for breaking up and removing oily road film than your normal waterless wash, which is okay for doing a maintenance wash but when I’m getting a car ready for detailing I need it CLEAN! Not mostly clean. So back in those days, I found a good quality glass cleaner did a better job of getting a car clean, if I wasn’t going to use a traditional wash method using a garden water hose, bucket and wash mitt, which because of the type of a lot of cars I detail, I do not use the traditional approach for washing a car.And keep in mind, I didn’t have a chemist like Jim Lafeber around to educate me on the types of harsh chemicals in glass cleaners, that while working for what I wanted to do, (a prep wash without running water), they were overkill and actually harmful to the paint surface I was prepping to make look beautiful. This is called, working backwards.
After watching me use a glass cleaner as a prep wash, instead of telling me I was wrong, Jim went back to his laboratory and solved the problem. The problem in my opinion is most, if not all waterless washes are to formulated with the focus on light cleaning, safe cleaning, which makes them perfect for a maintenance wash but not a prep wash. Jim created a formula that was focused on super cleaning without the need for running water.
Dr. Beasley’s Prep Wash
Prep Wash
Here’s the story behind Prep Wash
From the Dr. Beasley’s product page:
“Prep Wash was inspired by detailing legend Mike Phillips and his need for a defect-revealing cleanser to use on restored or vintage cars. Something waterless so as to avoid getting water in those hard-to-dry crevices. And unlike most waterless washes available (a certain three letter acronym comes to mind) it had to be totally free of organic ingredients since they stop coatings from permanently bonding.
Dr. Beasley’s founder and formulator Jim Lafeber took Mike’s need as a challenge and got to work! With real-world testing at Dr. Beasley’s detailing studio “Simon’s”, he perfected his inorganic formulation, tweaking factors that allow for easier wipe-off and greater clarity to expose defects.This final formulation is engineered to remove the layer(s) of contaminants that prevent detailers from seeing the full range of defects affecting the finish.
True to Mike’s request, however, this is a completely inorganic product with no carnauba or silicone whatsoever. Jim recommends using it in place of a regular wash before starting the paintwork correction process so detailers can get the clearest view of the defects being addressed. And while other waterless washes with organic ingredients won’t necessarily make the coating fail instantly, organic contamination is a chance you don’t want to take when protecting an investment like a valuable vehicle.”
SIV or Special Interest Vehicles
Most of the cars I detail professional fall under the category of SIV or Special Interest Vehicles. While some SIVs are in fact new or modern cars, most are classics, muscle cars or streetrods, meaning they are older. This also means that somewhere along their timeline, someone has restored the car including removing rusted floor pans, body panels, sections of frames, etc. and replaced these components with new steel. As a professional courtesy to the current owners of these types of SIVs, I don’t wash with running water because running water introduces water to areas you cannot see or reach, where it could create a future rust problem for the next owner. Thus for most SIVs – I use a spray-on, waterless wash.The Baggie Test
When doing the baggie test, use a soft touch – pressing or rubbing the baggie hard over the paint can actually induce marring that you’ll have to remove later via machine polishing.
After getting the car clean, which was primarily removing a light layer of dust plus wiping all the fender lips and lowest body panels on the car, next it was time for The Baggie Test. Believe it or not, even here and now in the year 2023 I continually meet people that do not know what The Baggie Test is nor how or why to do one?
If you don’t know what the baggie test is or how and why we do done, here’s the explanation. The baggie test is where after first removing any loose dirt or dust off the paint of a vehicle, you place your hand in a clean sandwich baggie and lightly feel the various body panels of the car you’re planning to detail. The THIN film of plastic increases your sensitivity so that you can feel contamination on the paint that you cannot feel (in most cases), with just your skin and sense of touch.
The baggie test reveals whether or not the paint is contaminated, or clean and smooth and ready for the next step. The idea being, after you remove any loose dirt via washing and drying your car, or in this example, after I did a waterless prep wash, if the paint is uncontaminated it will feel smooth like brand new glass to the touch. If there’s any type of contamination bonded to the paint, contamination like overspray paint, industrial fallout, airborne pollution or even stubborn tree sap mist, the paint will have a bumpy feel to it. These tiny bumps you feel through the plastic sandwich baggie tells you two things:
- The paint is in fact contaminated with something
- Whatever the contamination, the bond to the paint is so strong that washing or using a waterless prep wash did not remove it.
If you discover via the baggie test the paint on your car or any car you plan to detail is in fact contaminated, then you will need to perform some type of mechanical decontamination to remove the contamination. Many of you might be wondering, “Won’t machine buffing remove the contaminants?”
Great question. When buffing with a wool pad and an aggressive compound the answer is yes/sometimes. When buffing with any type of foam buffing pads the answer is no, not usually and this is because foam pads tend to glide over the contamination, not remove it. So the most effective way to remove any above surface bonded contaminants is to use a mechanical method such as detailing clay or clay substitutes. For this car I used a clay mitt, which is a clay substitute.
Why does a freshly restored 1970 Superbird have contamination?
Another great question. Years ago, in an effort to answer this question, I wrote an article that is titled “The Most Common Place to Get Overspray Paint is at a Body Shop”. Why? Because besides spraying paint inside the sealed paint booth, technicians also spray paint in other work areas when prepping a car for the actual paint job. For example it’s common for primer paint or guide coat paint to be sprayed onto body panels as the body panels are straightened and perfected for final paint. This other paint drifts around in the air and if your car is at a body shop to be repainted, or if it has already been repainted but you have not picked up your car yet, then there’s a good chance your car will have overspray paint – yes, even if it’s a brand new paint job or panel repair. It’s the nature of the beast.Checking the paint for contamination
Even though I know this is a freshly restored muscle car (because all the final assembly took place at a body shop) my instincts and experience told me there was a good chance most of the outside of the car would in fact be contaminated and I was correct.For doing the baggie test – I recommend searching for simple, fold-top sandwich baggies – there’s no need for a zip locking option.
Yep… even the top of the iconic wing is contaminated.
Glass can also be contaminated
While feeling the paint, I also felt all glass except the back window. The previous week I had machine sanded and then machine polished the back window while it was out of the car and I can guarantee you it’s as slick and smooth as possible. But the rest of the glass? Contaminated. No problem – I will clay the glass and also machine polish it.When doing the baggie test, if the paint is contaminated it’s highly likely all the glass is contaminated too.
Mechanically decontaminating a 1970 Superbird
Yeah kind of silly, but for people like me that love detailing super cool and also super rare cars like this Vitamin C Orange Superbird – this wasn’t work, it was a labor of love.Using a clay mitt to mechanically decontaminate the paint and glass on this old bird.
Using a clean microfiber towel to remove the Prep Wash (clay lube in this example)
You clay glass the same way you clay paint – use plenty of clay lube then rub the clay mitt over the glass.
Visual inspection
Once the claying step is over, it’s time to inspect the paint visually using a source of strong bright light. For this I like to use the SCANGRIP brand of swirl finder lights.
This is called a frame-up shot – I took a picture of the swirls in the paint next to the hood latch to provide geographical context.
This is the same shot as above only I’ve cropped out the fluff to focus directly on the swirl scratches while leaving just a portion of the hood latch in the picture so you can trust this is the same area of paint.
While some areas were better than other areas as far as the level of swirls go – for a car like this, no amount of swirls are acceptable – at least from my point of view, this is a 426 Hemi car after all.
Same area as the above picture, I left the top portion of the black matte paint for context.
Major paint correction
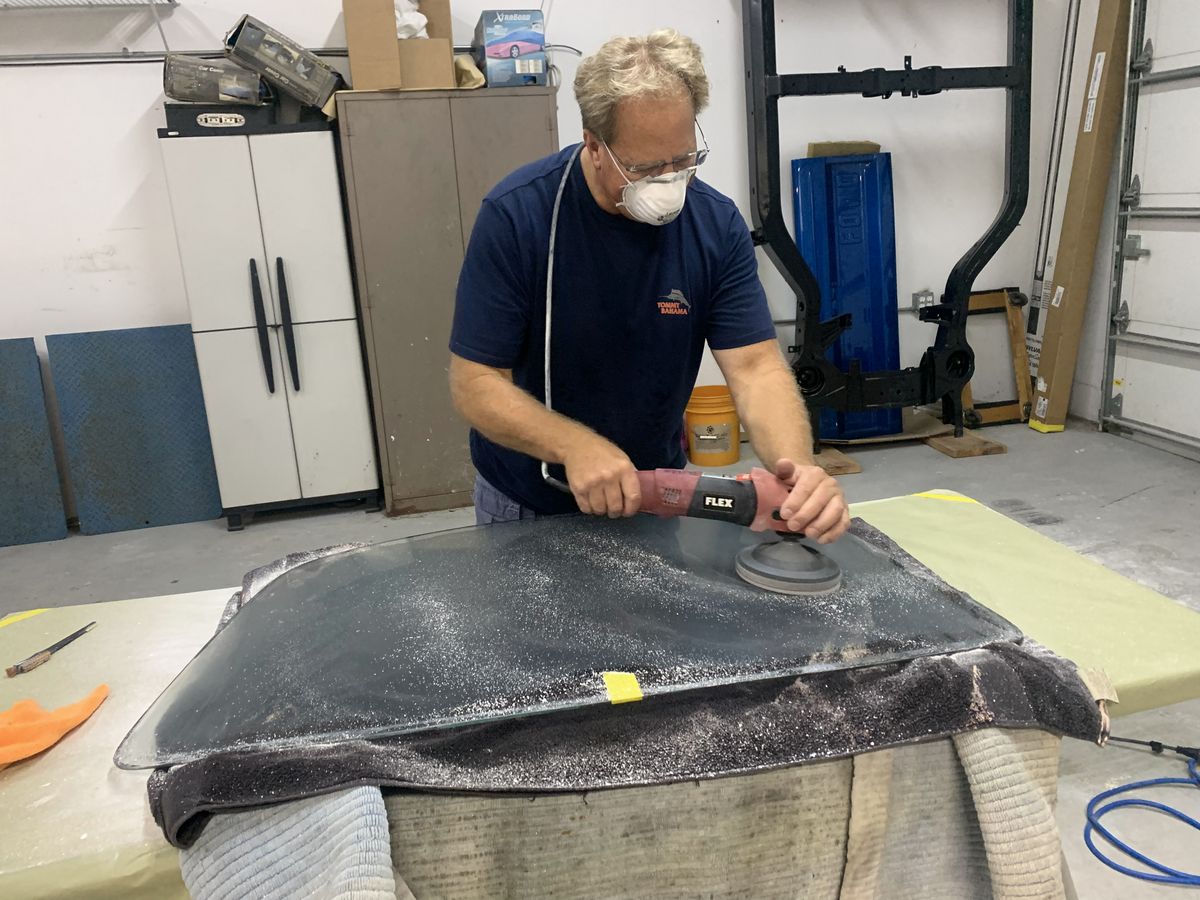
When I arrived for this job, one of the technicians pointed out an area where some light sanding was performed to remove a minor paint imperfection. For this I’m going to use Dr. Beasley’s NSP 150 with a wool pad on a rotary polisher to remove these sanding marks. Due to the aggressive nature of the NSP 150, a wool pad and a rotary polisher – this is considered major paint correction.
If you look just below the passenger side wiper arm – you can see a dull section from light hand sanding using #2500 grit sanding paper to remove paint defect.
Here you can see I’ve placed some NSP 150 directly onto the sanded area.
The goal when doing this type of work on this type of car is to remove the sanding marks 100% and then when you turn you polisher over – you don’t want to see the orange color of the basecoat on the buffing pad.
Here’s yours truly surgically removing sanding marks.
People ask me, do you ever get nervous working on such rare cars? The answer is… hell yes!
Dr. Beasley's NSP 150
NSP 150
Doing a Test Spot
A Test Spot is where you test out a product, pads, tool and your own technique to one section of paint to see what it will take to remove the defects to your satisfaction. Normally you do your first test spot using a polish with a foam polishing pad and the normal tool you normally use for machine polishing. The idea being, if the polish with a foam polishing pads removes the defects to your satisfaction, you can then repeat this process over the rest of the car knowing that in most cases, what worked in one area will also work in other areas.If the results from your first test spot don’t work, then you can do a second test spot to a different section of paint only this time, switch things up a bit. For the next test spot you can test a more aggressive product, or pad or tool and in some cases, maybe change all three options.
Dr. Beasley’s NSP Z1
After testing NSP 45 with a foam polishing pad, followed by NSP 95 with a foam polishing pad, both of which produced almost perfect results – for my 3rd Test Spot I tested the NSP Z1, which is like an old school cleaner/wax except it uses Dr. Beasley’s proprietary engineered microsphere abrasive technology for removing defects and leaves behind ceramic protection instead of a conventional wax.The benefit to using the Z1 is that it’s a one-and-done type product. That is, after wipe-off, if you like, you’re done. The Z1 will leave behind a layer of ceramic protection, which acts to seal the surface of the paint and protect it as well as creating a high gloss, slick, hydrophobic finish.
Dr. Beasley's NSP Z1
NSP Z1
I found using the Dr. Beasley’s micro-wool buffing pad on the 8mm gear-driven FLEX BEAST orbital polisher easily removed the deepest of swirls in the paint and left in my eyes what appeared to be a flawless show car finish. But, just to ensure there was no hidden micro-marring from the fibers that make up a micro-wool buffing pad, I re-polished each body panel with the same product, the Z1 but with a foam polishing pad. The results were perfection, even after stripping a section of paint and inspecting with the swirl finder light. Once I dialed in the process, it was just a matter of buffing out the entire car, panel-by-panel.
Dr. Beasley’s Microwool Heavy Cutting Pad
Dr. Beasley’s HDO Orange Polishing Pad
No pictures of me doing the work but please take my word for it, this car didn’t buff out itself.
This may be the largest car hood I’ve ever buffed out!
To say you’ve buffed out the wing on a 1970 Superbird is something only a few detailers can say in this day and age.
Machine perfecting the paint using Dr. Beasley’s NSP Z1, which seals the paint at the same time with a ceramic coating!
Me in my happy place! (I know, corny but true)
See my hand positions? When doing surgical buffing, sometimes it’s better to hold the tool by the body to get your arm and hand out of the way of you line of sight so you can see exactly where the pad is touching.
Carefully buffing around the vinyl letters and not buffing over them. In a perfect world I would have buffed out the paint where the graphics go before the graphics were installed. Next time.
Bead Hero
After machine polishing all the paint and glass to perfection using the NSP Z1, I then applied the Dr. Beasley’s Bead Hero, which is a spray-on hydrophobic ceramic coating, which creates extreme gloss, slickness and a surface that repels water as well as dirt and dust. Sorry, no pictures, was running out of time.Dr. Beasley’s Bead Hero
Bead Hero
Final results!
Here’s a few pictures of the final results inside the shop where I did the work.
Going home…
I did the detailing work on Friday and the following Monday, the car was going to be loaded into an enclosed trailer and delivered to the owner. Knowing this, I stopped by first thing in the morning, hoping to get some pictures of the car in outdoor lighting and also get the highly coveted sun shots – showing the paint is in fact swirl-free.
In case you didn’t notice – these are HUGE cars!
That’s overhead sunlight beaming down on the driver’s side of the hood and there are ZERO swirls.
You can see the car hauler in the background of the below picture. I had to move fast as this is a busy shop and it’s GO TIME!
Getting the sun shots on the deck lid was tricky with the wing in the way, but I call this, a great problem to have.
One more picture because this car is so freaking cool and a real piece of American car culture history.
What is a Hemi engine you ask?
For those that might not know exactly what it means when someone says they have a real hemi engine, here’s a few pictures that tell the story. The original hemi engines, or hemispherical head engines, are easily identified by the spark plug wires entering into the top middle of the valve covers. The design of the head is such that the probe of the spark plug is smack-dab in the top, middle of the inside of the head where upon when the fuel is ignited by the spark created by the spark plug – the explosion of the fuel/air ration is optimized for maximum power! Thus the reason back in the day, having a real hemi powered muscle car, race car or even race boat was truly some bragging rights!Below are some pictures of the 426 Hemi Engine as well as some close-ups of the tops of the valve covers where you can see the spark plug wires disappear into the inside of the valve covers on their way to the hemispherical head.
Don’t forget to also notice just how perfectly clean and detailed the engine compartment looks.
BOOM! That be them! The tell-tell sign of a true hemi engine are the location of the spark plug wires.
Clean enough to eat off of!
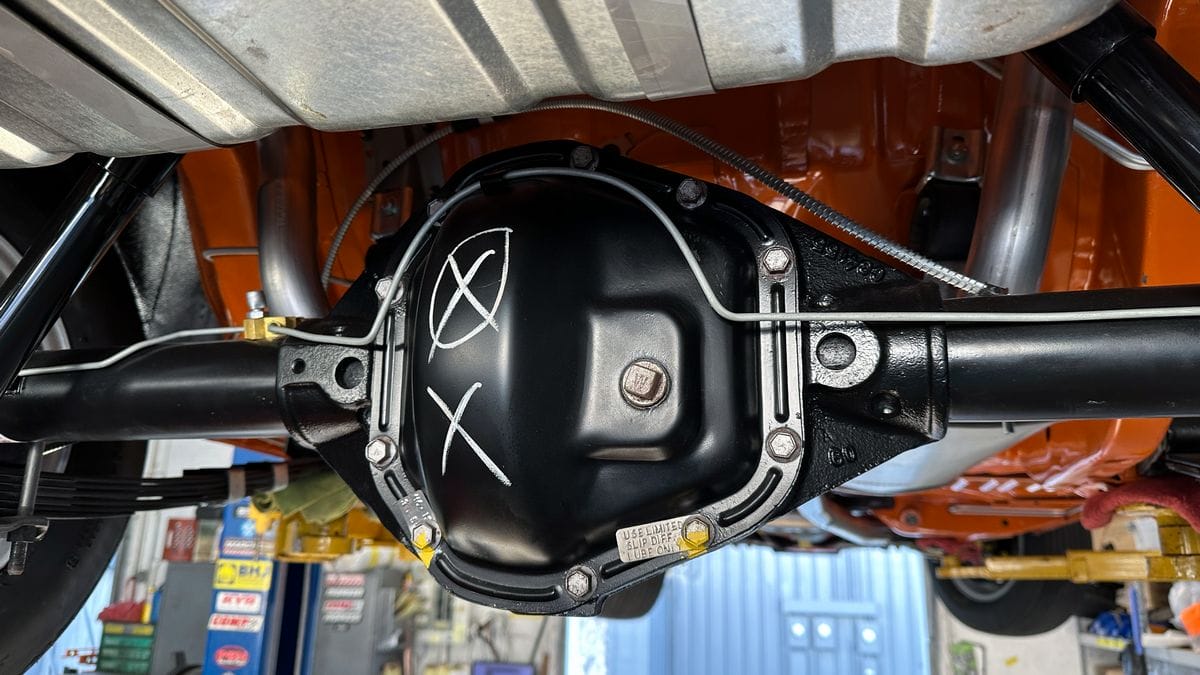
Did I mention this is one of the nicest and cleanest rotisserie restorations I’ve ever seen? Check it out, the underneath of the car is just as nice as the topside and in fact, the underneath is so clean you could eat off of it!
There’s more!
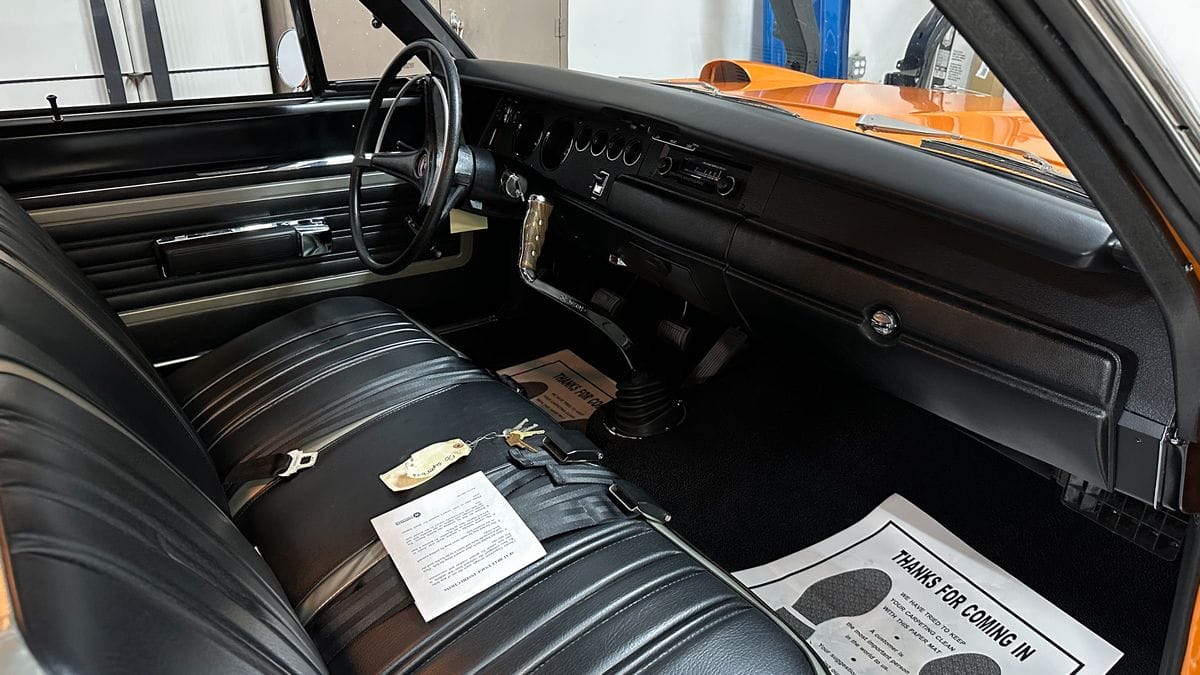
Besides being famous for their hemi headed engines back in the 1960s and 1970s, Mopars were also known for their pistol grip Hurst Shifters!See it?
Now do you see it? Both iconic and cool.
Final thoughts…
Every detailer has their favorite types of vehicles they prefer to detail. For me? I much prefer the timeless body lines of traditional American Detroit Iron. To be clear though, I detail pretty much all types of cars, a few weeks ago I detailed a brand new Audi station wagon – about as far away from this 1970 Superbird as it gets – but still a very cool car in it’s own right.Products used
What are you working on?
Besides detailing cars professionally, teaching classes on both car and boat detailing and writing articles and making videos sharing tips and techniques on these topics, I also love answering questions and helping others to success for their projects in their shop or garage. If you have any car or boat detailing questions, as well as glass polishing questions, feel free to reach out and I’ll do my best to help.
Mike Phillips
760-515-0444
Mike@drbeasleys.com
Last edited: