

- Admin
- #1
- Joined
- May 21, 2021
- Messages
- 2,824
- Reaction score
- 1,695
- Points
- 113
- Location
- Stuart, Florida
- Website
- themikephillipsforum.com
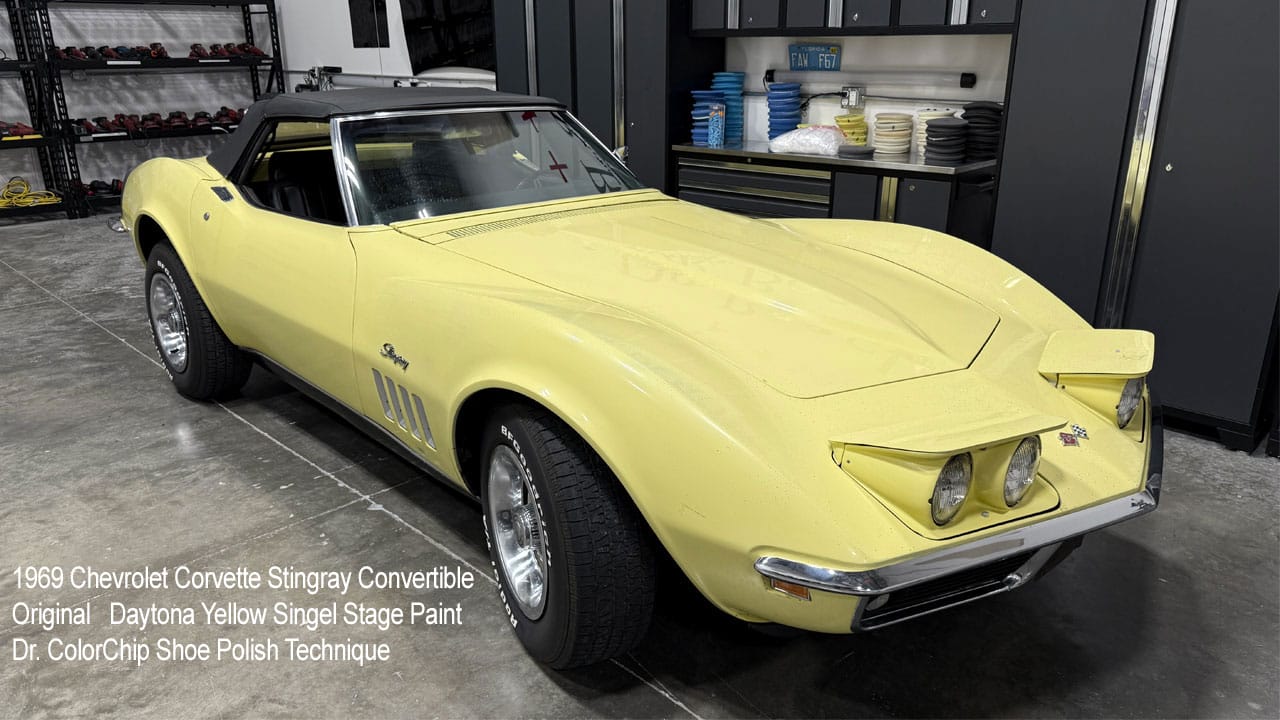
How to Use the Dr. Colorchip Shoe Polish Technique to the Original Paint 1969 Corvette by Mike Phillips
Insert Video Here
With Dan’s Shoe Polish Technique, you use a rubber squeegee to spread a generous amount of touch-up paint over the damaged area, working the paint into the chips.
After allowing the paint to dry for a few minutes, you use the Blending Wipes included in the Dr. ColorChip Rock Chip Repair Kit to apply SealAct blending solution. This removes the excess paint from the surrounding surface while leaving touch-up paint in the chips.
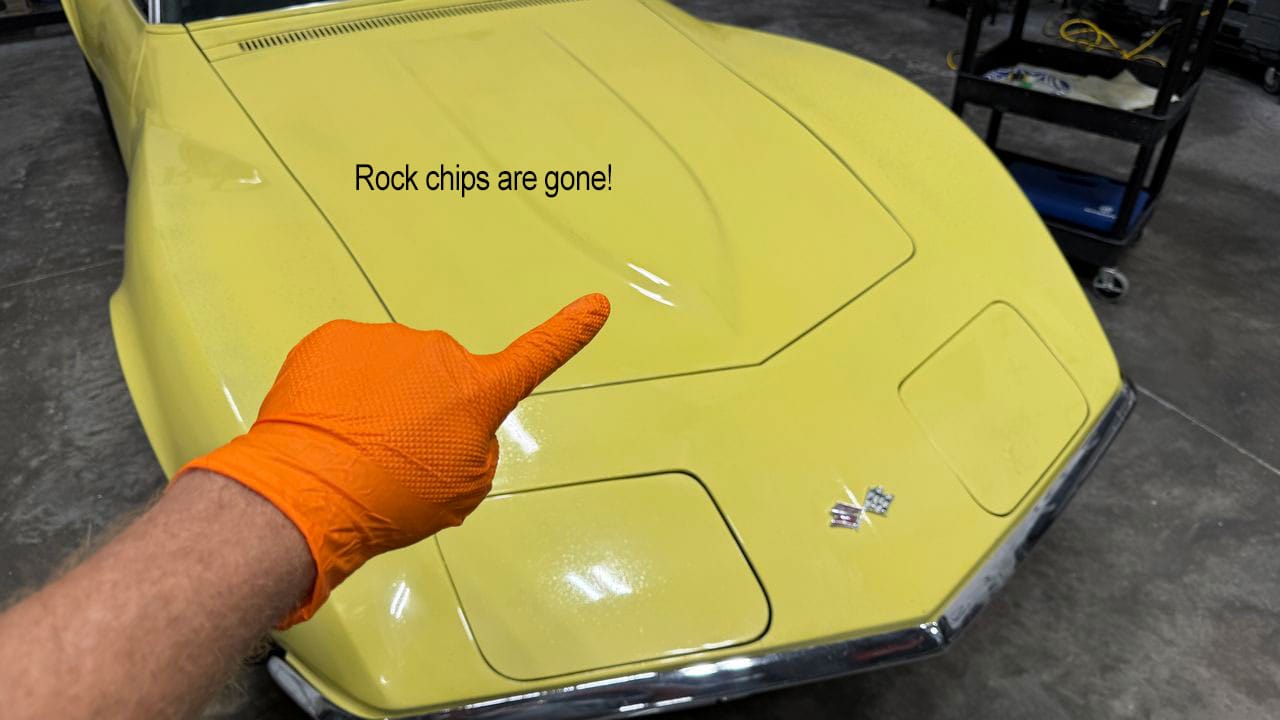
For damage this widespread, the Shoe Polish Technique offers a practical way to fill the chips and dramatically reduce their visibility.
Like the original owner, his goal is to keep the car as close to factory original as possible.
With its original single-stage Daytona Yellow paint and numbers-matching drivetrain, this Corvette deserves an approach built around preservation.
The goal is to PRESERVE the original paint, fill the rock chips, and improve the appearance while keeping as much of that factory finish intact as possible.
Original is only original once.
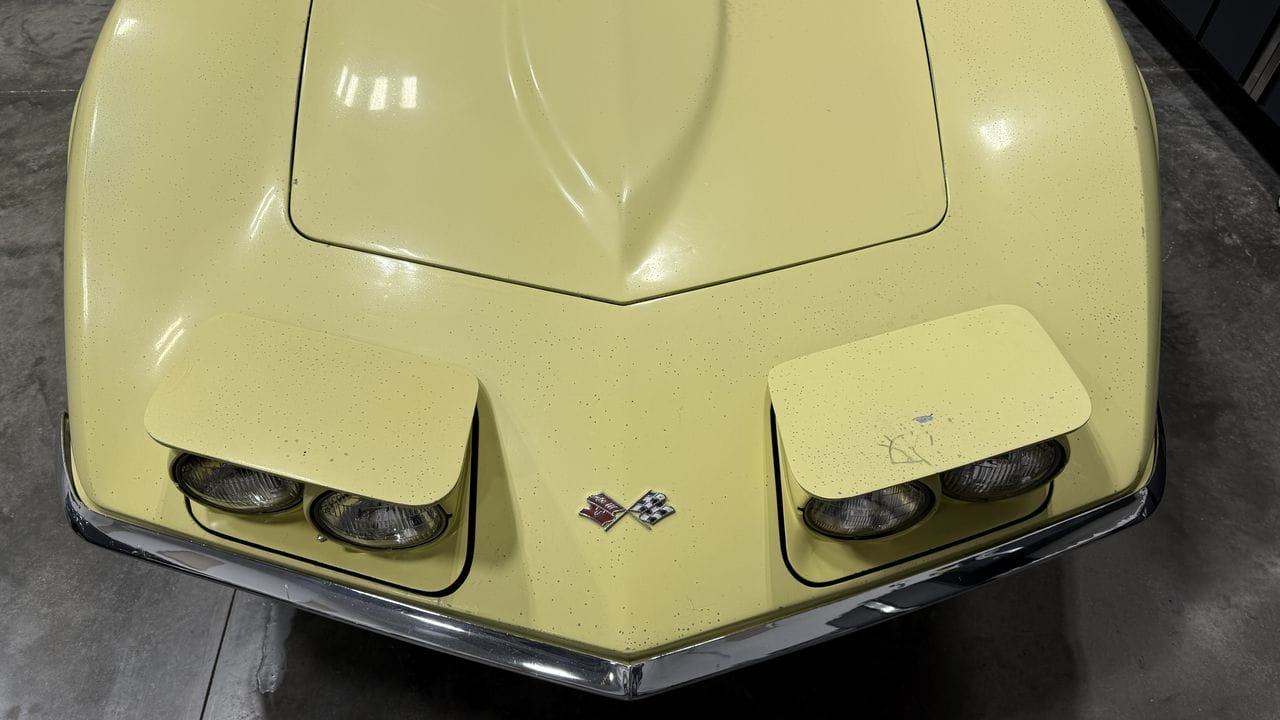
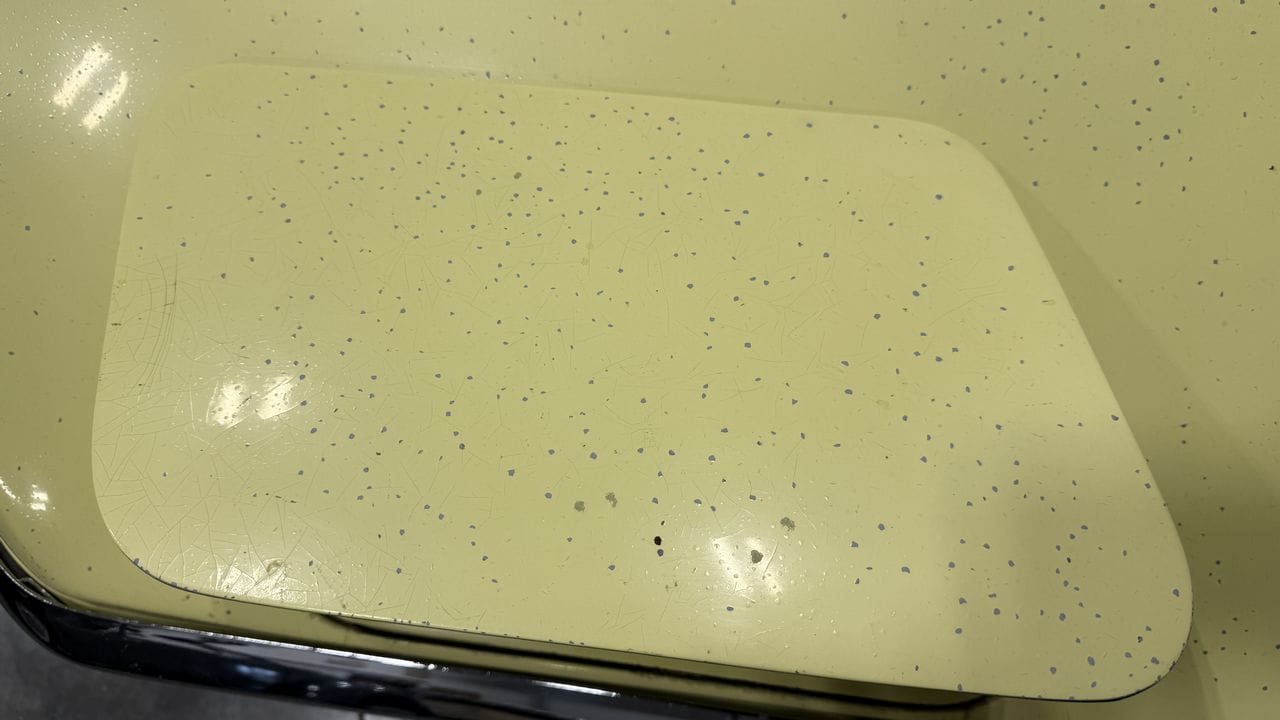
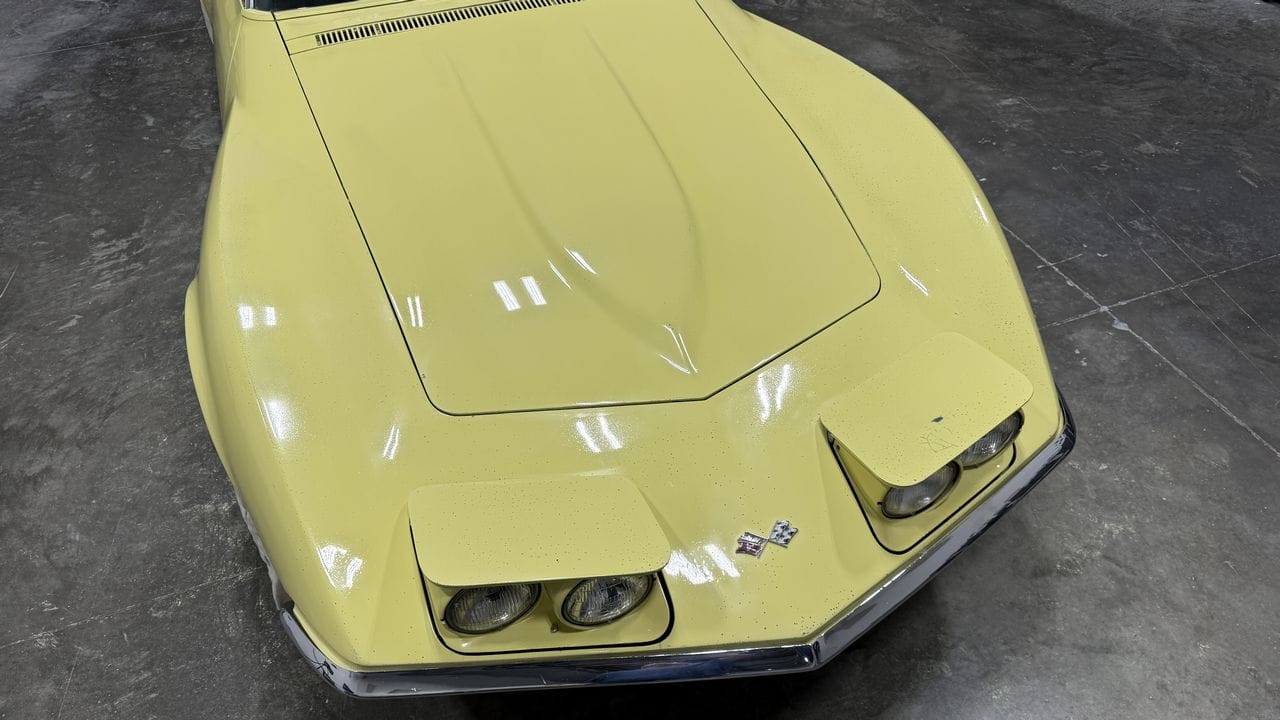
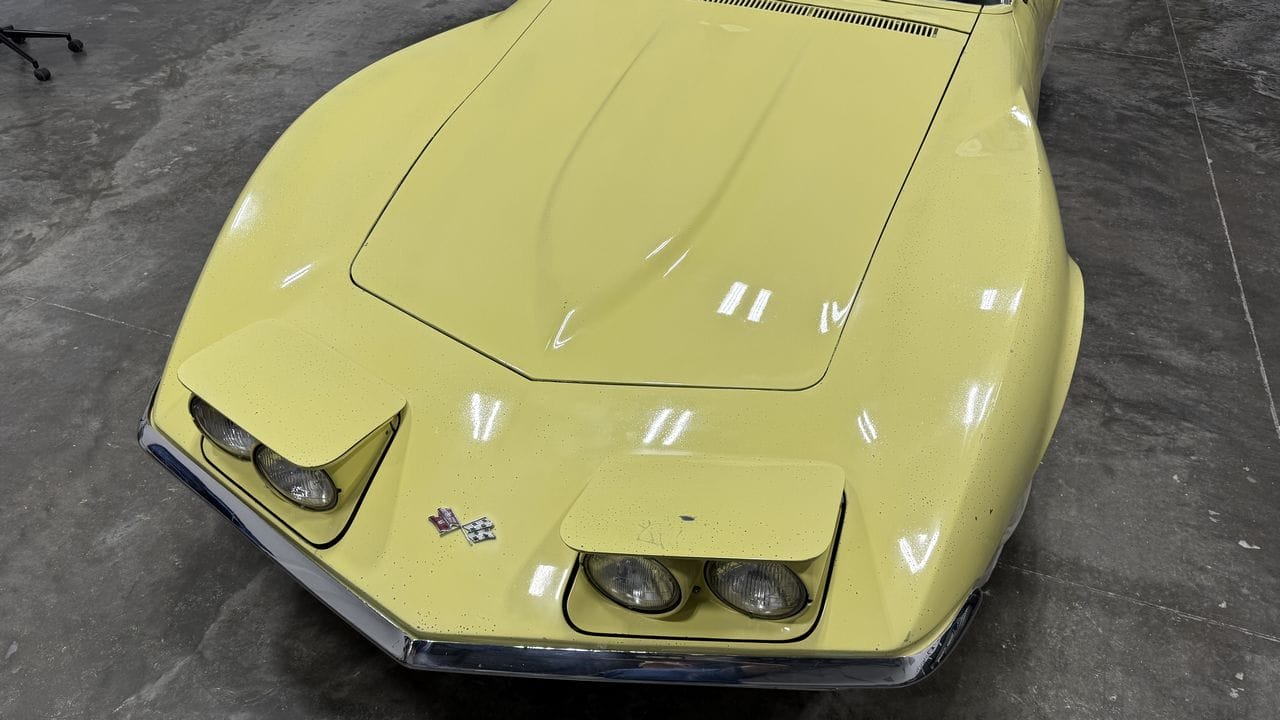
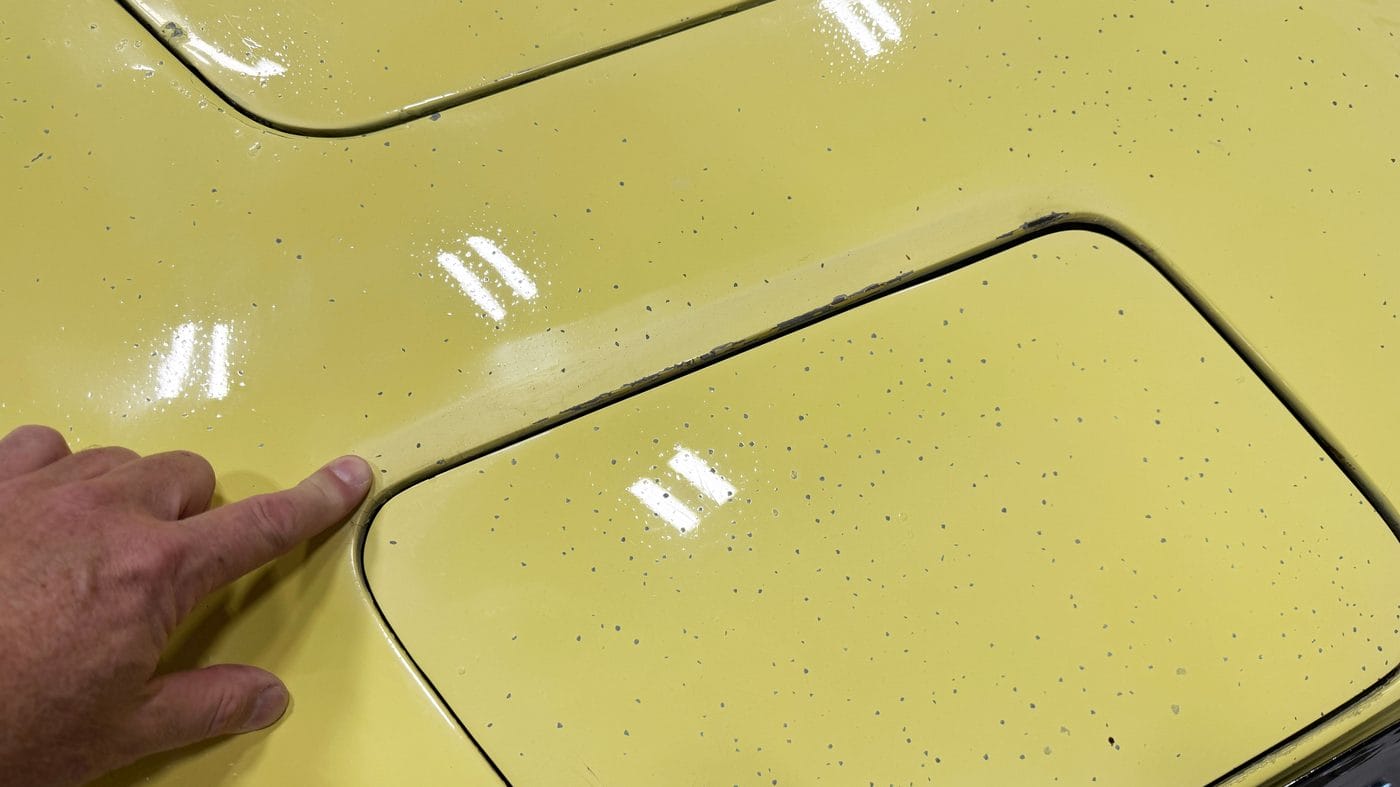
The passenger-side headlight cover alone has dozens of chips—and this same damage is repeated across virtually every painted body panel.
Take a look at the following pictures, panel by panel, and you’ll understand why I chose the Shoe Polish Technique for this project.
If you look at the back label, you’ll see PLANT OIL is included in the formula. This is a closely guarded secret, but my research over the years and talking to Meguiar’s old-timers, (I worked as a Trainer for Meguiar’s for about 11 years, so I met quite of few of the old-times), leads me to believe the plant oil is castor oil, which is derived from castor beans. Just a guess.
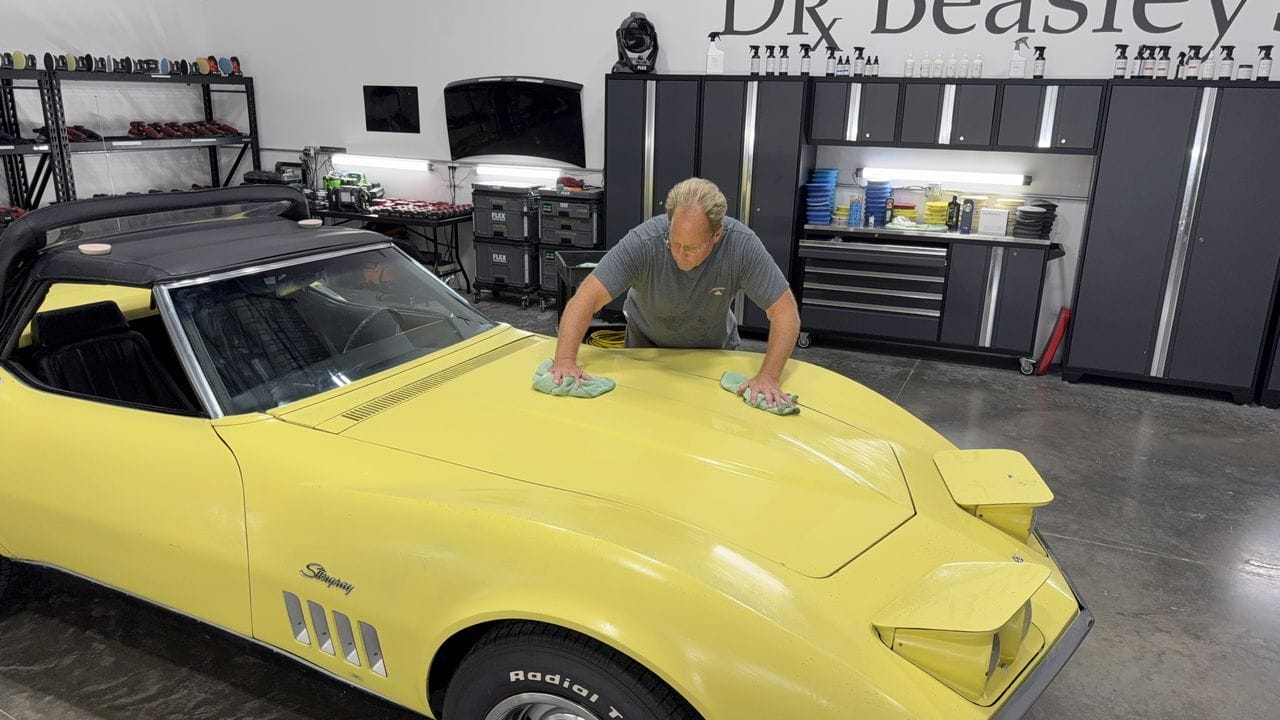
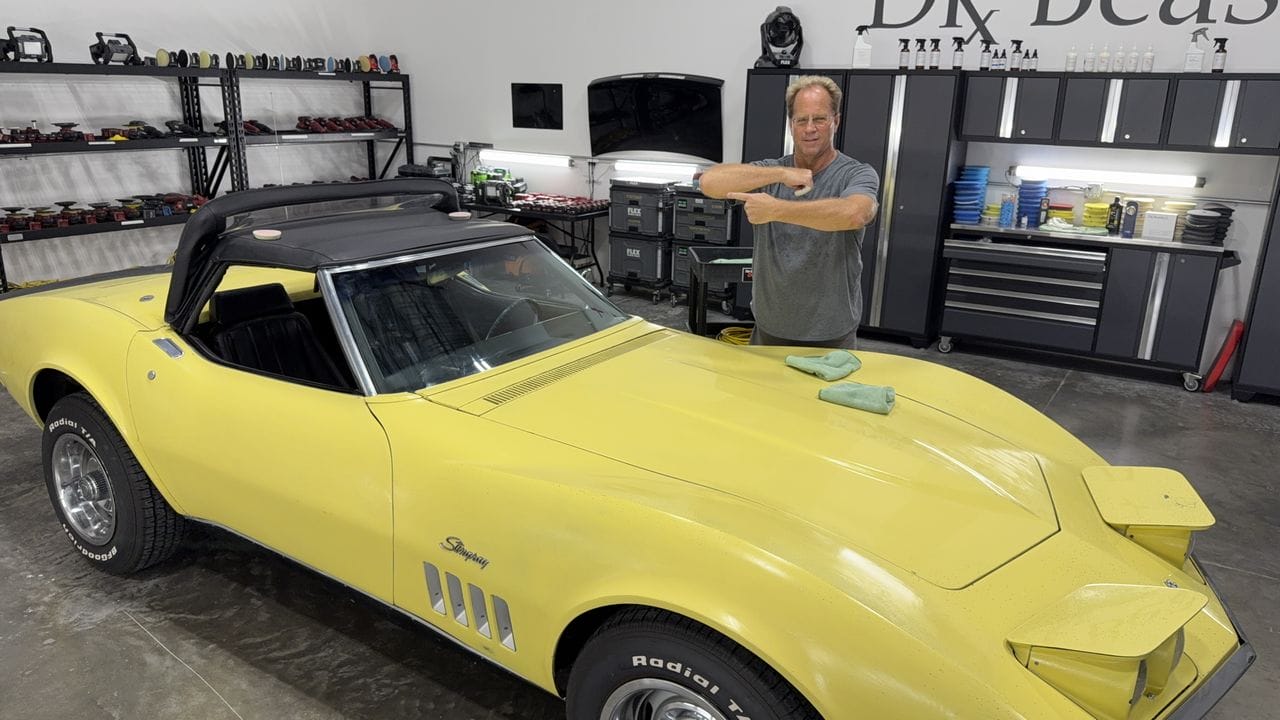
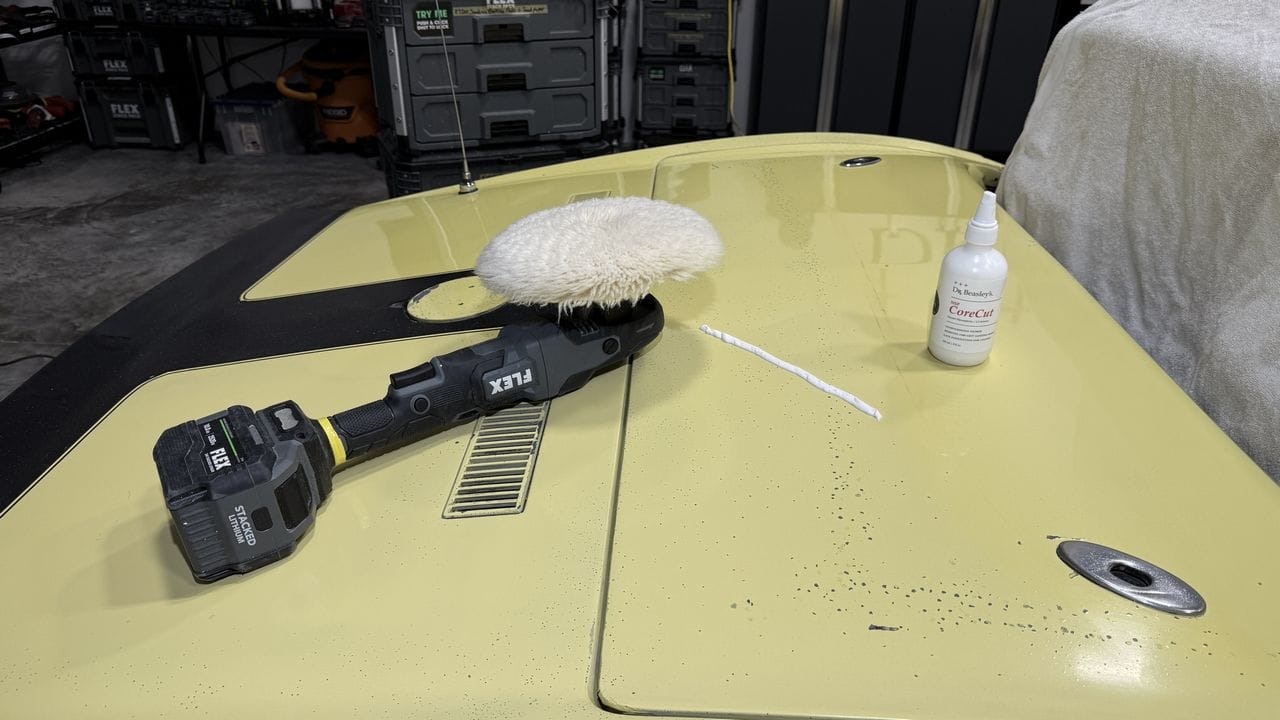
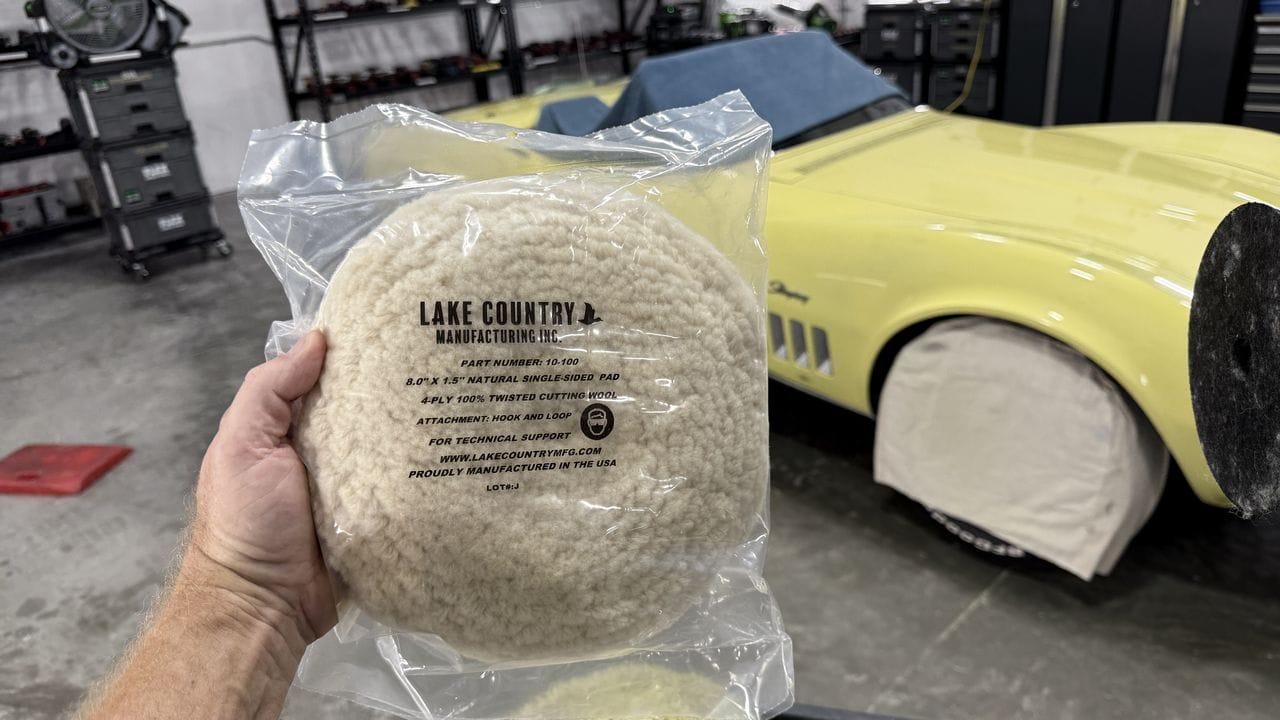
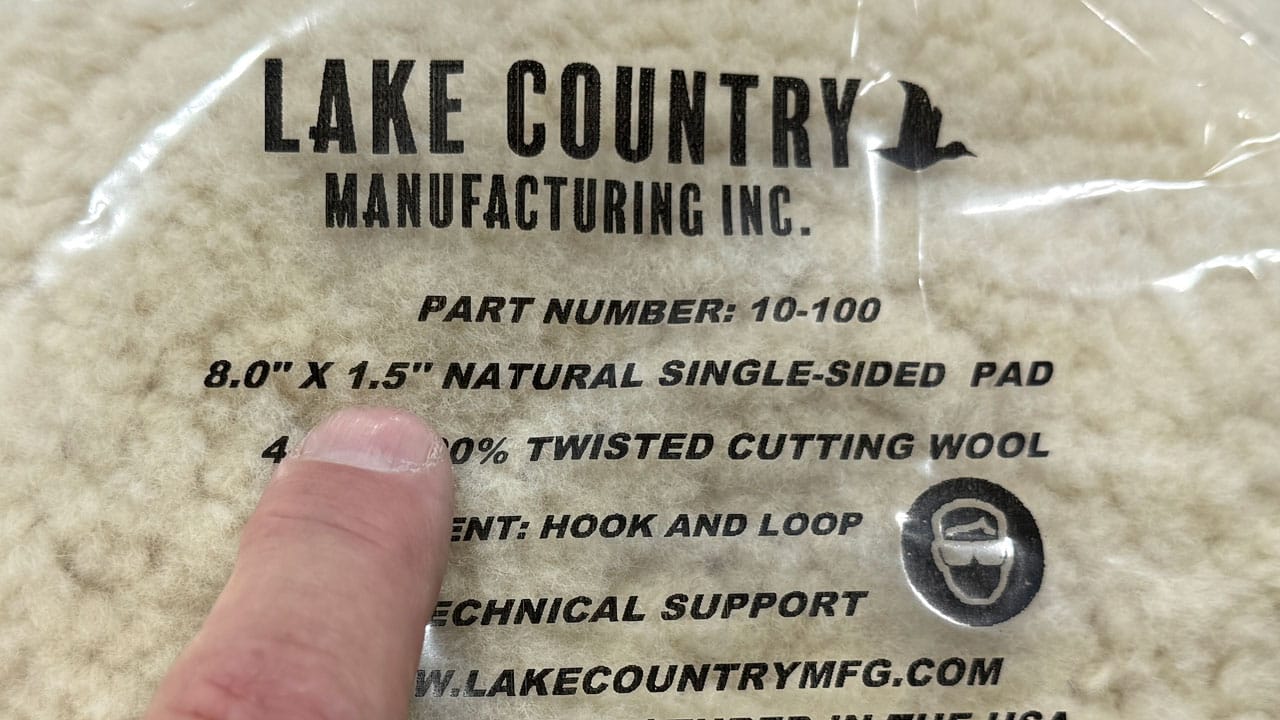
People always ask which buffing pads I use, so here’s a close-up of the description on the bag. Notice the fiber, or pile, length is 1.5 inches. This is considered a LONG pile length, and in my experience, it offers three benefits:
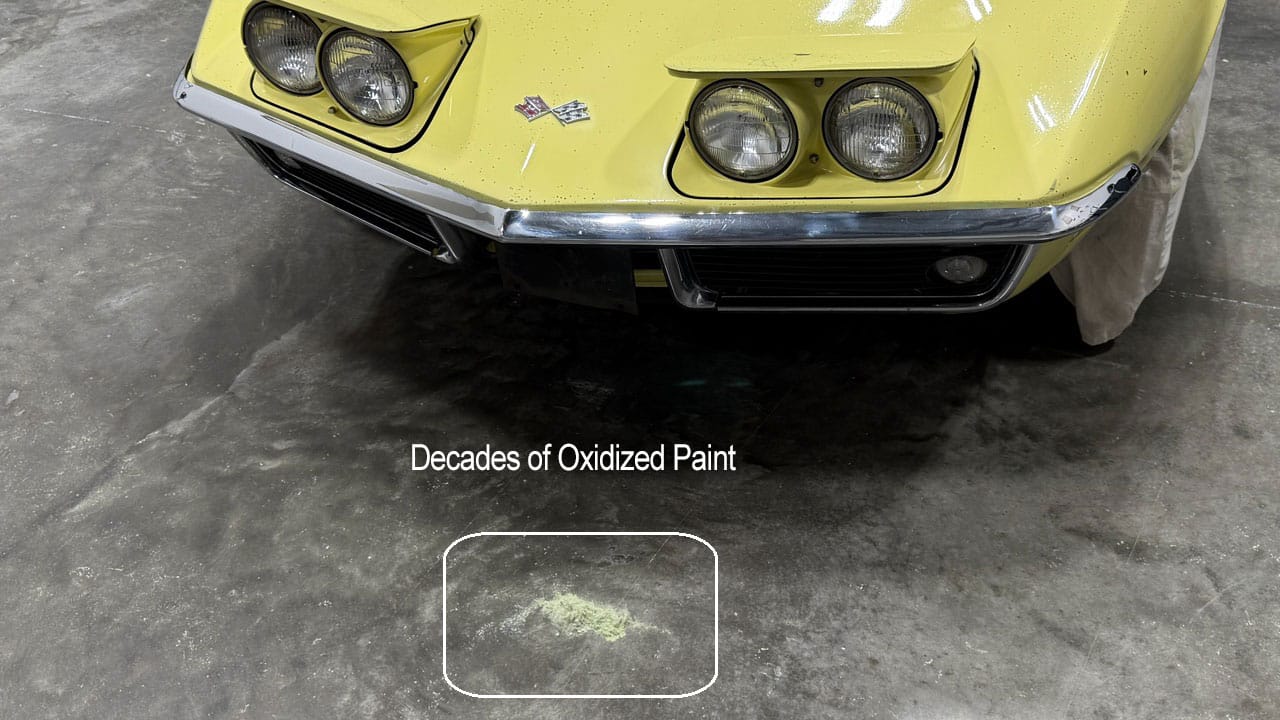
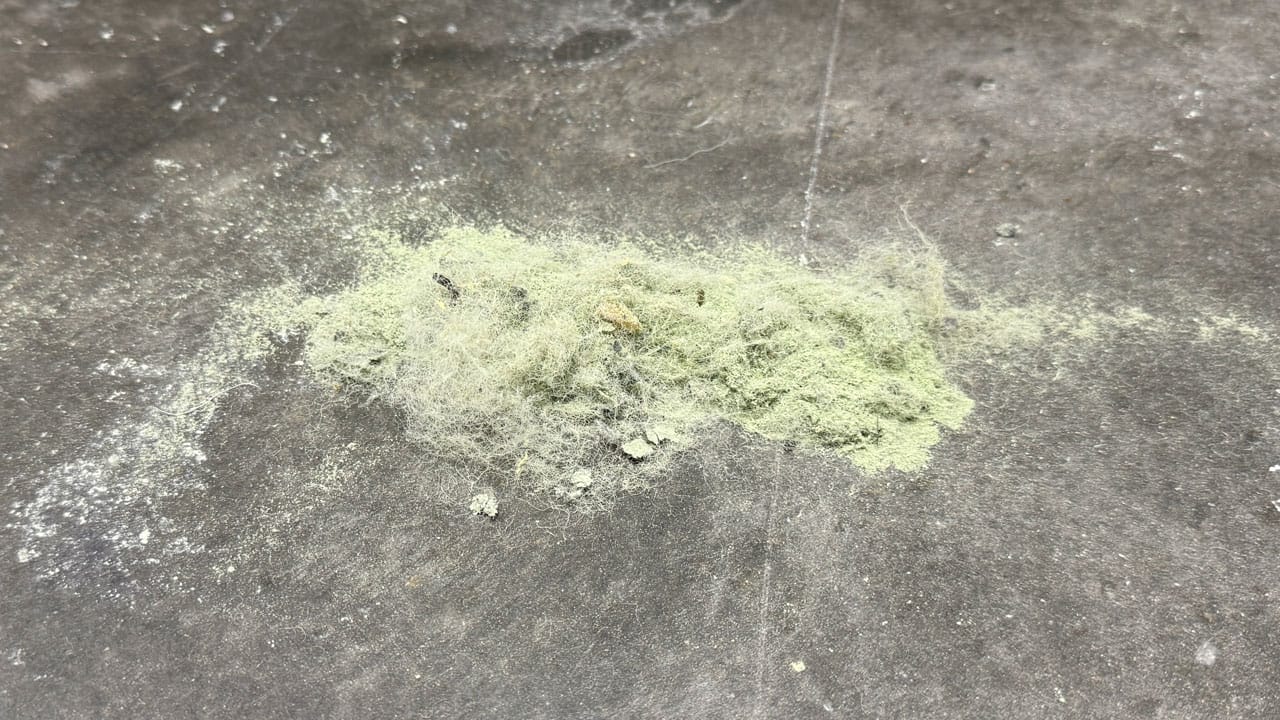
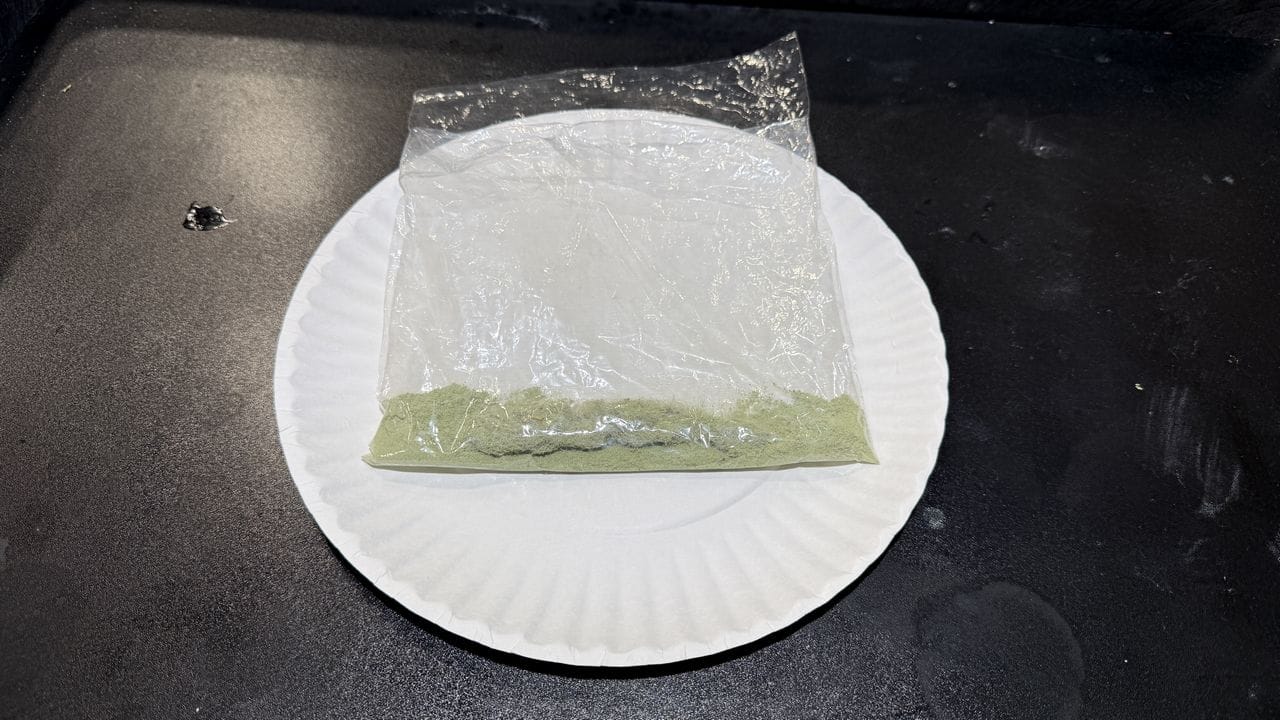
There was so much paint dust on the ground surrounding the car, I swept some of it up and put it in a plastic sandwich bag for the owner.

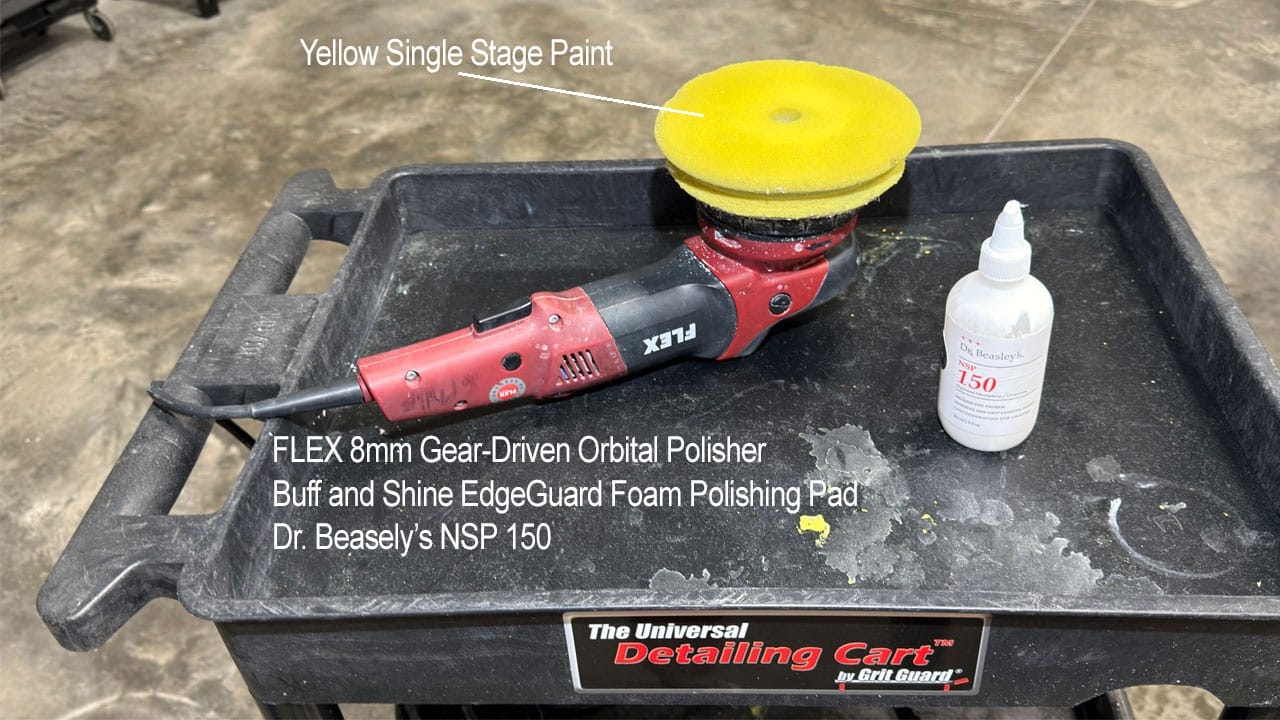
After cutting paint hard with a wool pad on a rotary polisher you WILL have HOLOGRAMS. No problem, this is normal, it’s just vital that you always follow ANY buffing step with a wool pad on a rotary polisher with a less aggressive polishing step using a foam pad, which unlike a fiber pad has a UNIFORM surface, and together with a quality polish you can remove the holograms.
For this, I used an 8mm gear-driven orbital polisher with a Buff and Shine EdgeGuard yellow foam polishing pad with the Dr. Beasley’s NSP 150, which is polish, not compound or a fine cut polish, but right there in the sweet spot between a compound and a fine cut polish.
After using the Shoe Polish Technique over all the body panels, I will do one more LIGHT machine polishing step using a Free Spinning, Random Orbital Polisher, a Buff and Shine foam finishing pad and the Dr. Beasley’s NSP 45, which is an ULTRA FINE cut polish.
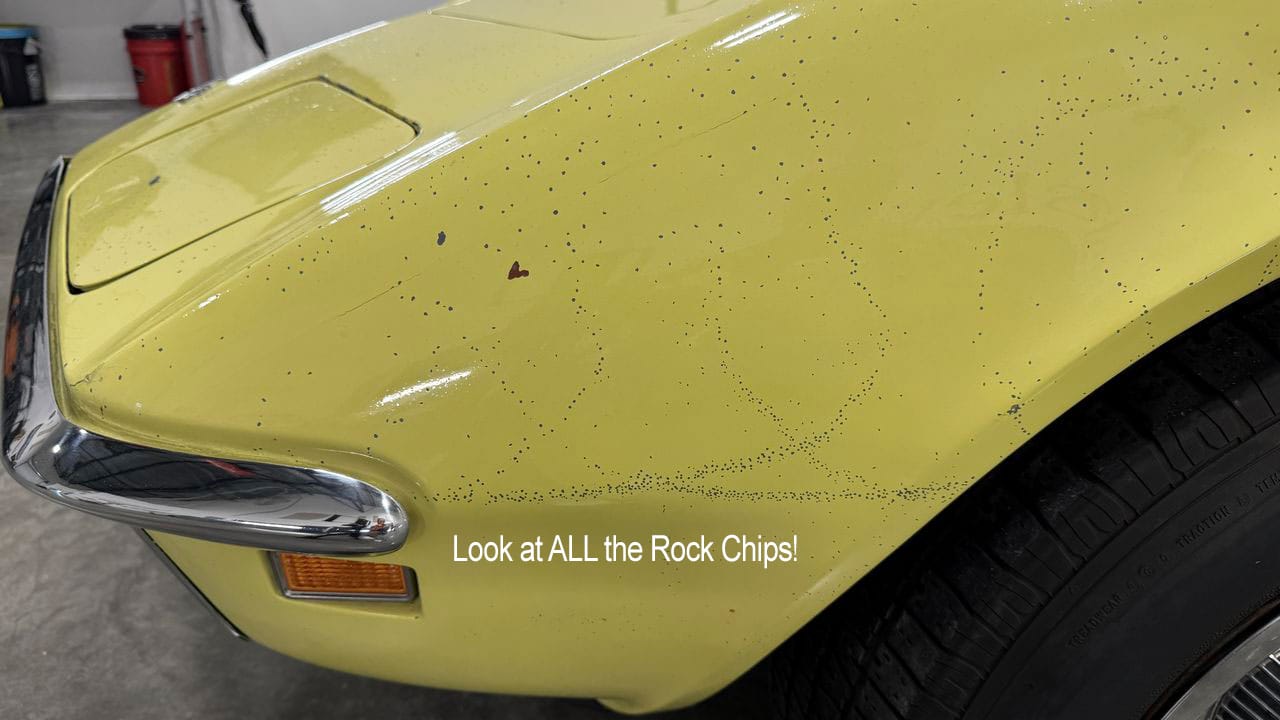
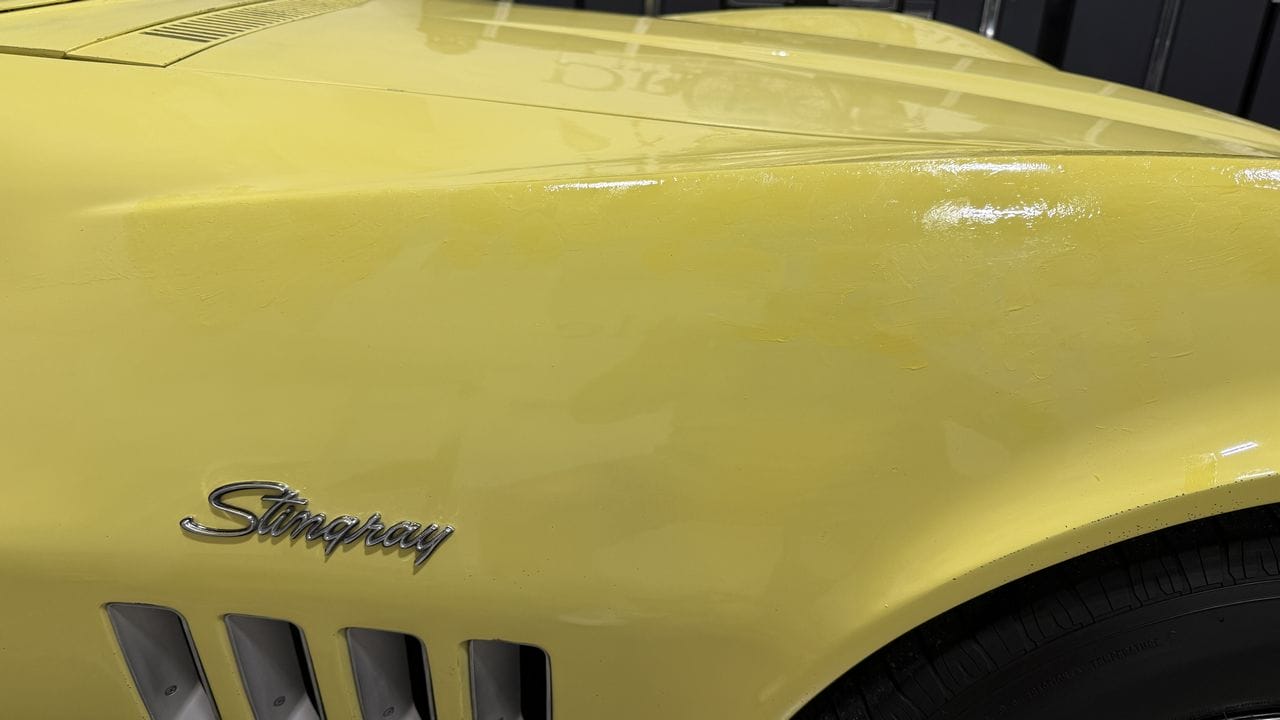
I applied the Dr. ColorChip Daytona Yellow paint to a large section on the Driver’s front fender.
See it? See the paint I smeared over the entire section of paint?
From the Dr. ColorChip website,
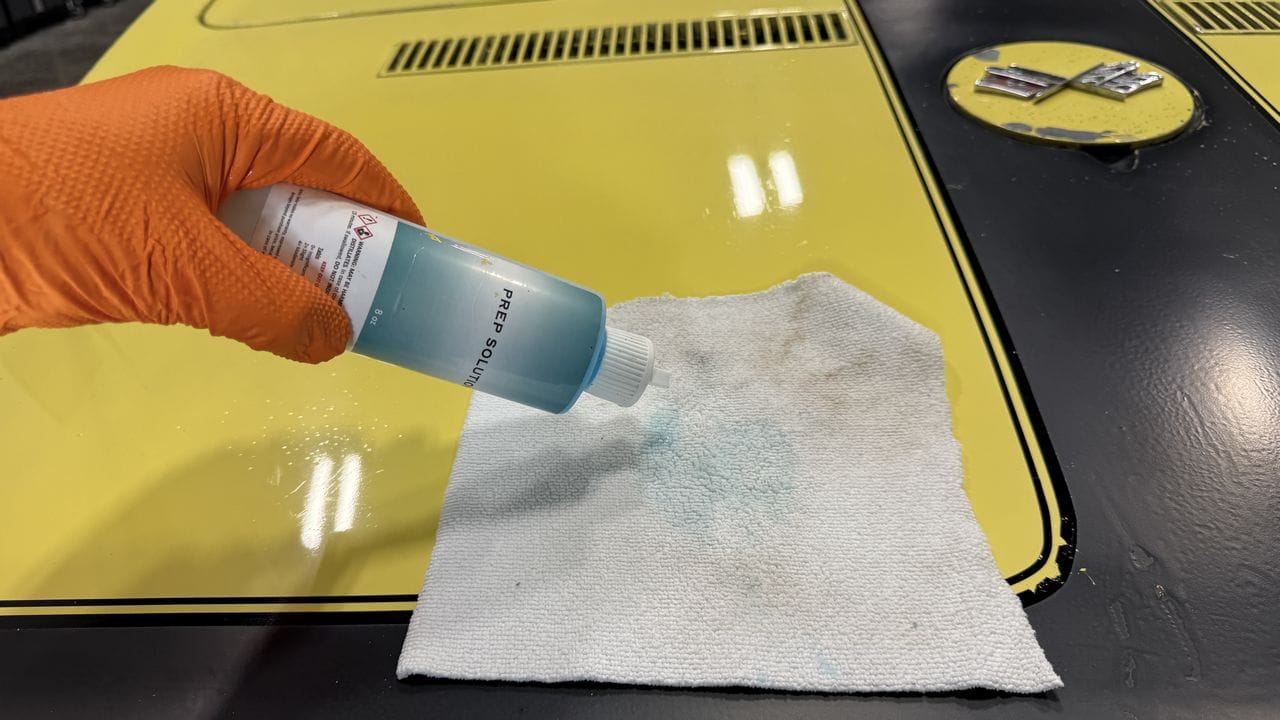
Proper surface preparation helps touch-up paint adhere to the damaged area. Dr. ColorPrep Panel Cleaner is formulated to remove wax and other surface contaminants from an automotive panel before applying Dr. ColorChip touch-up paint. Starting with a properly prepared surface helps prevent residue from interfering with paint placement and the final repair.
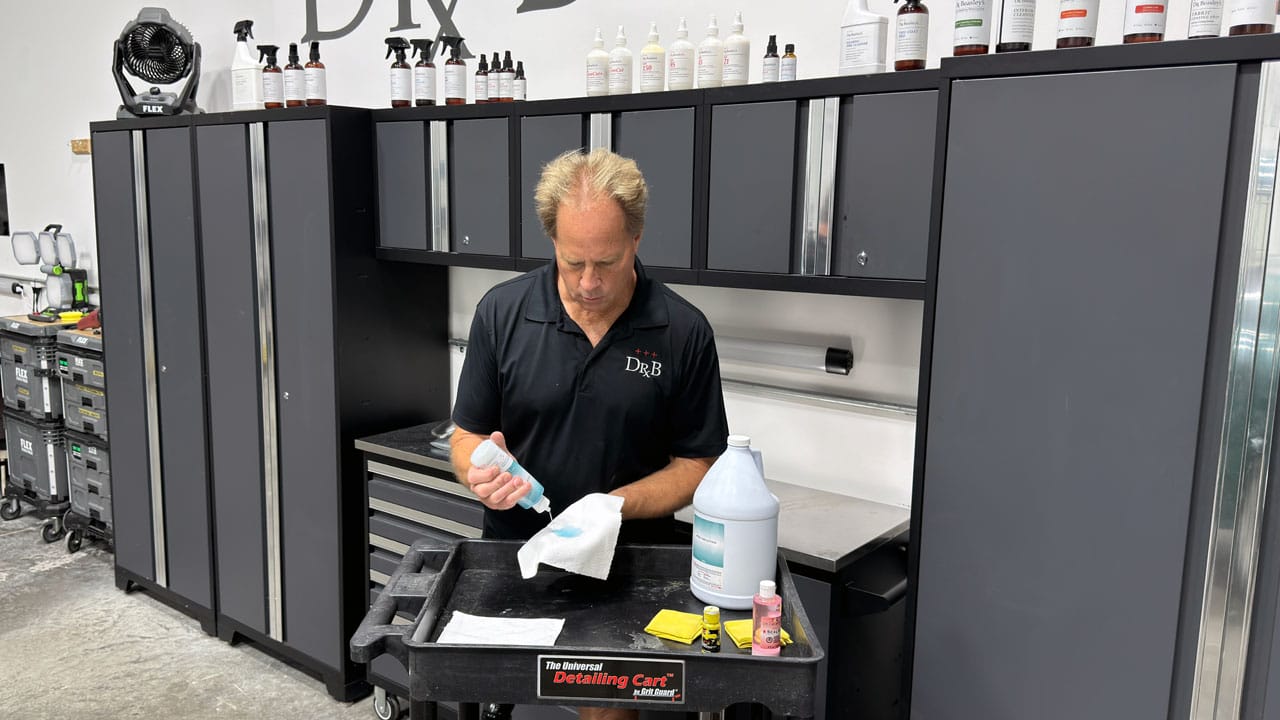
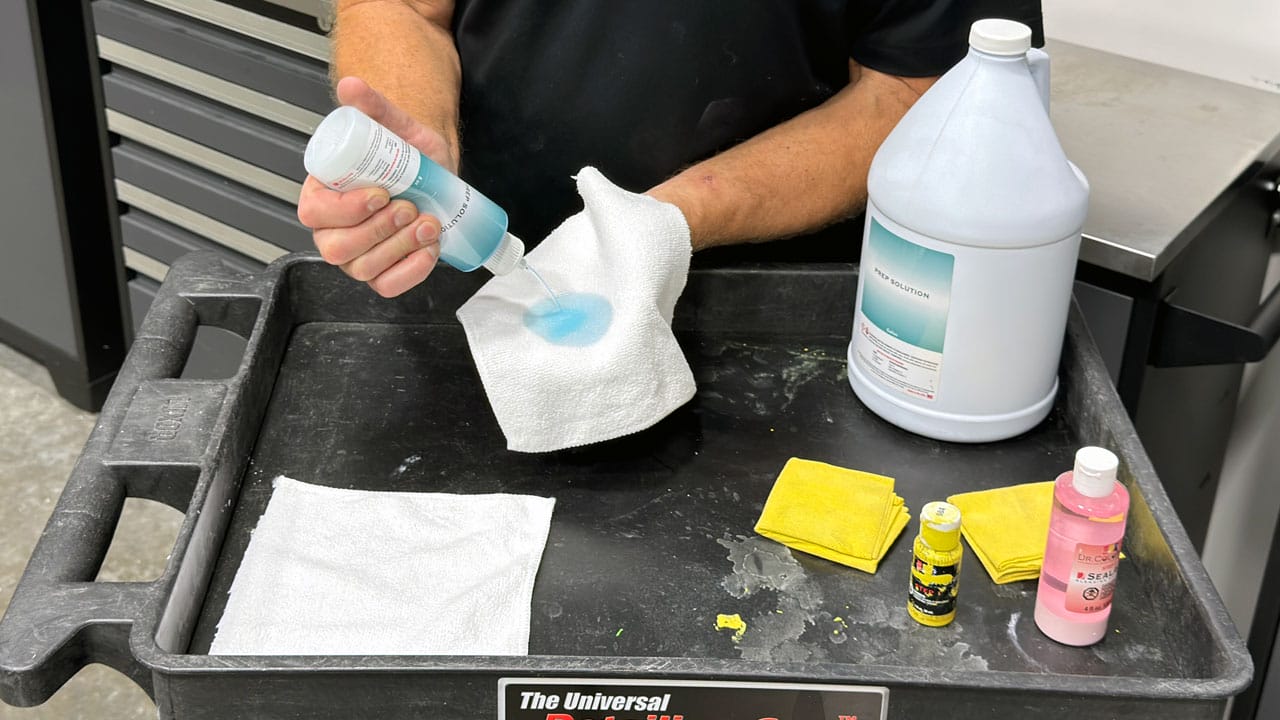
Clean the area first using the Dr. ColorChip Prep Solution before applying the paint.
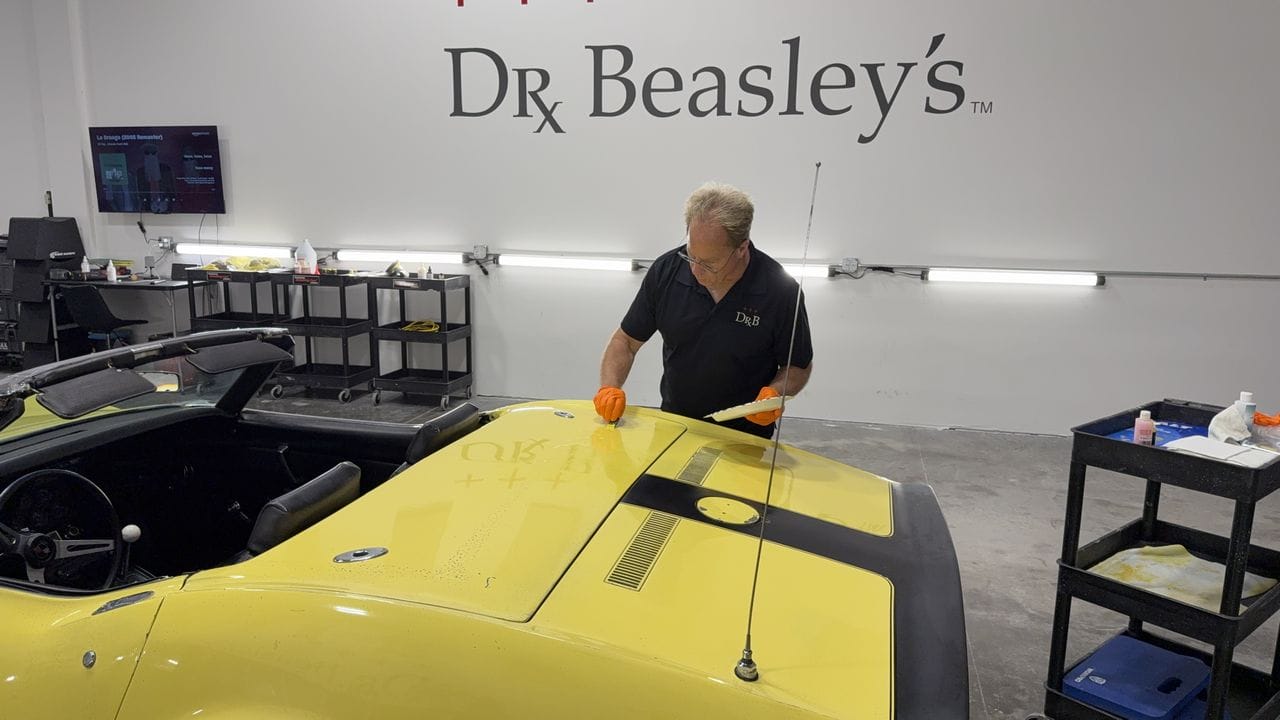
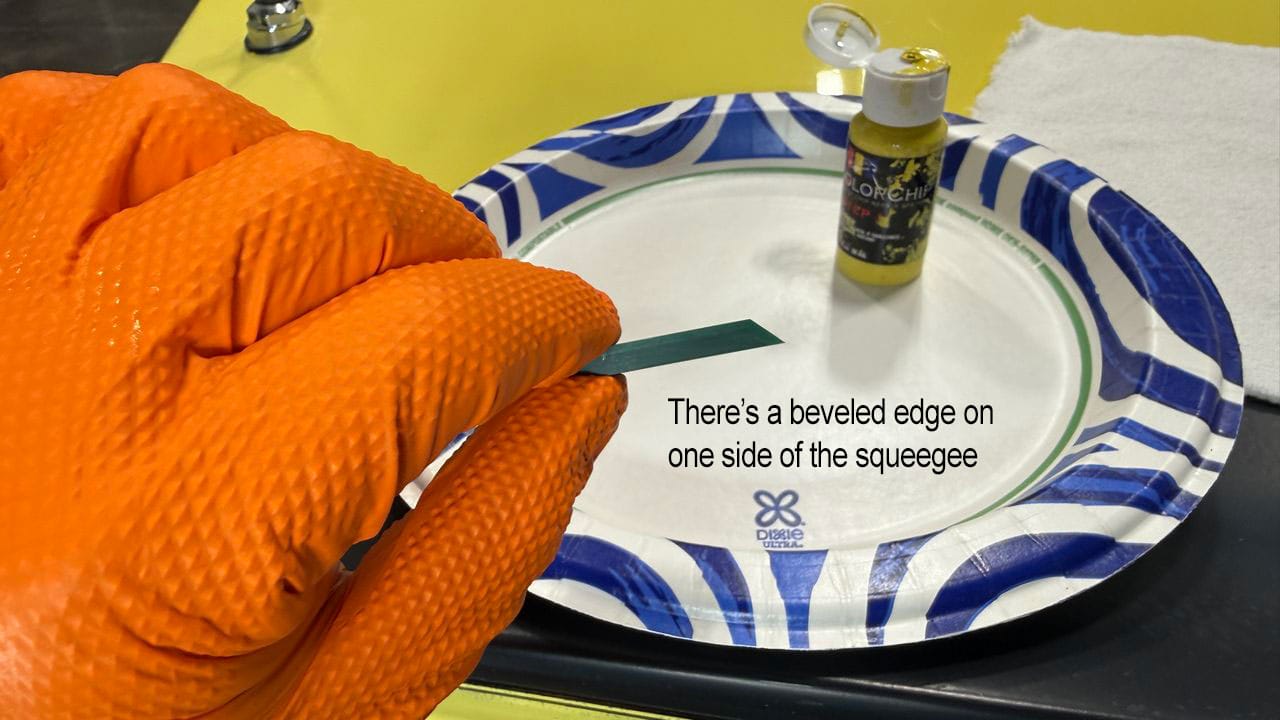
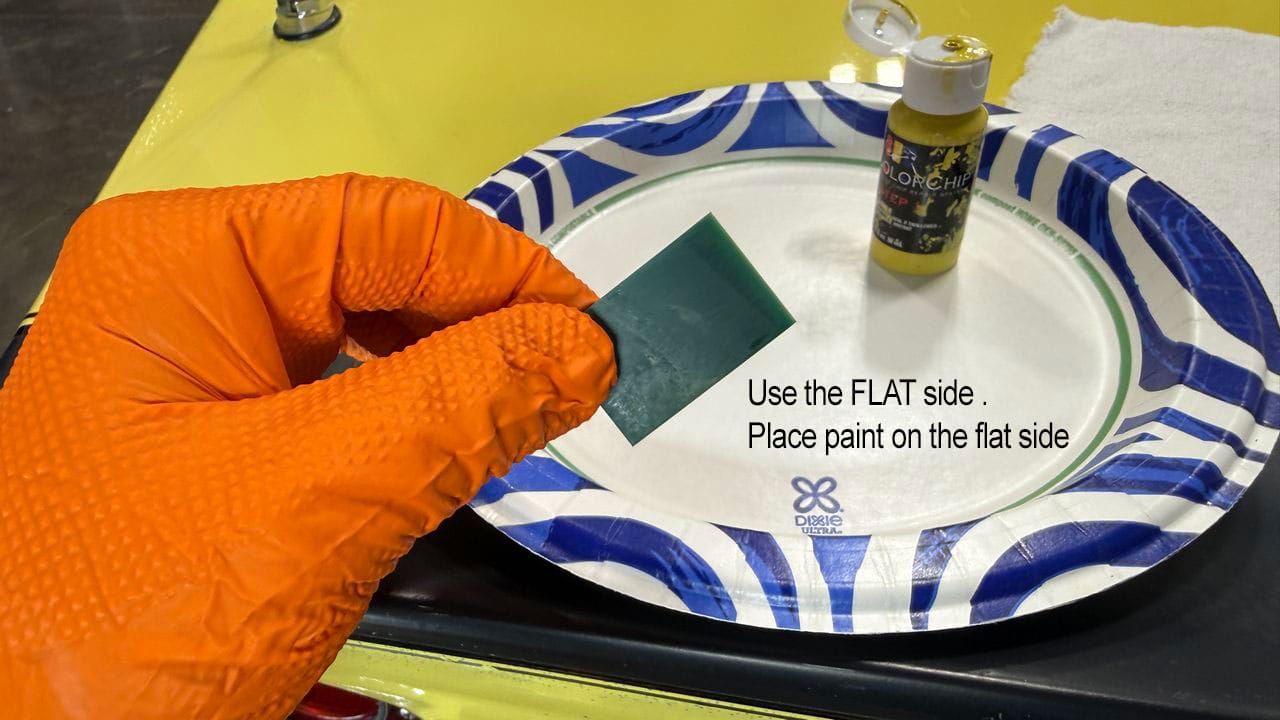
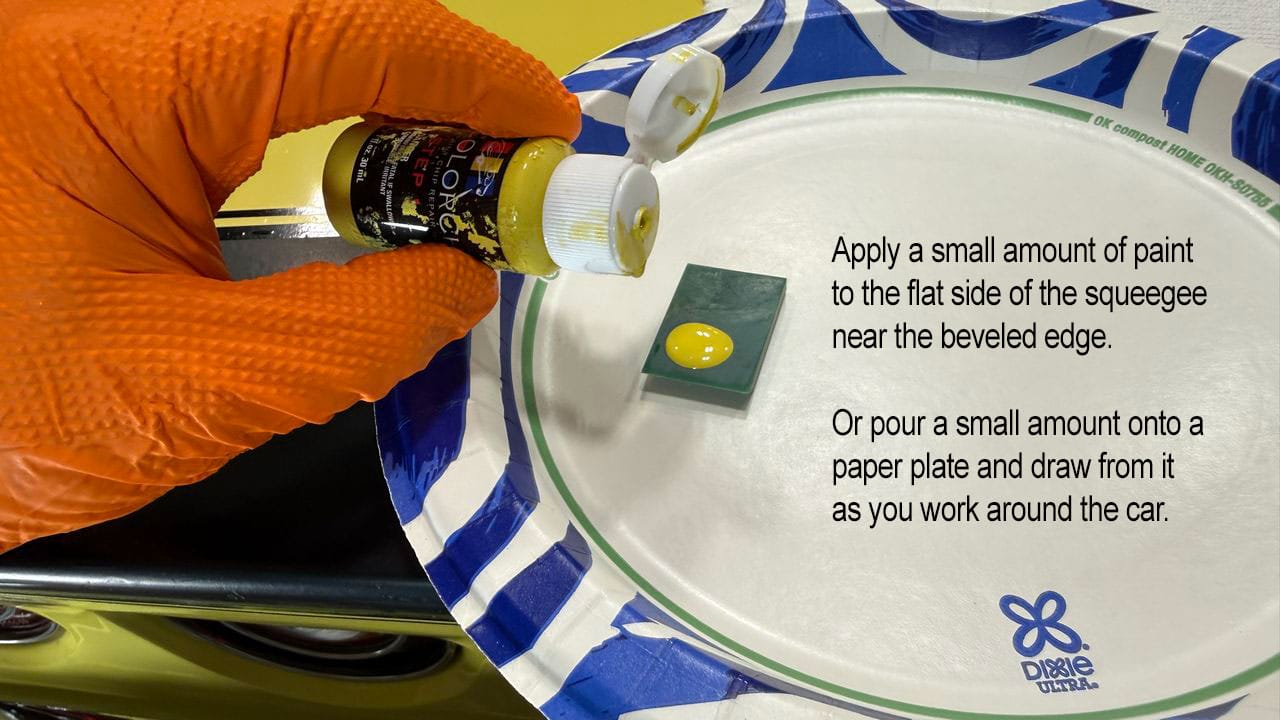
Using the flat side of the squeegee – smear paint over the entire section you want to fix. For deeper and/or larger chips, wait a few minutes for the initial paint you applied to get tacky and then if you can still see DARK SPOT, (that’s the chips without enough paint in them), then apply some more paint to these areas.
NOTE: If you can see dark spots after applying the paint, AFTER you do the blending step, they will still be there. Apply enough paint to make any dark spots/rock chips disappear. If you try to apply more paint while the first layer of paint is still wet you’ll tend to move the paint around, not fill the chip in. This is why you need to wait for a few seconds for the initial schmear of paint to get tacky and then apply MORE paint over the tacky paint until the entire section has a uniform appearance.
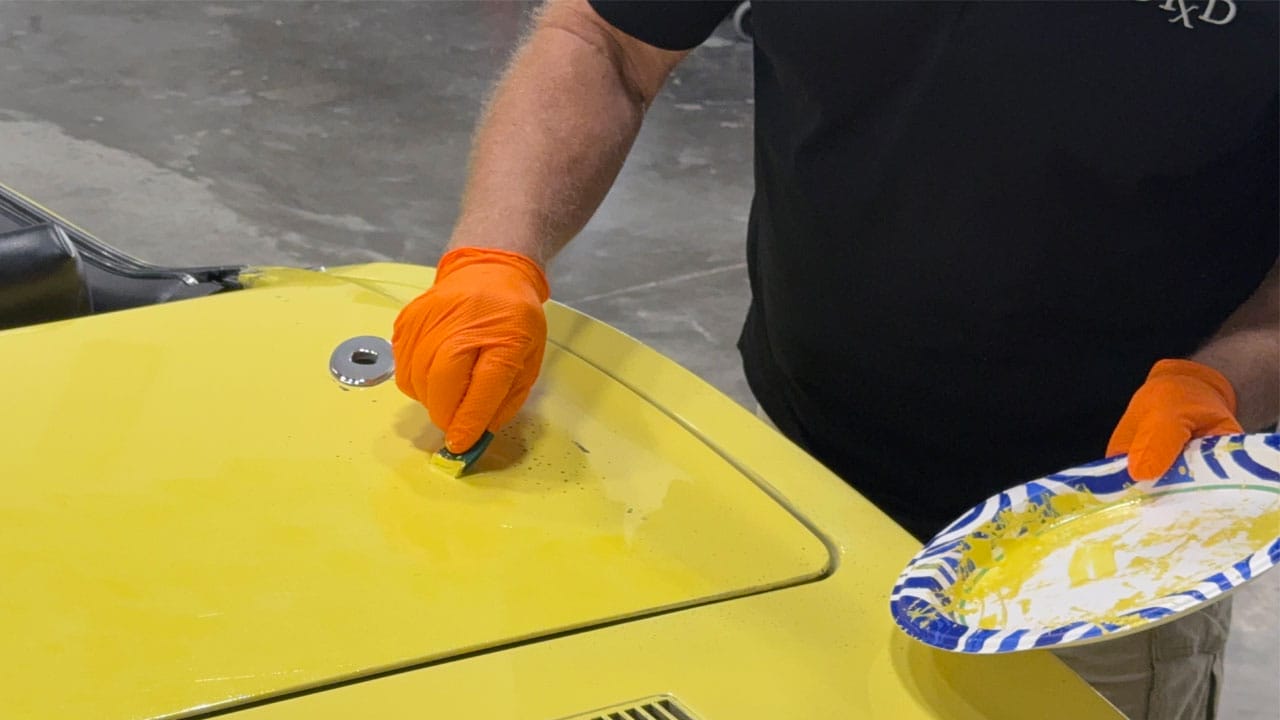
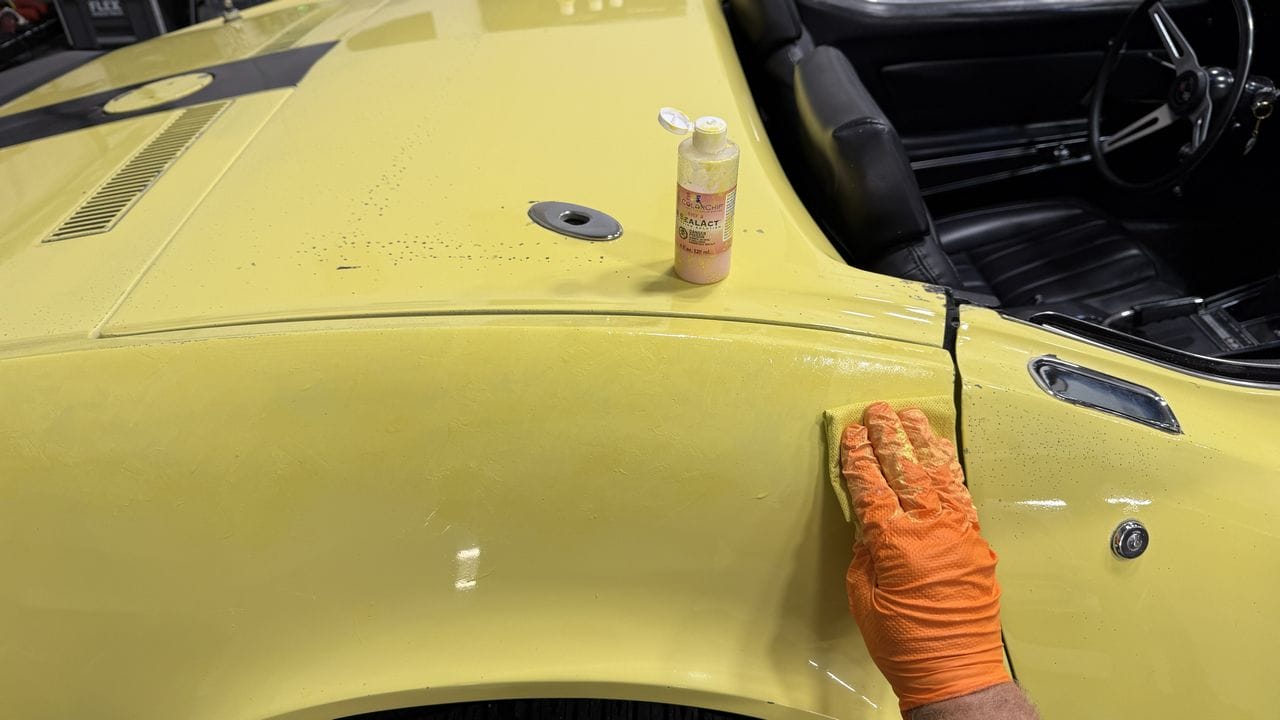
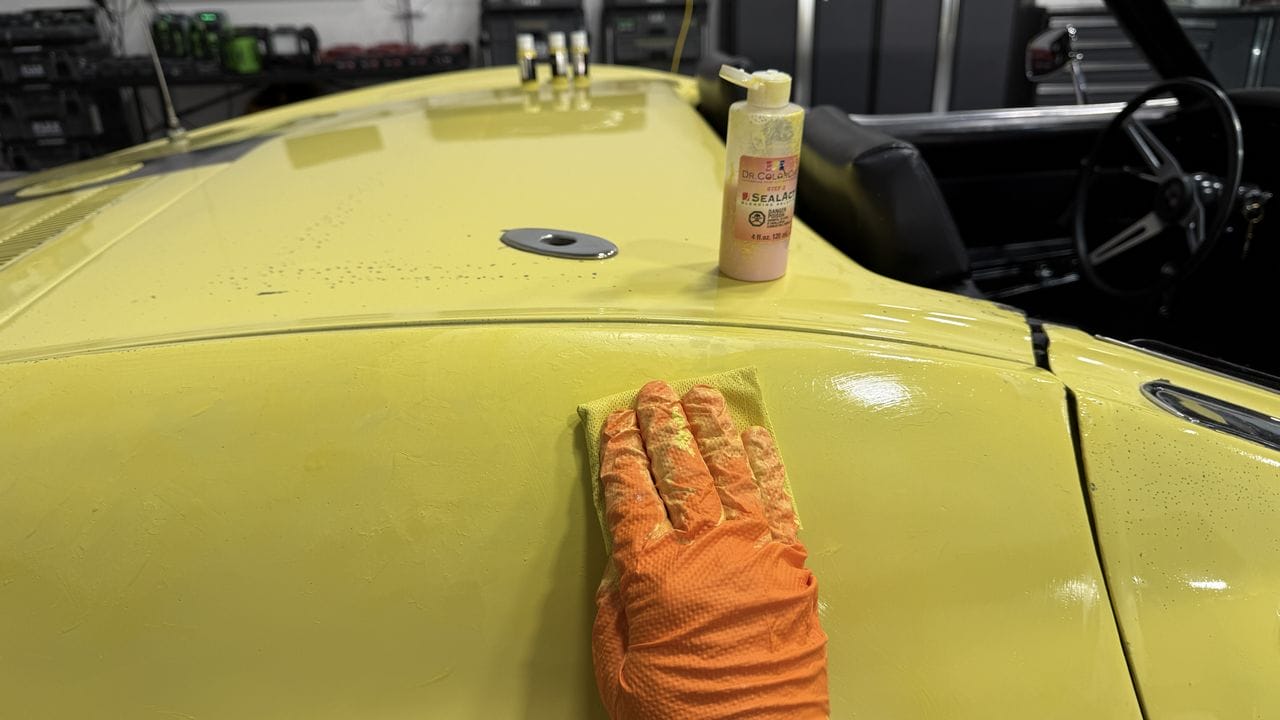
IMPORTANT: Use only light pressure and keep the wiping cloth as FLAT against the surface as possible.
The goal is to blend away the excess paint on the surrounding surface while leaving the paint inside the chips. Pressing too hard can push the cloth INTO the chips and remove the paint you just applied.
Work gently, keep the cloth flat, and add more SealAct as needed.
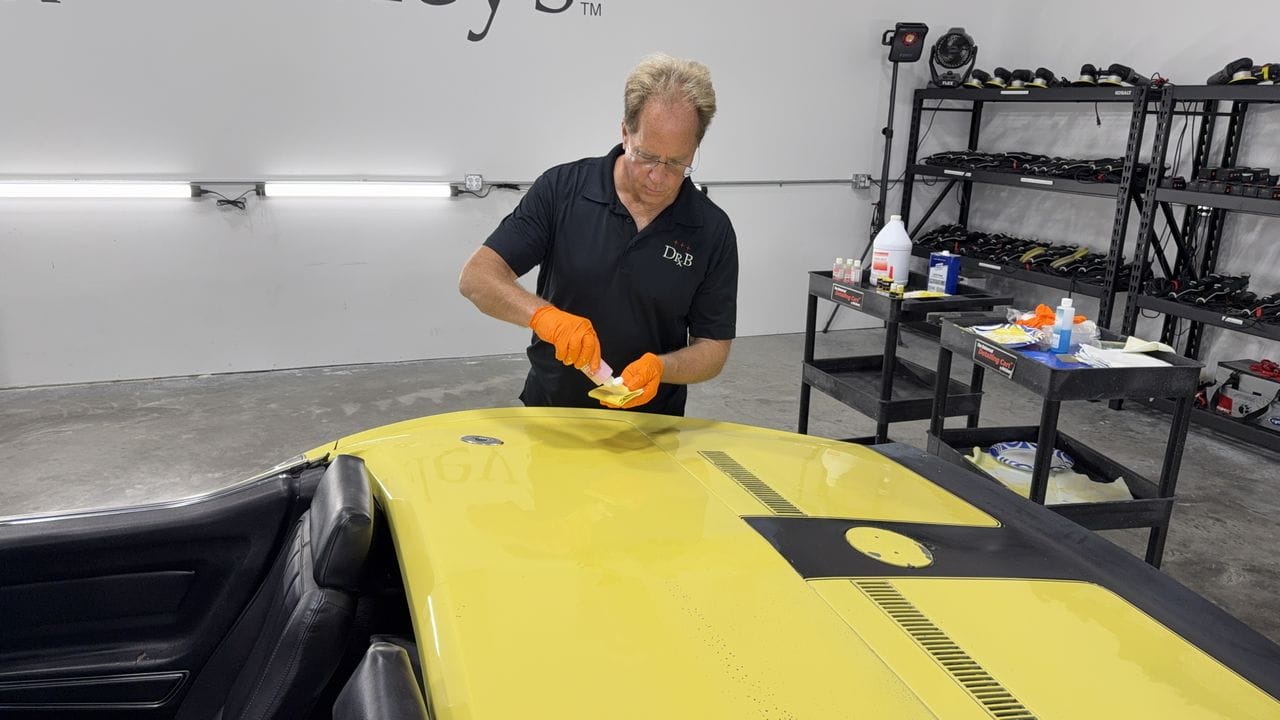
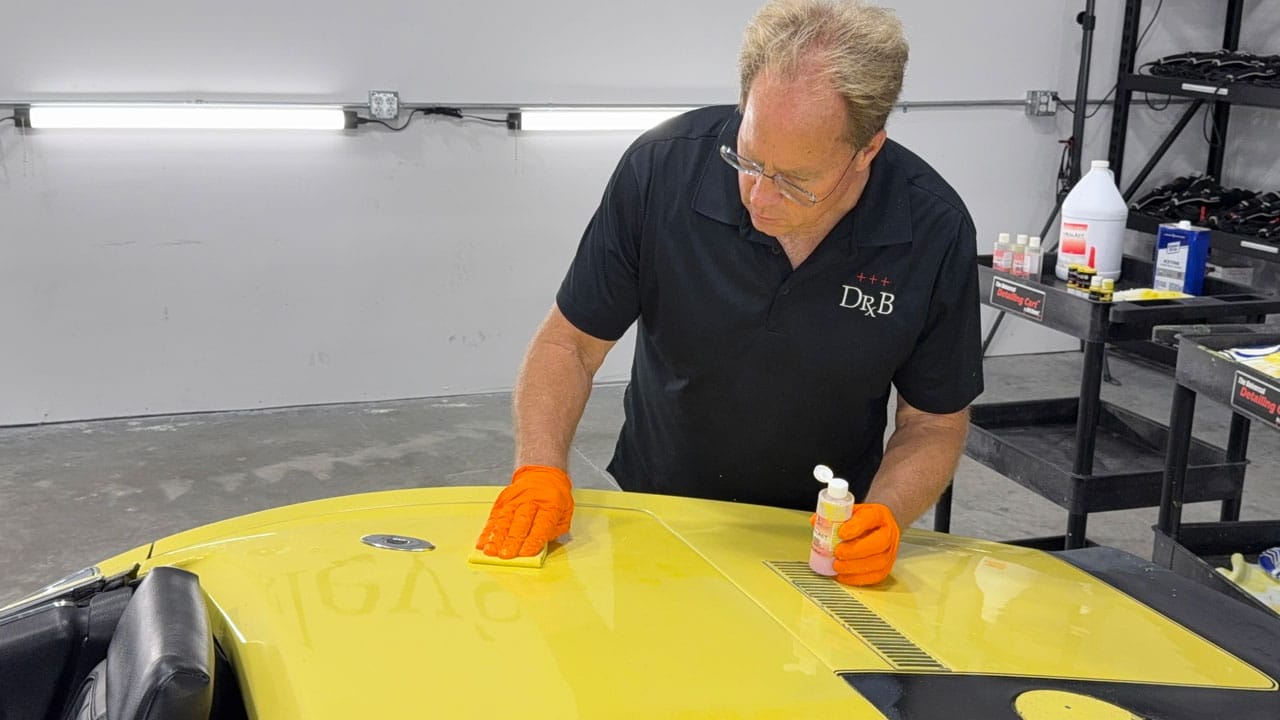
See how I’m using 4 fingers, laying flat against the wiping cloth when rubbing over the paint? It’s a small technique tip – but super important.
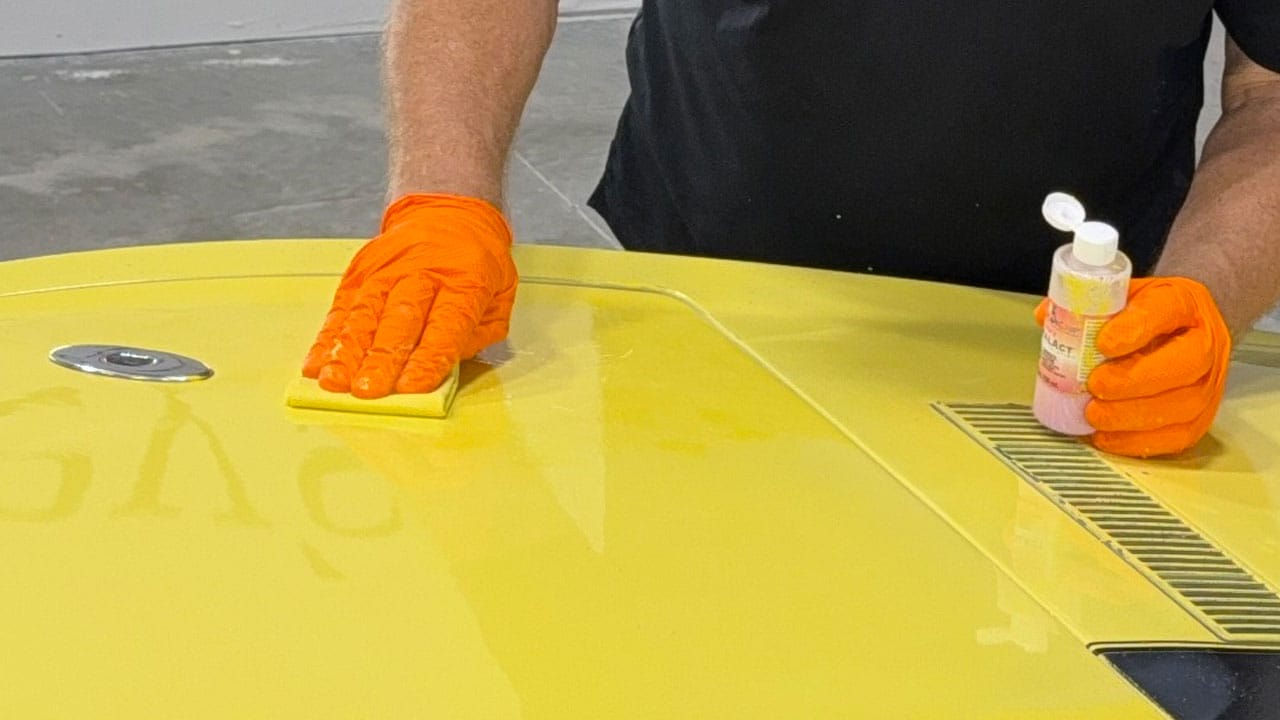
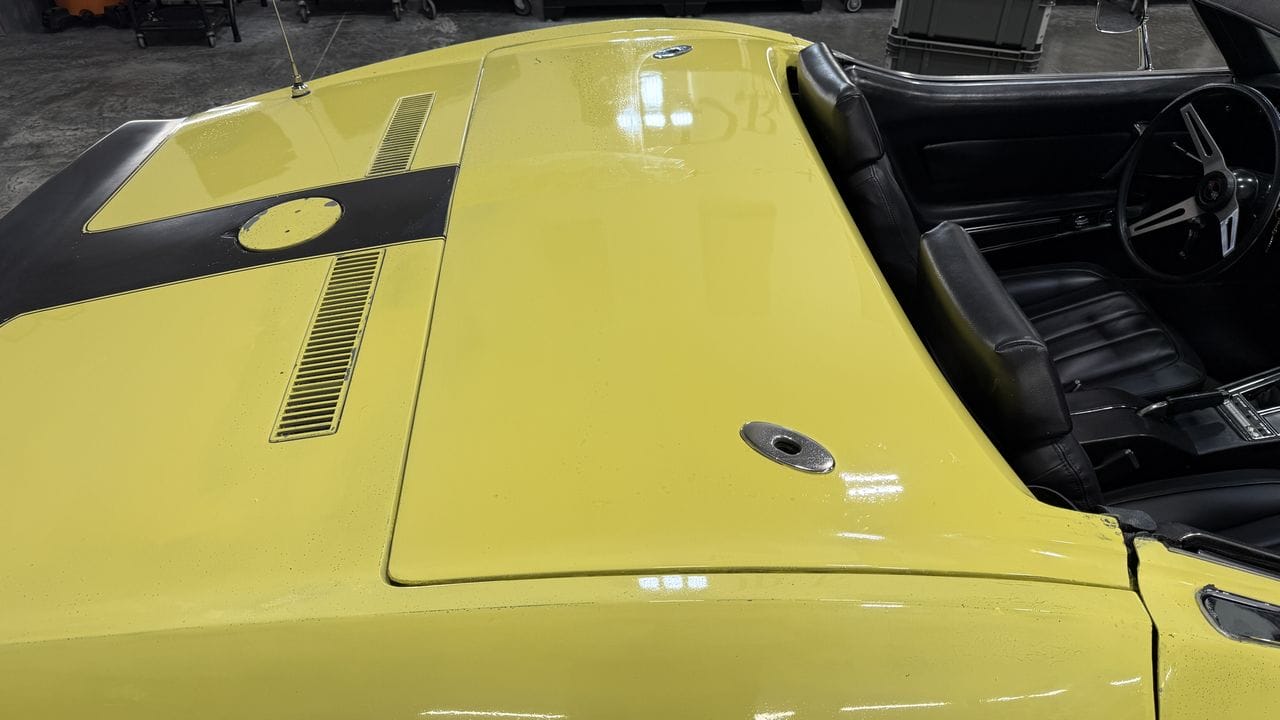
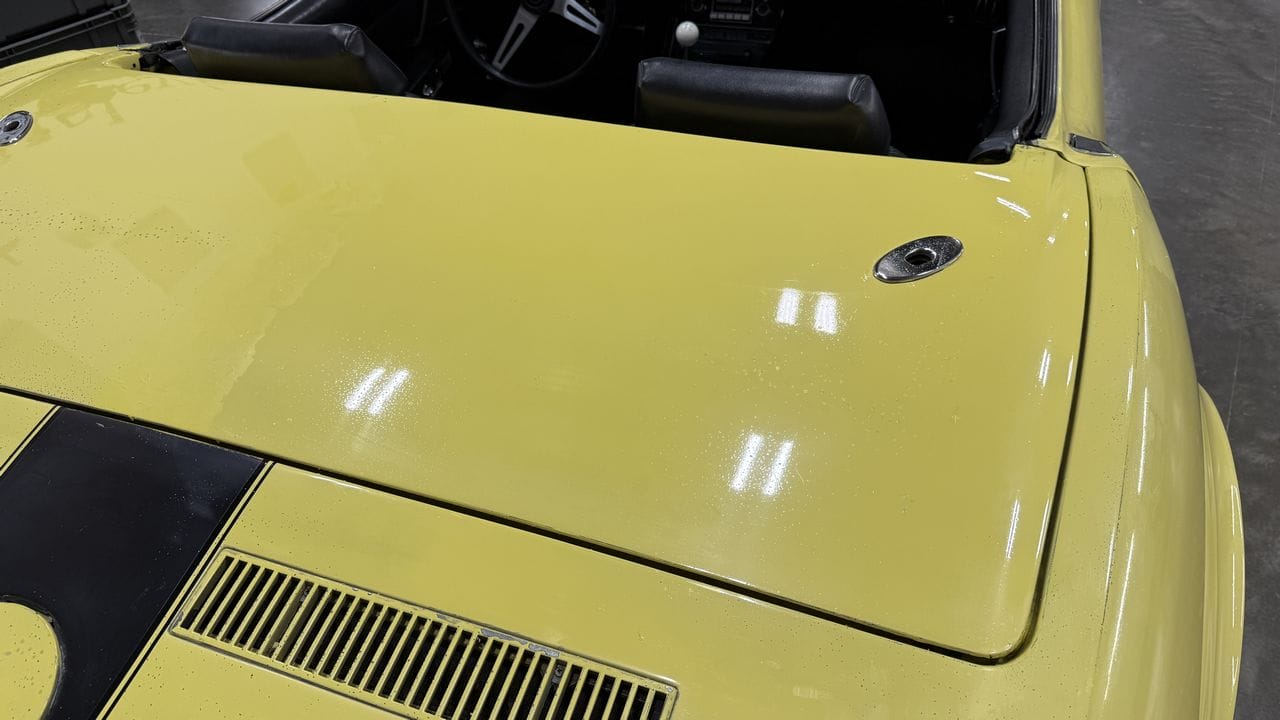
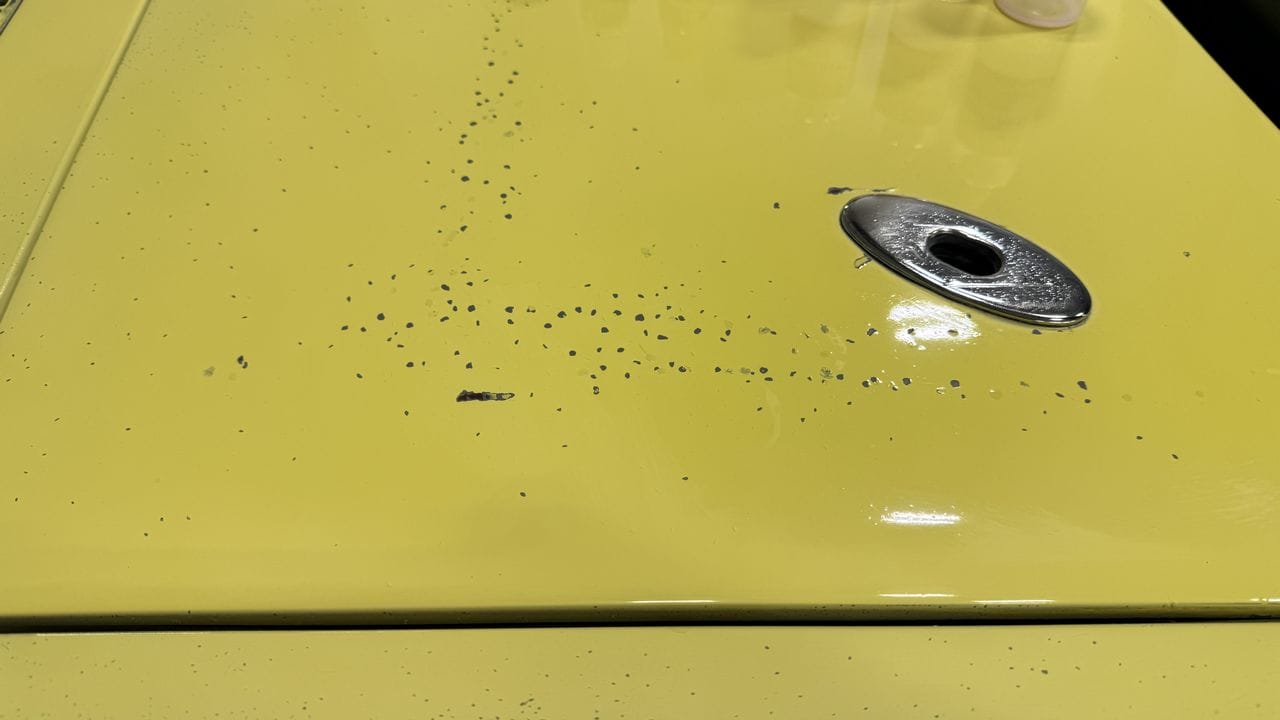
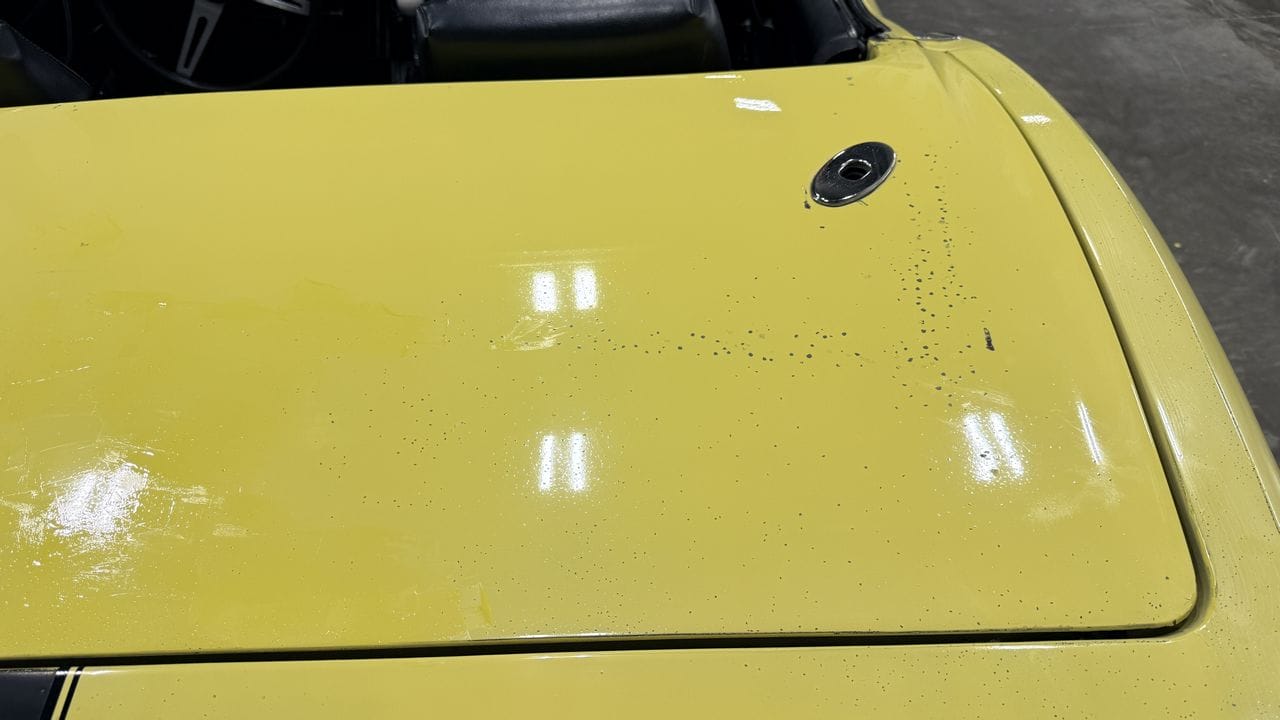
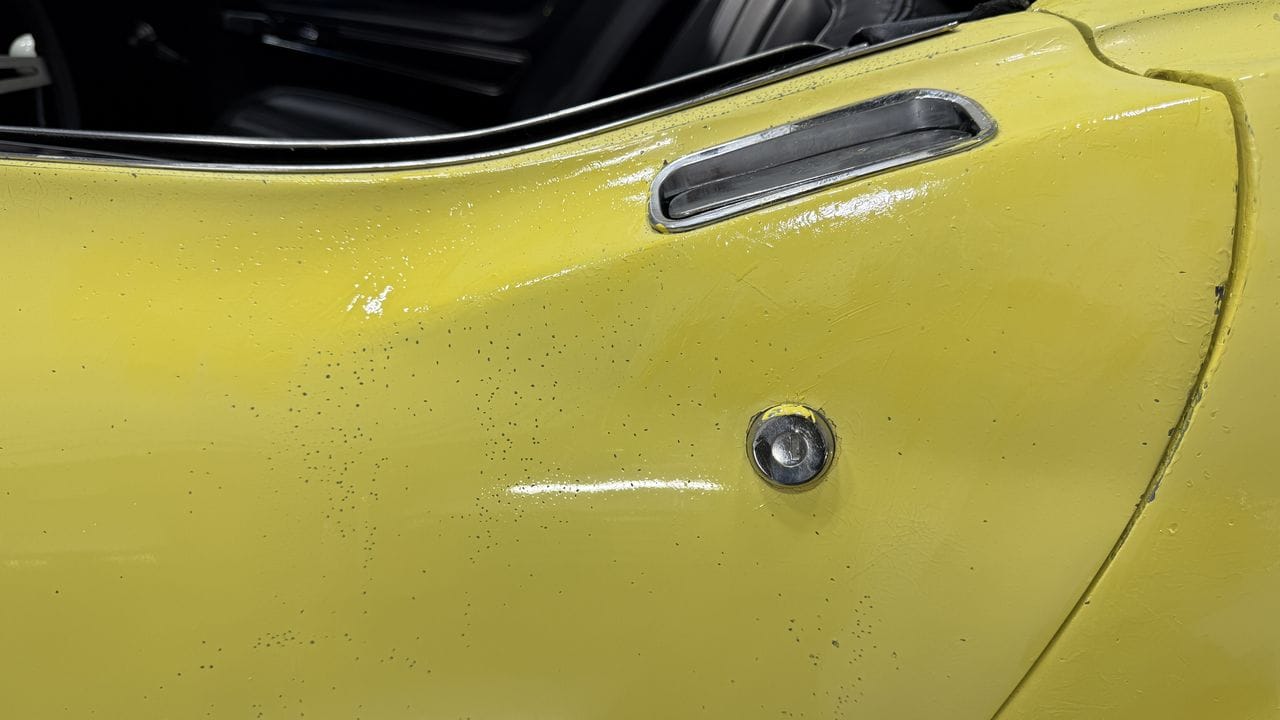
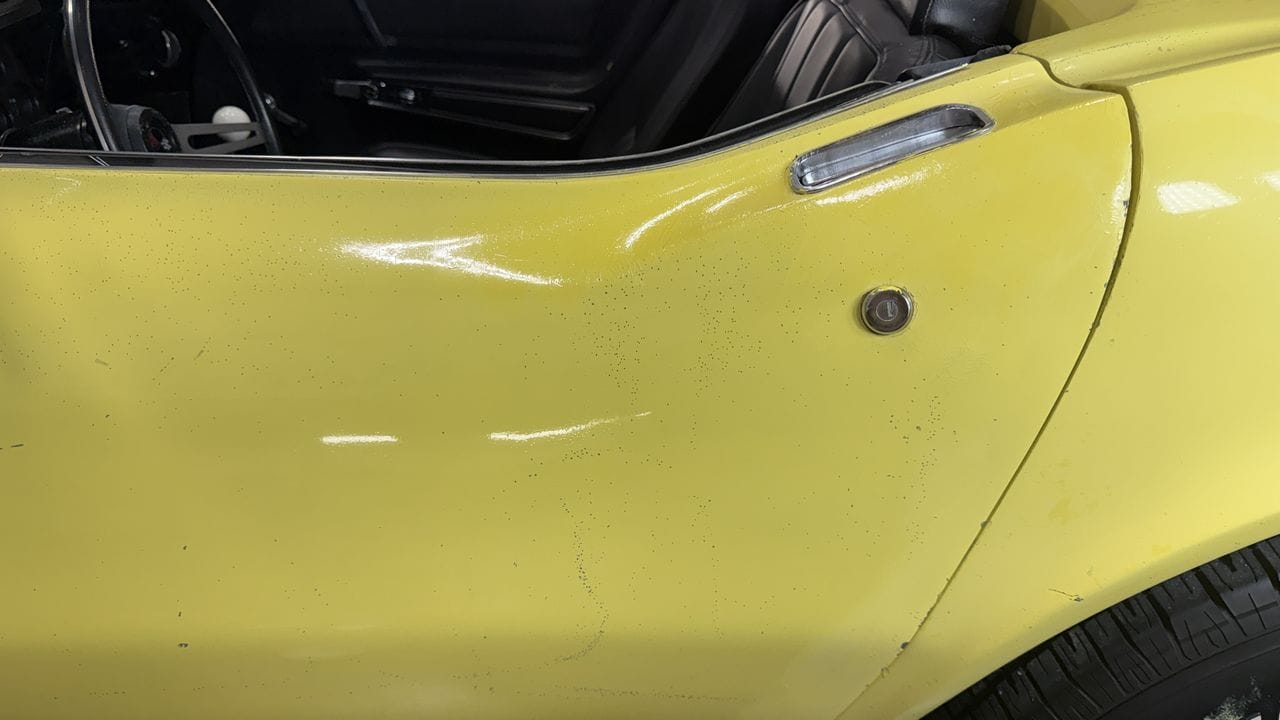
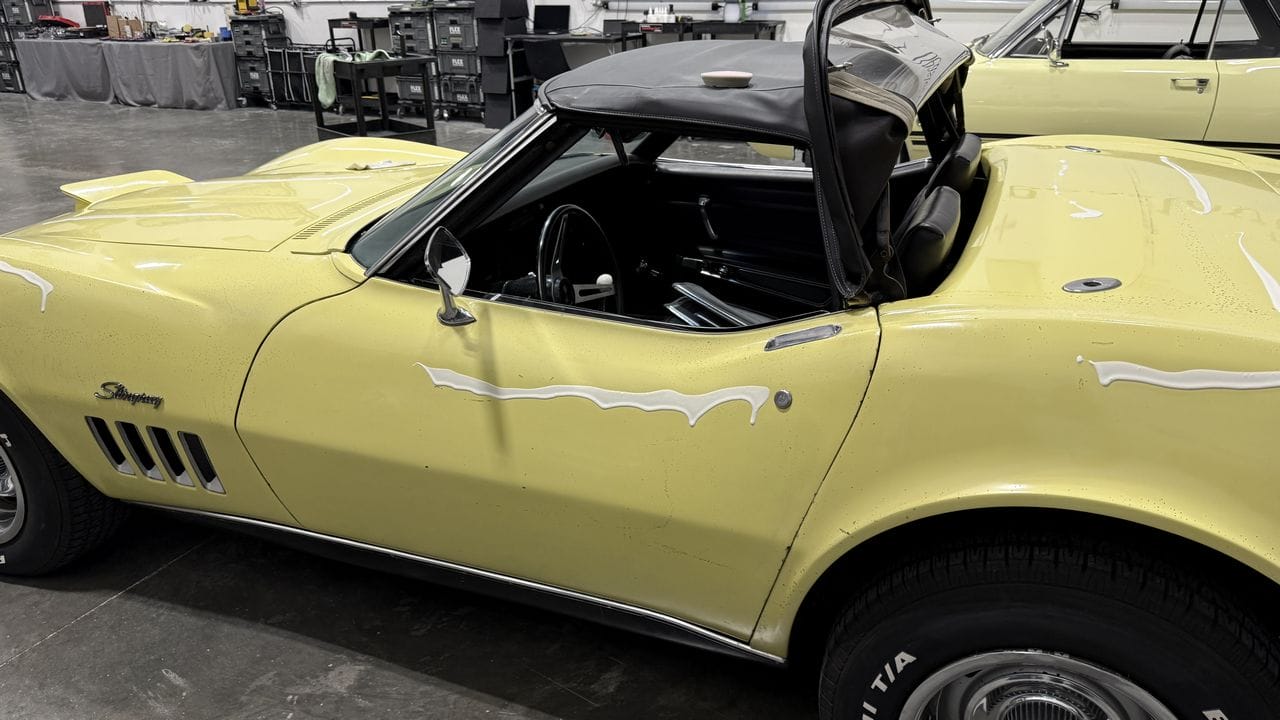
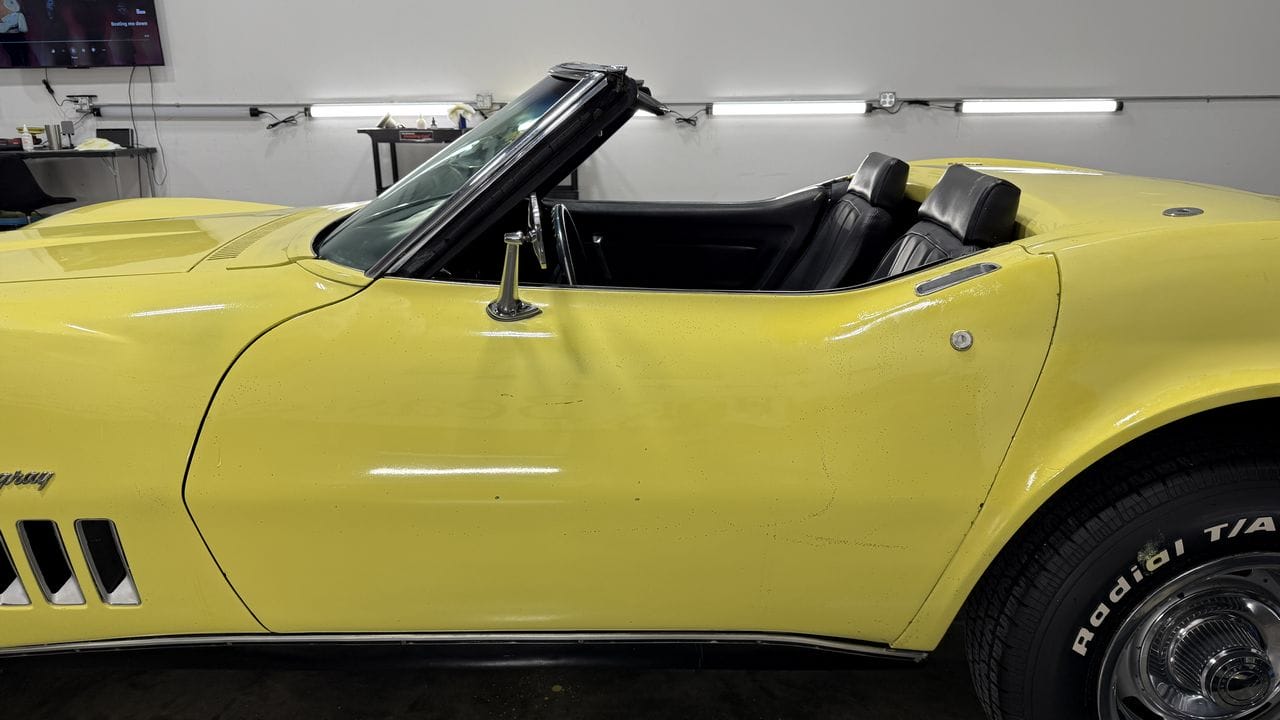
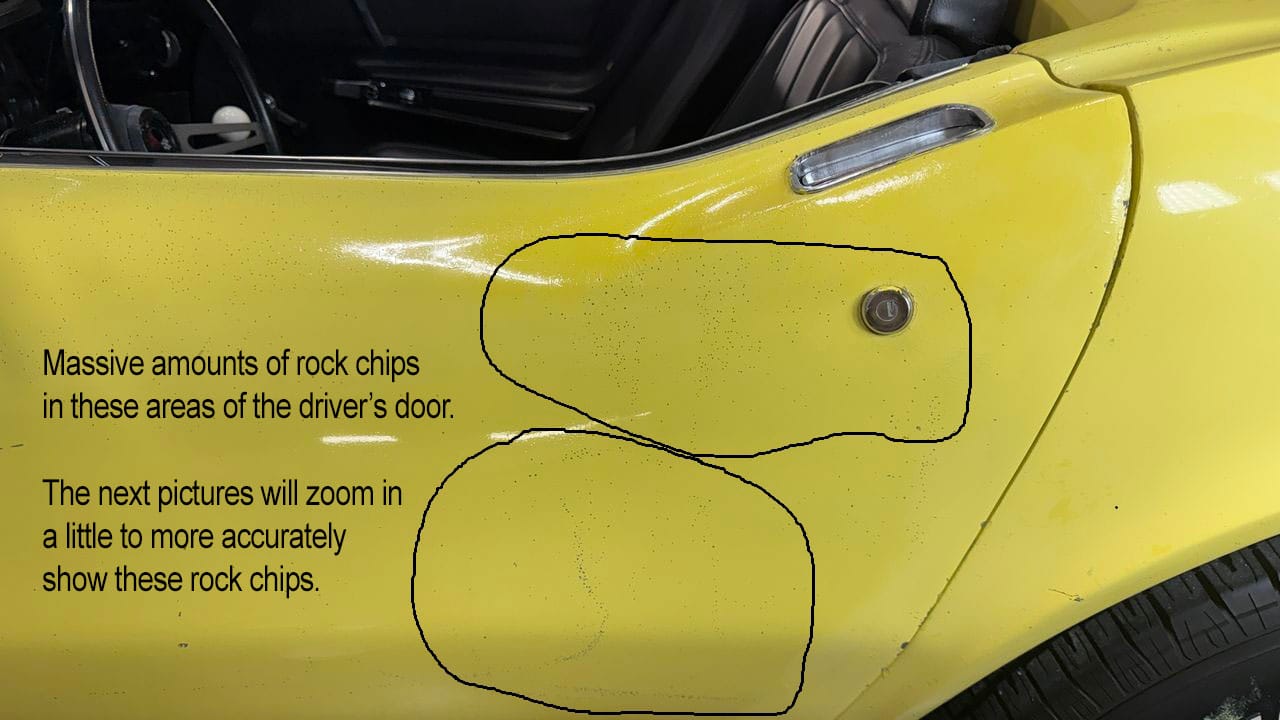
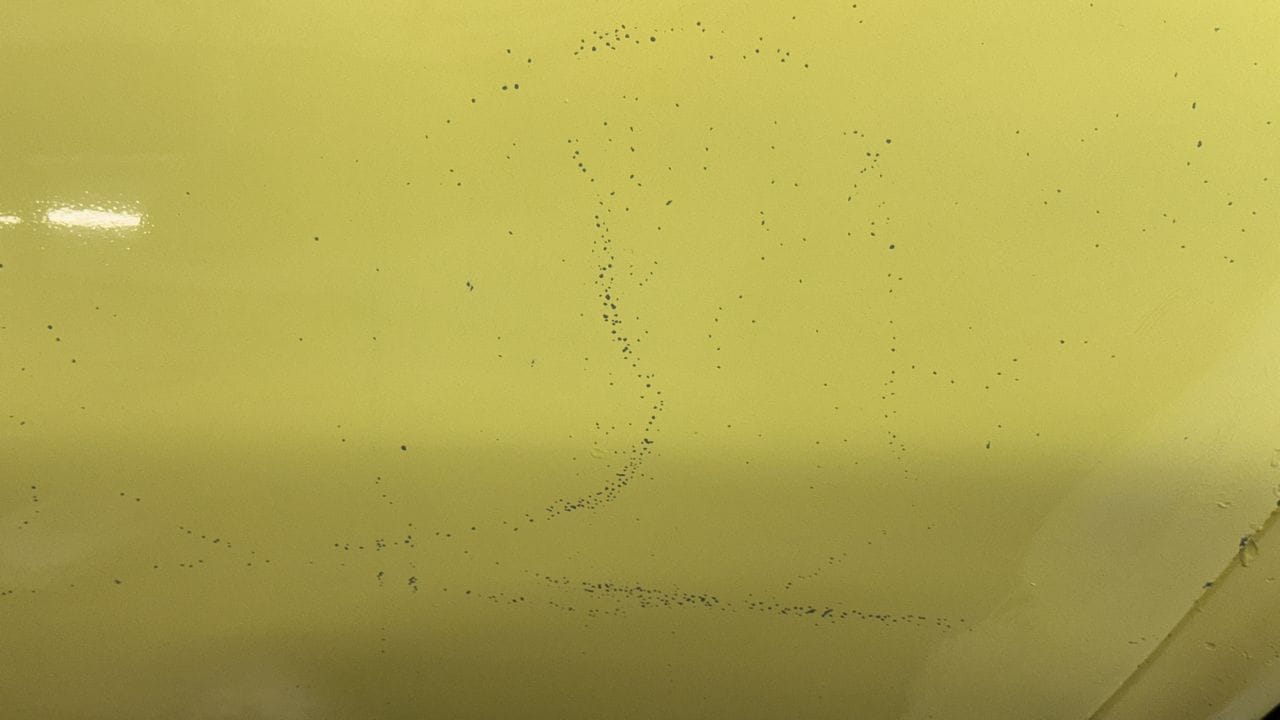
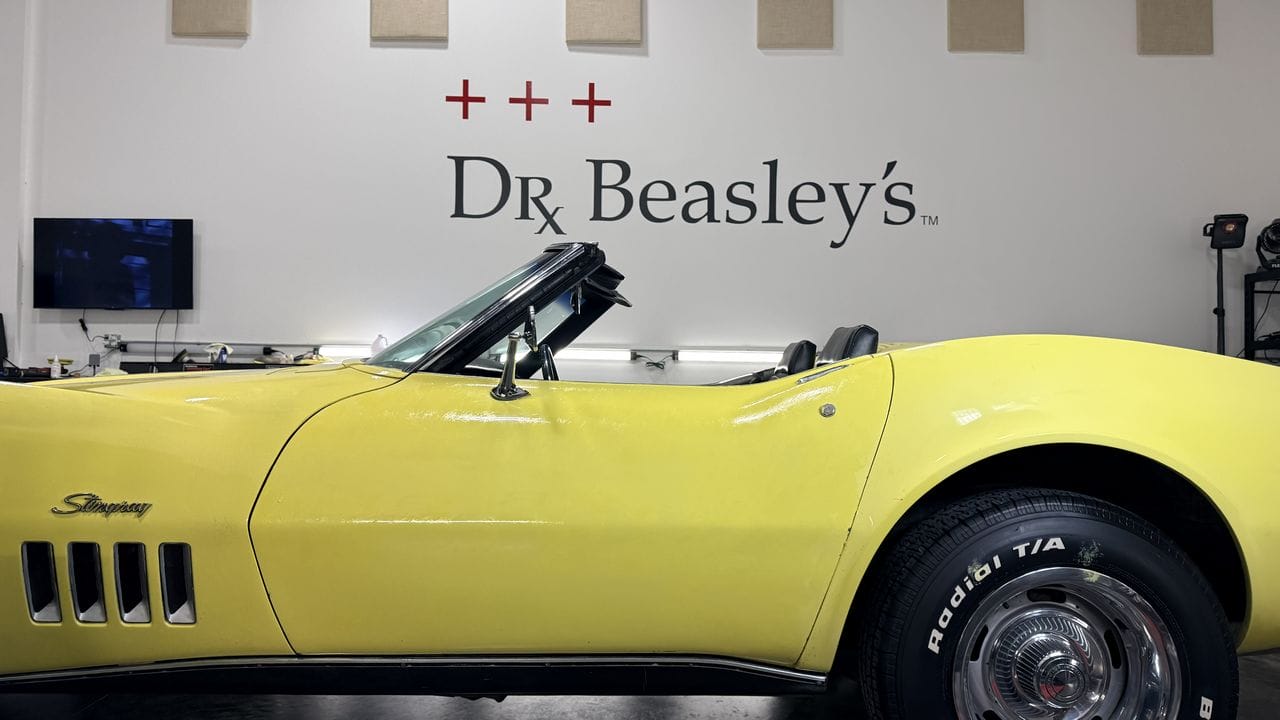
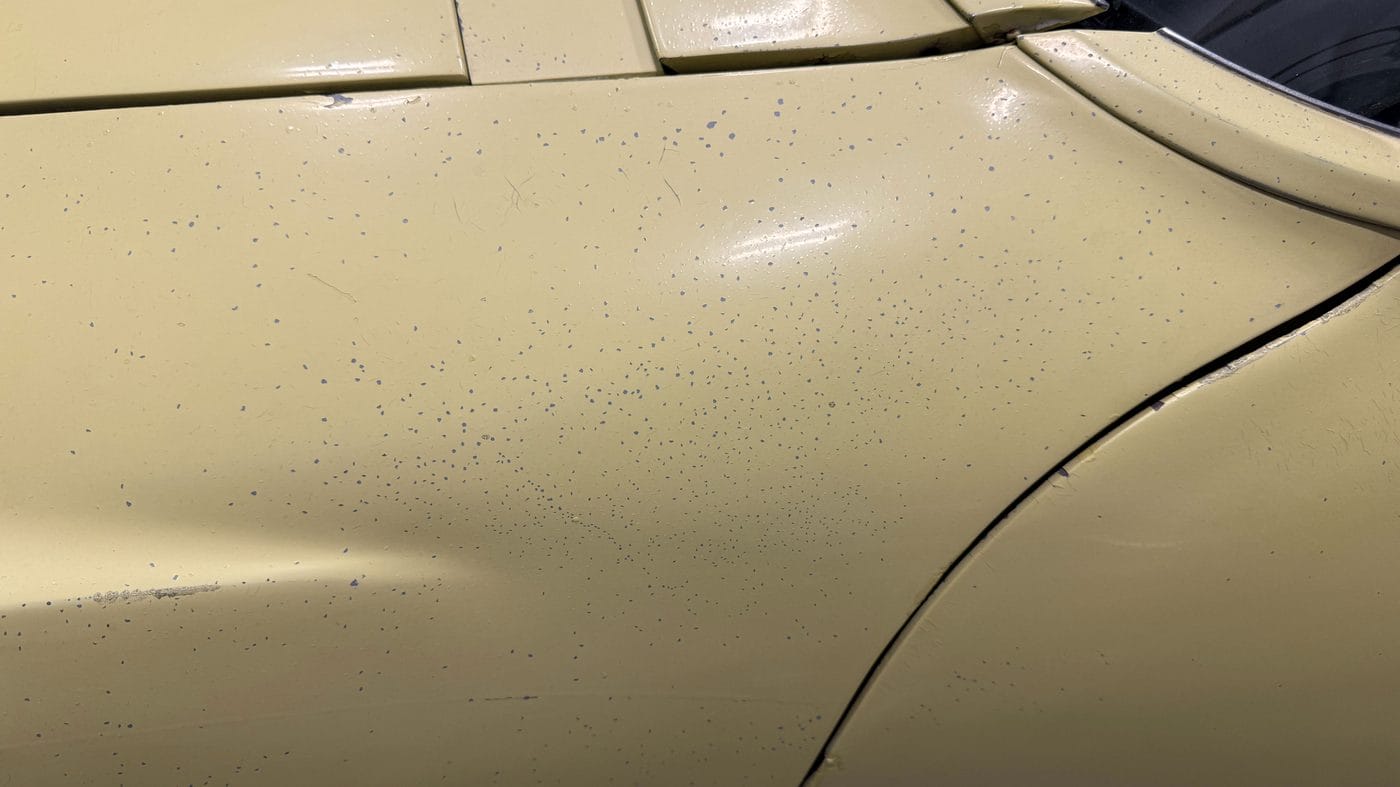
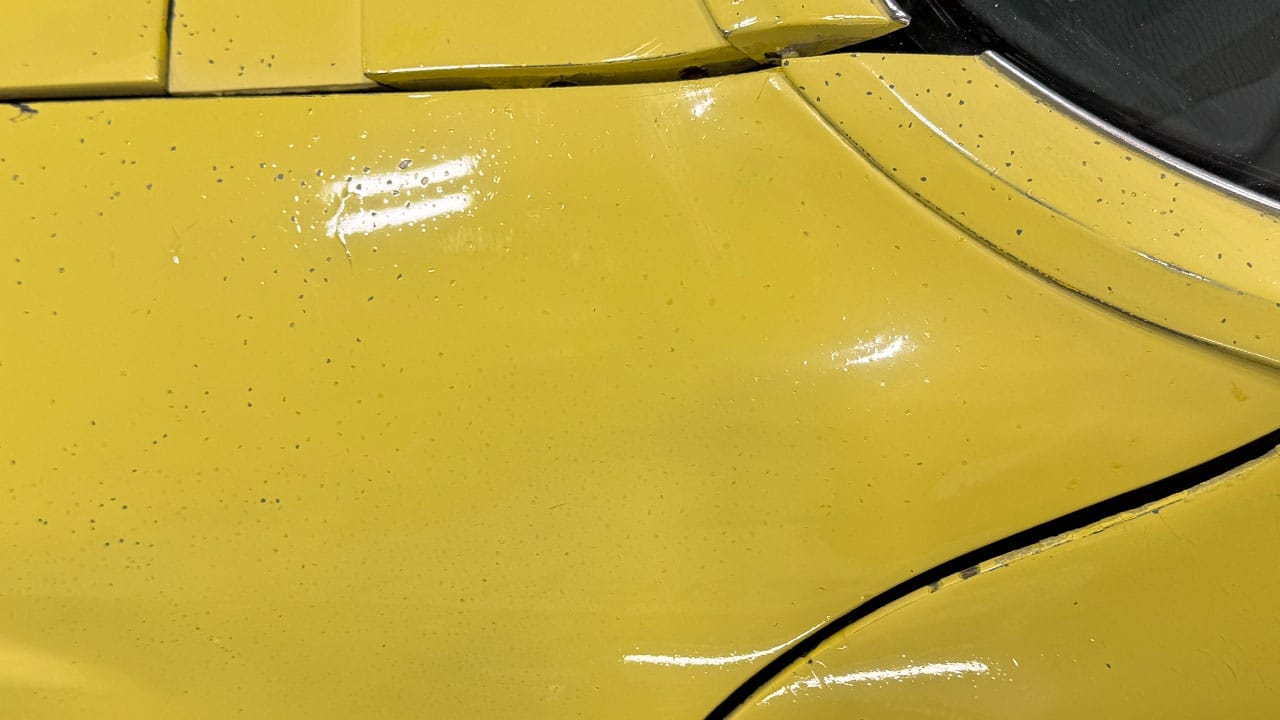
The below picture is a context picture to show you that we’re working on the driver’s door. The pictures that follow photo-document the massive amount of rock chips in the piant on the driver’s door.
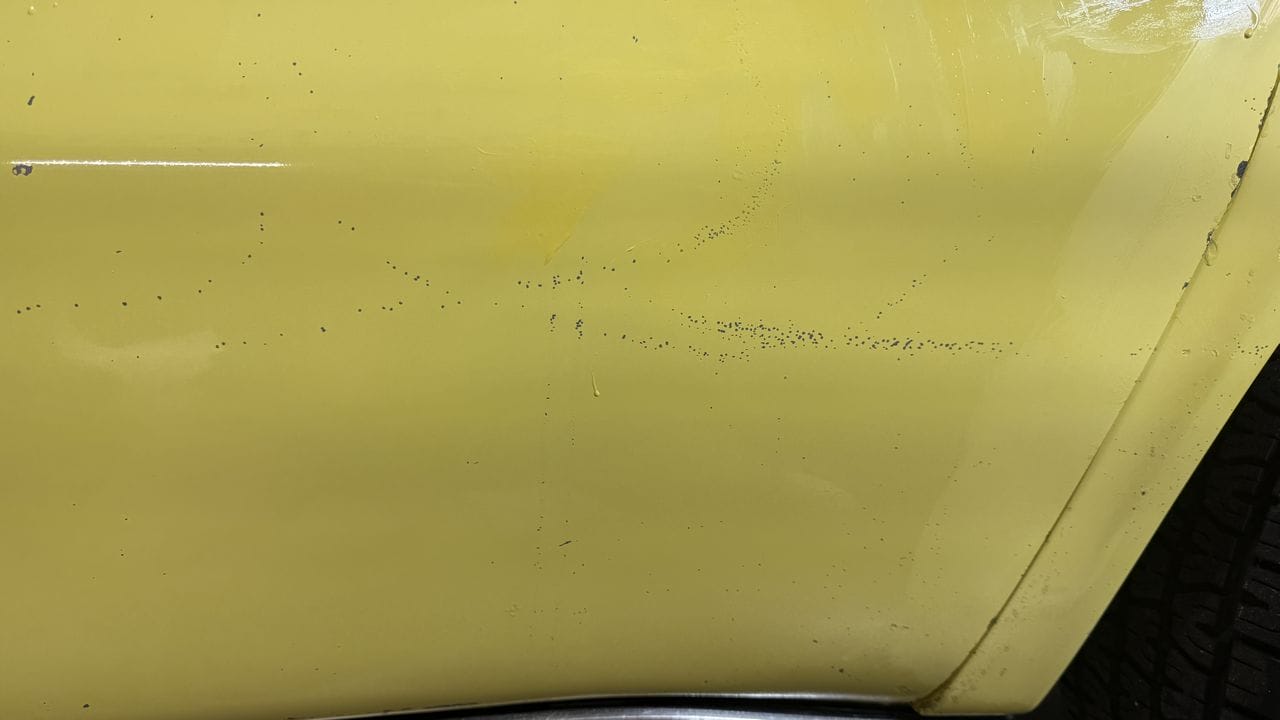
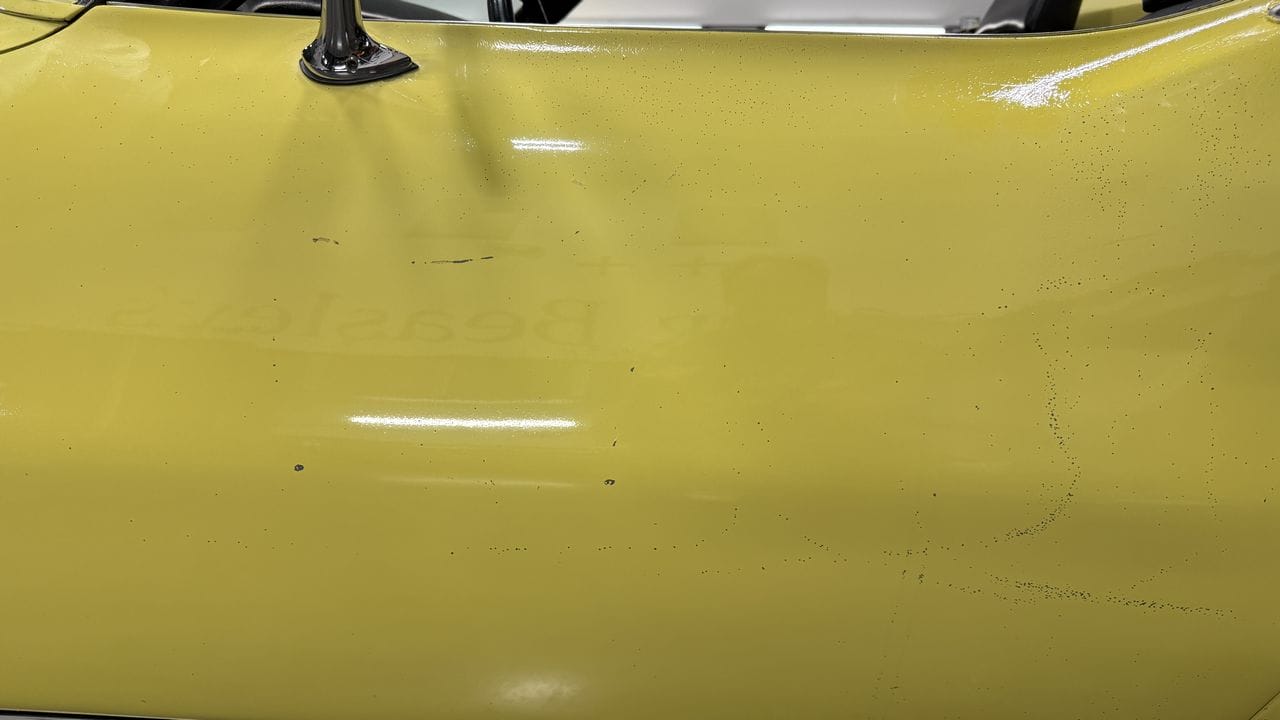
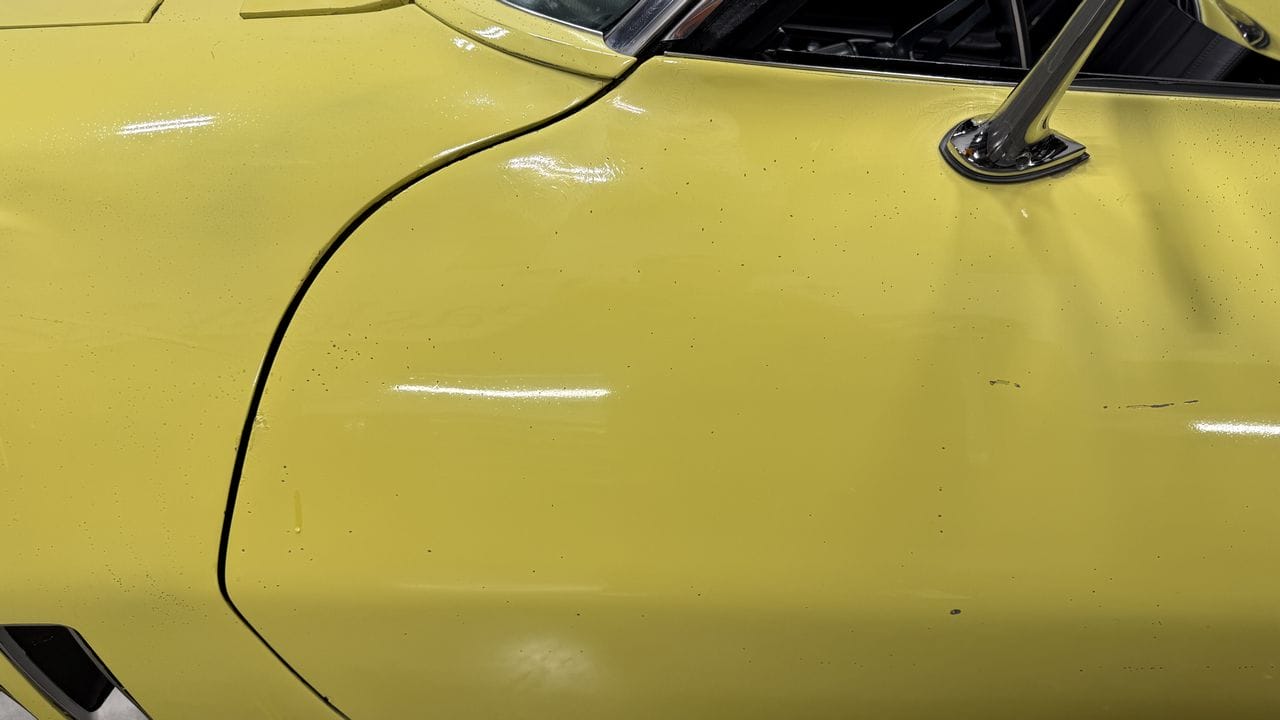
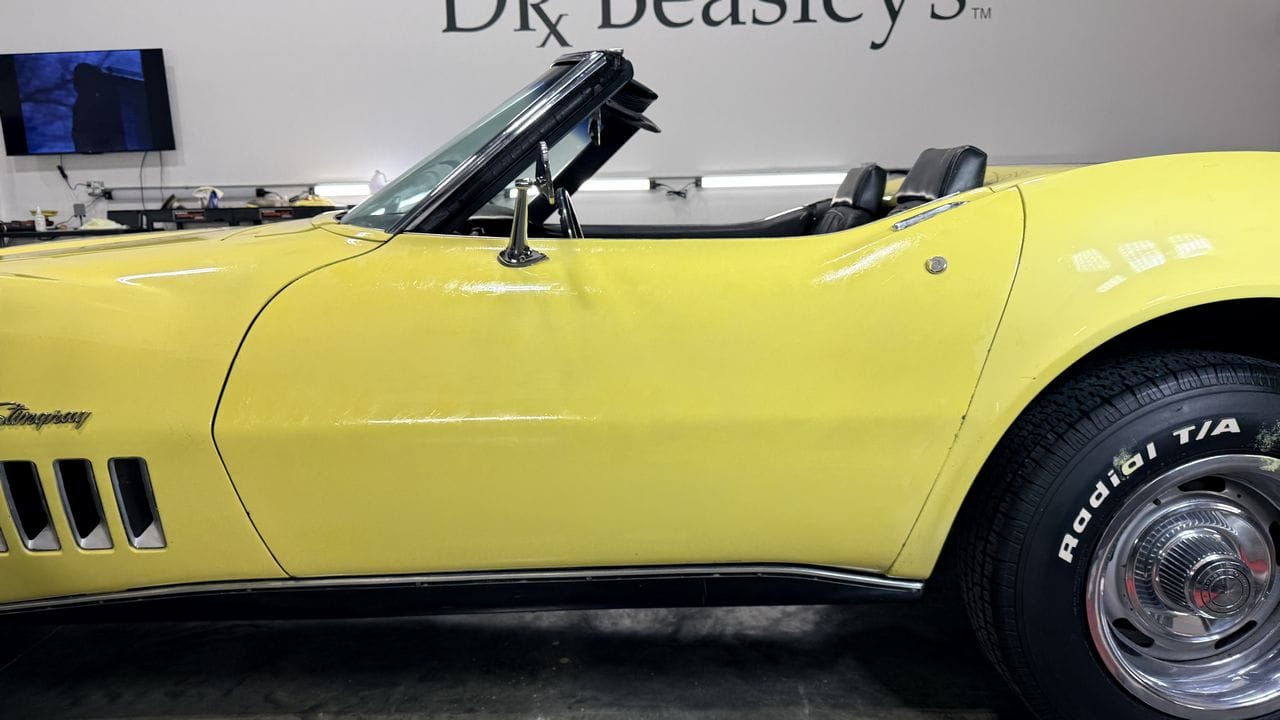
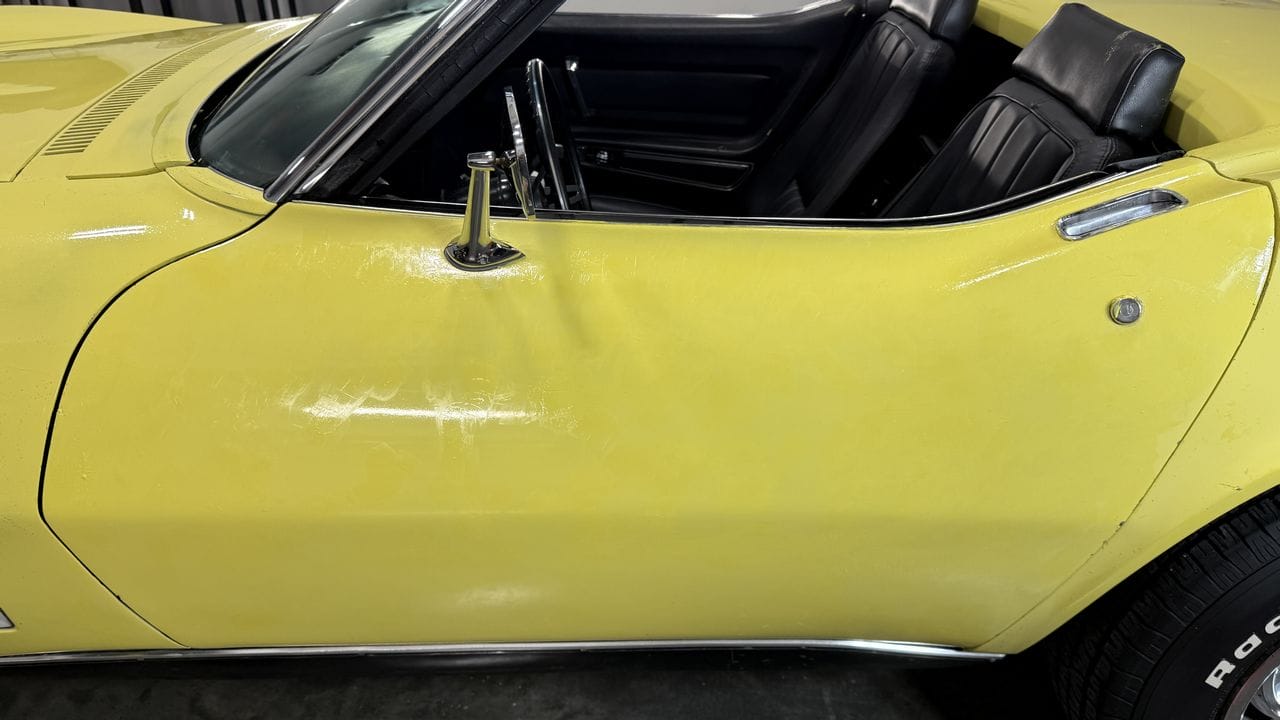
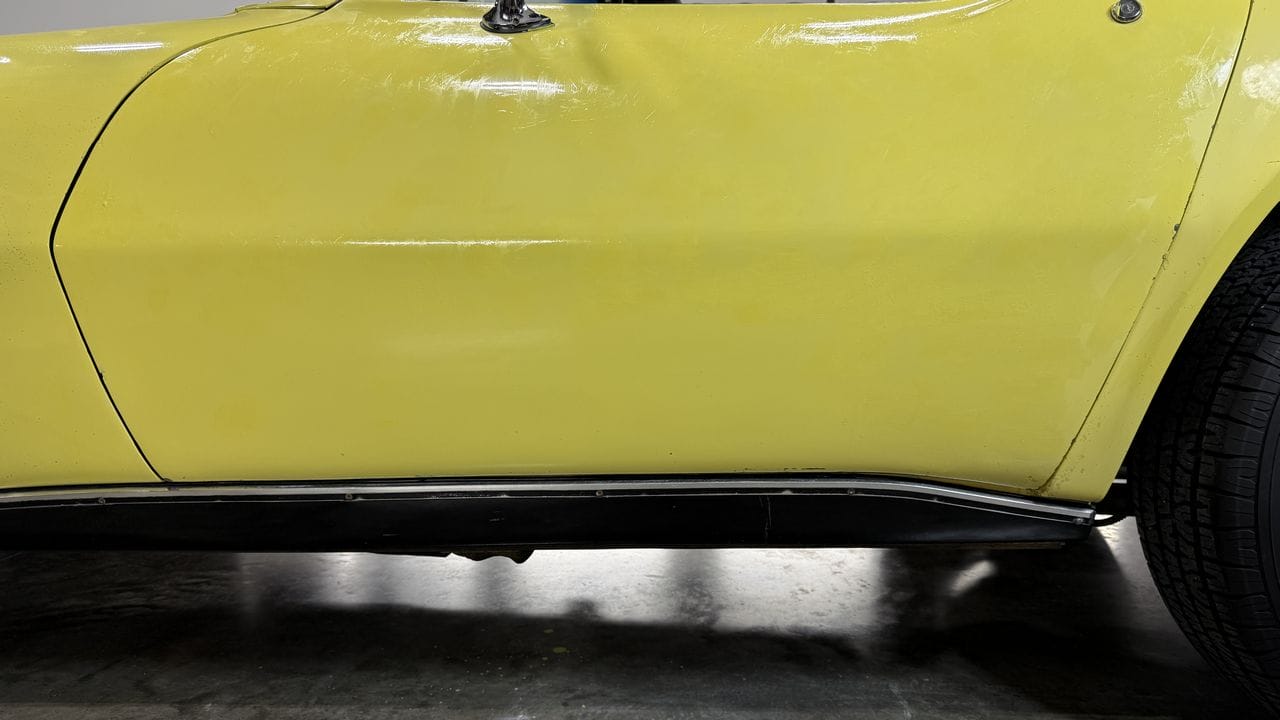
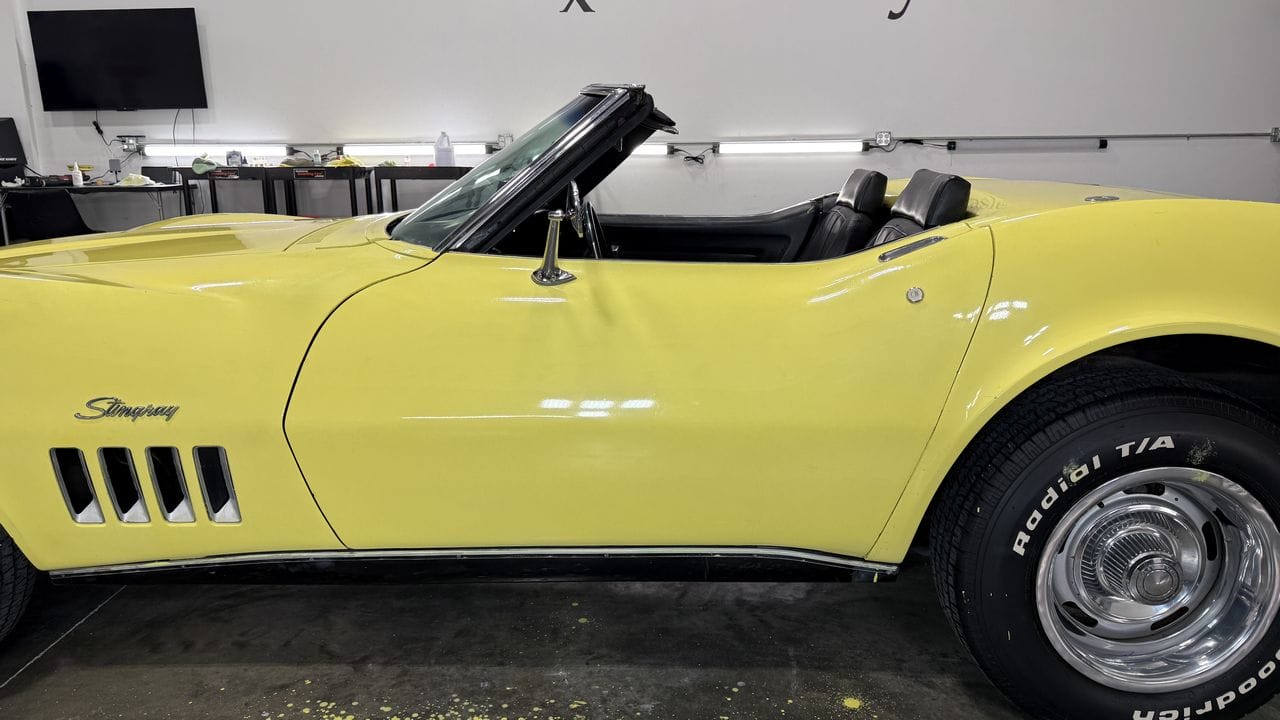
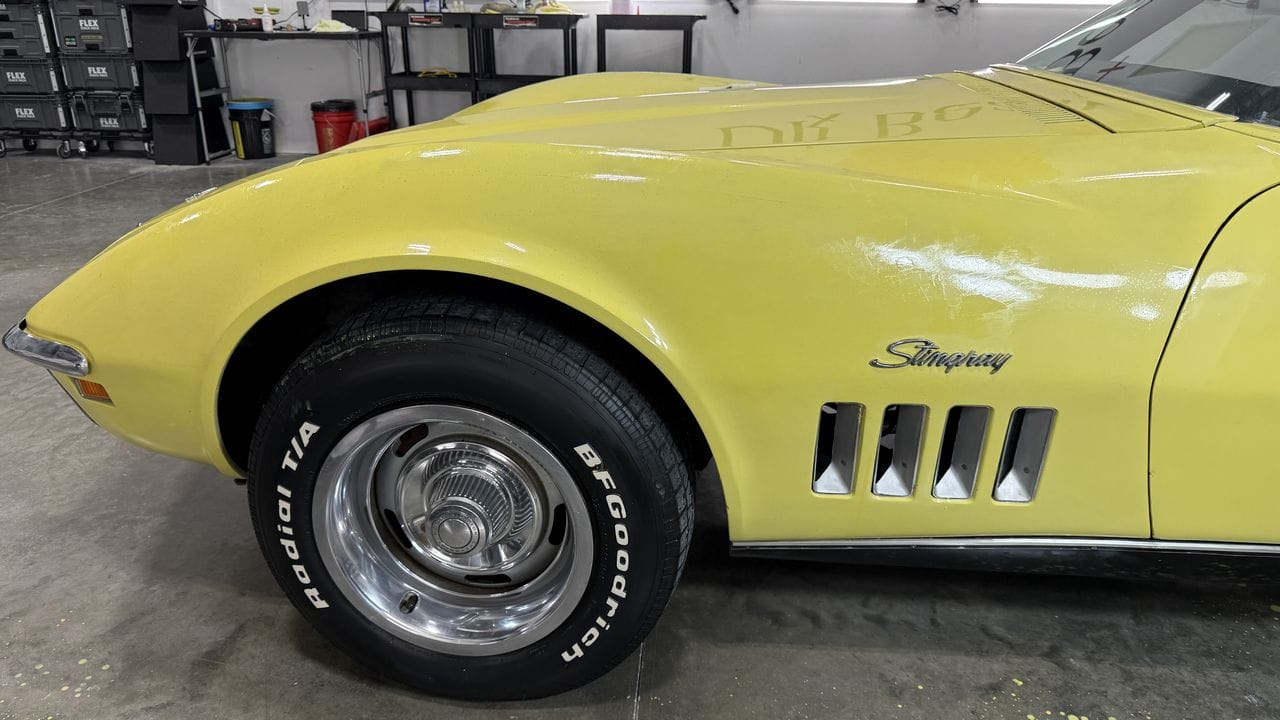
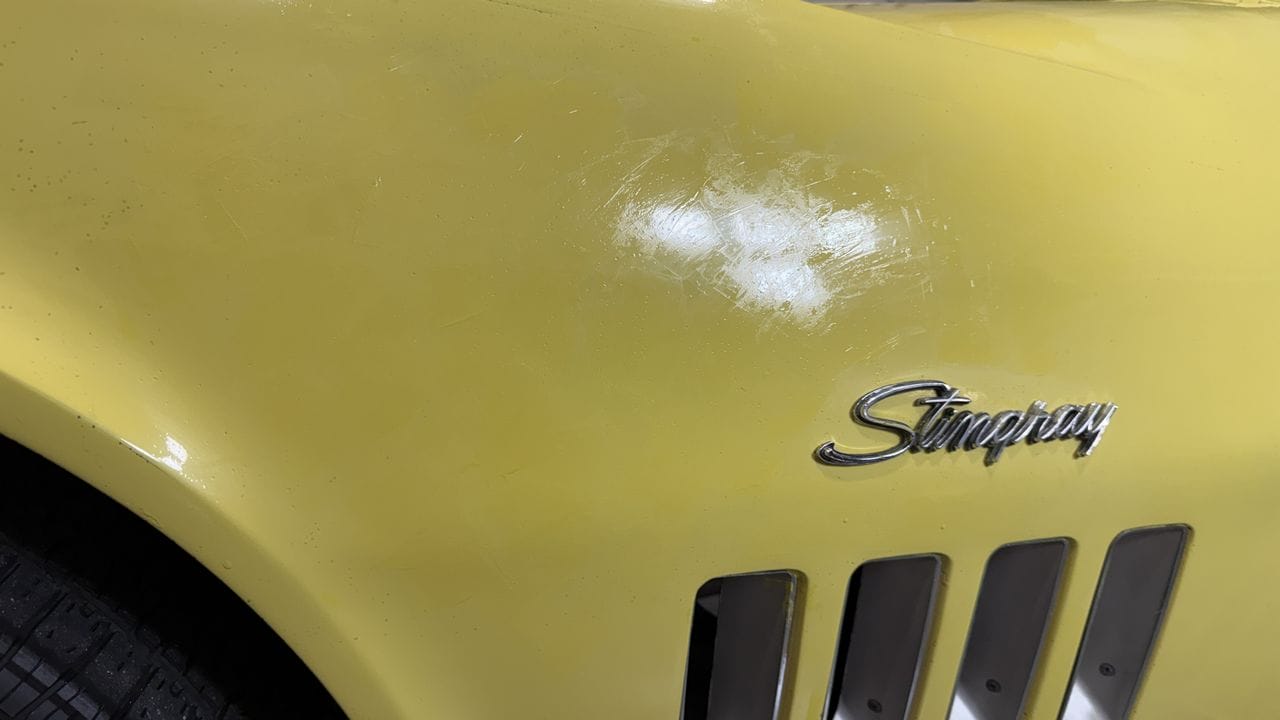
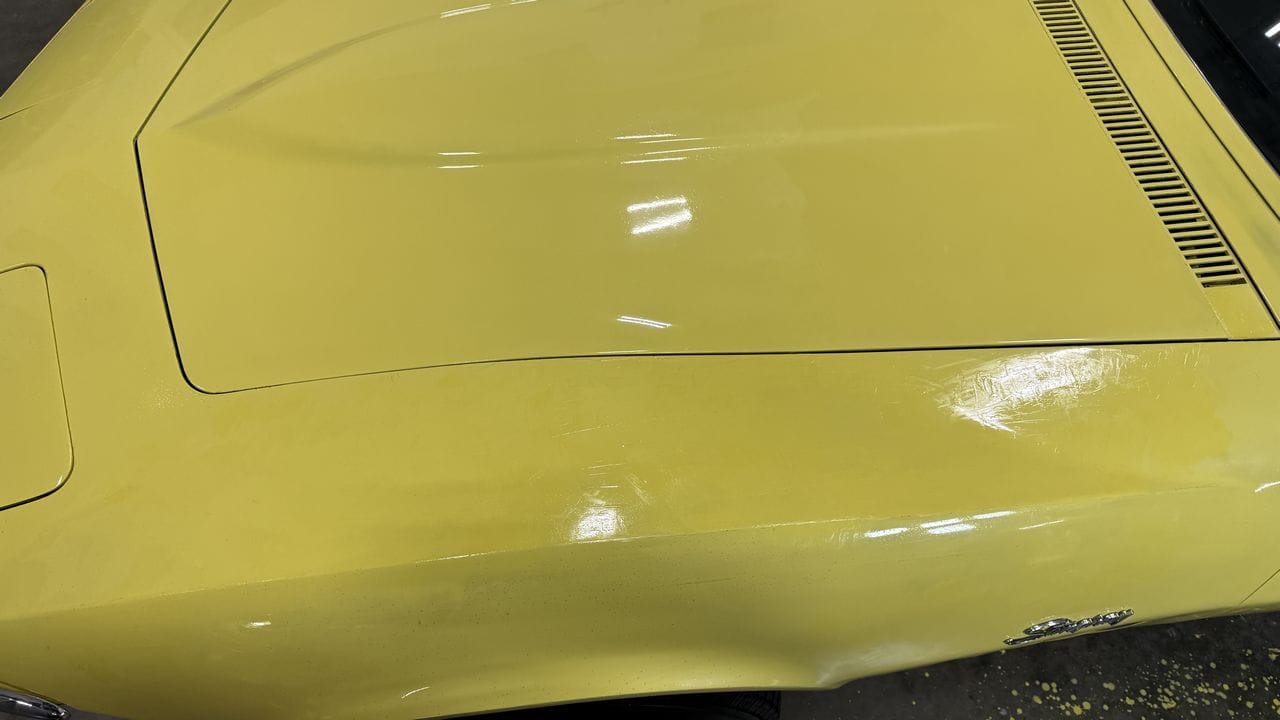
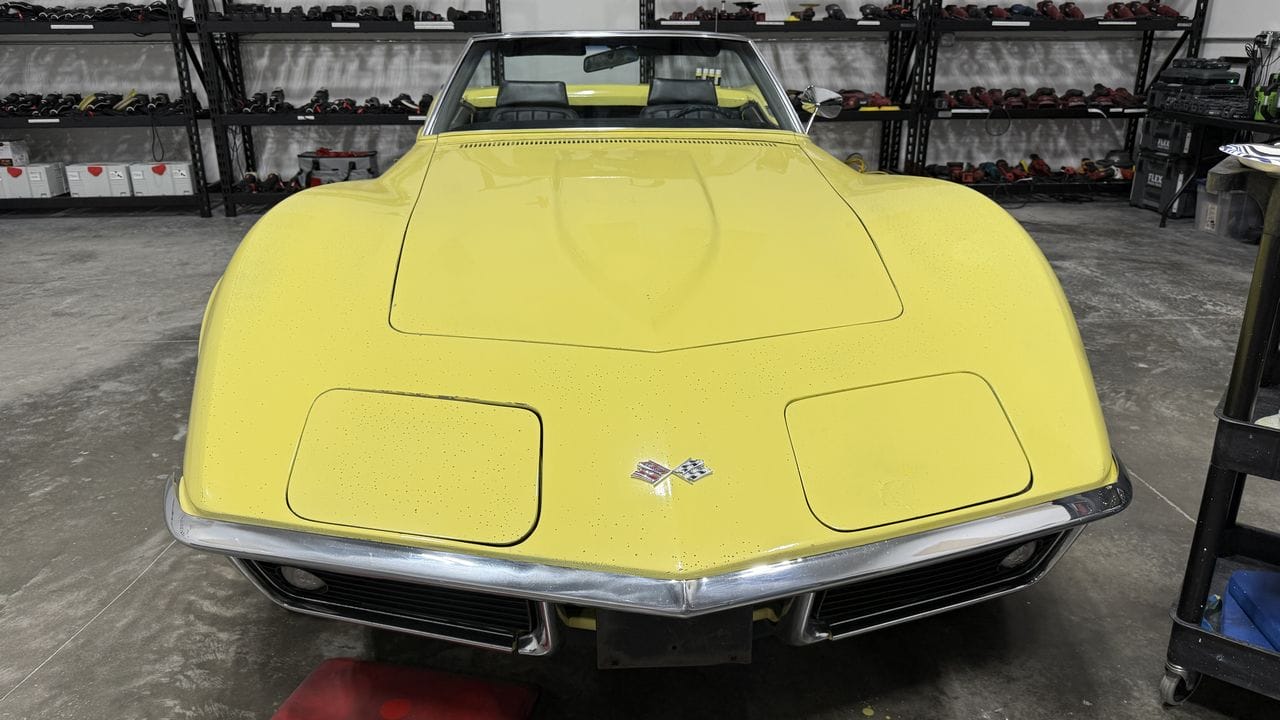
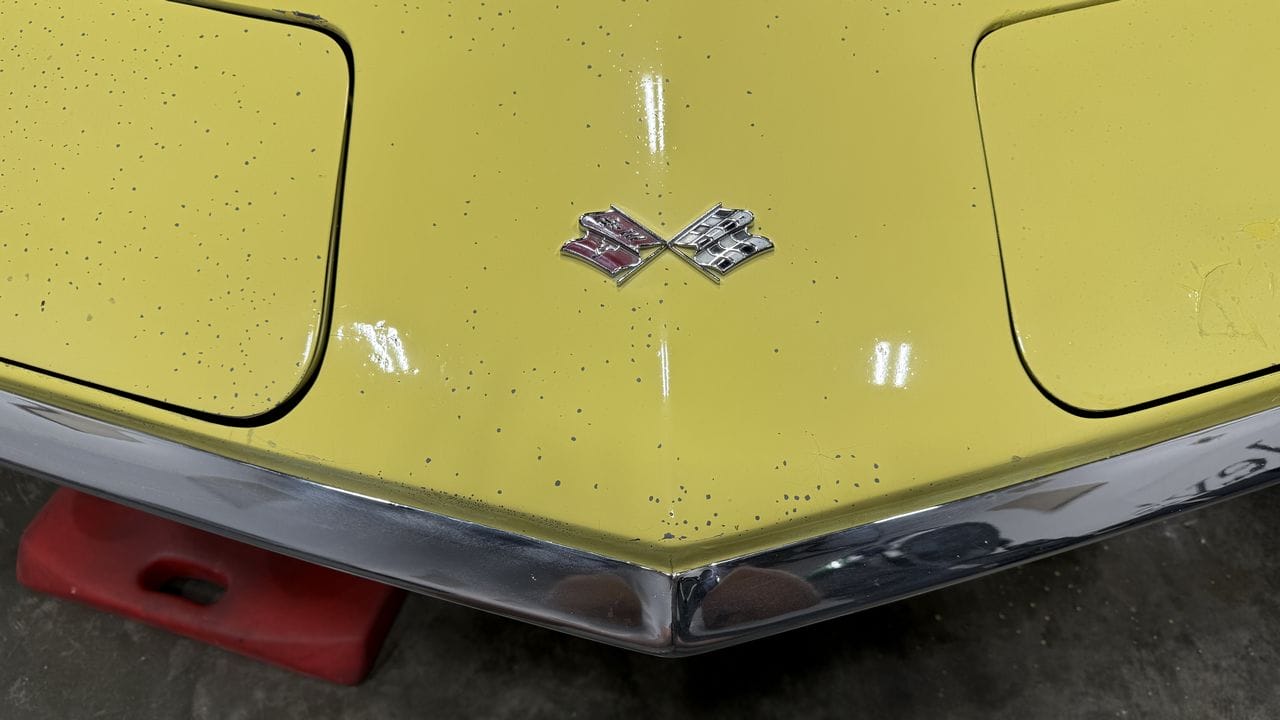
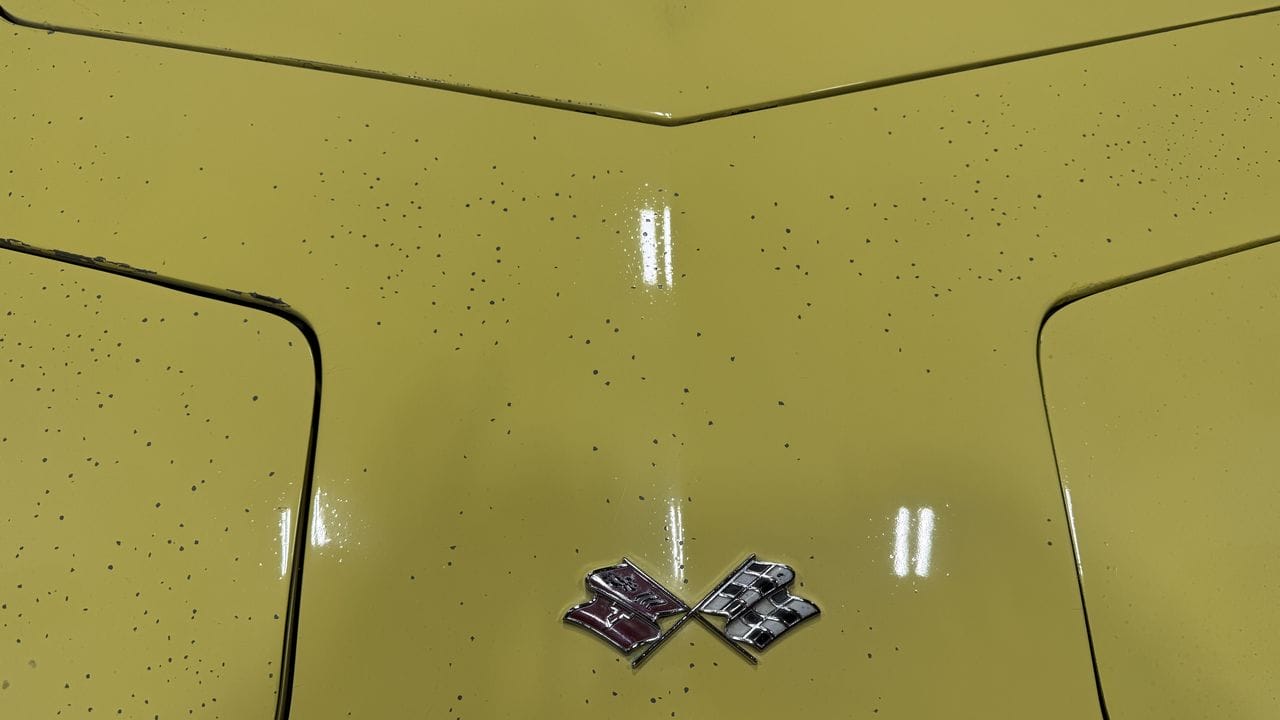
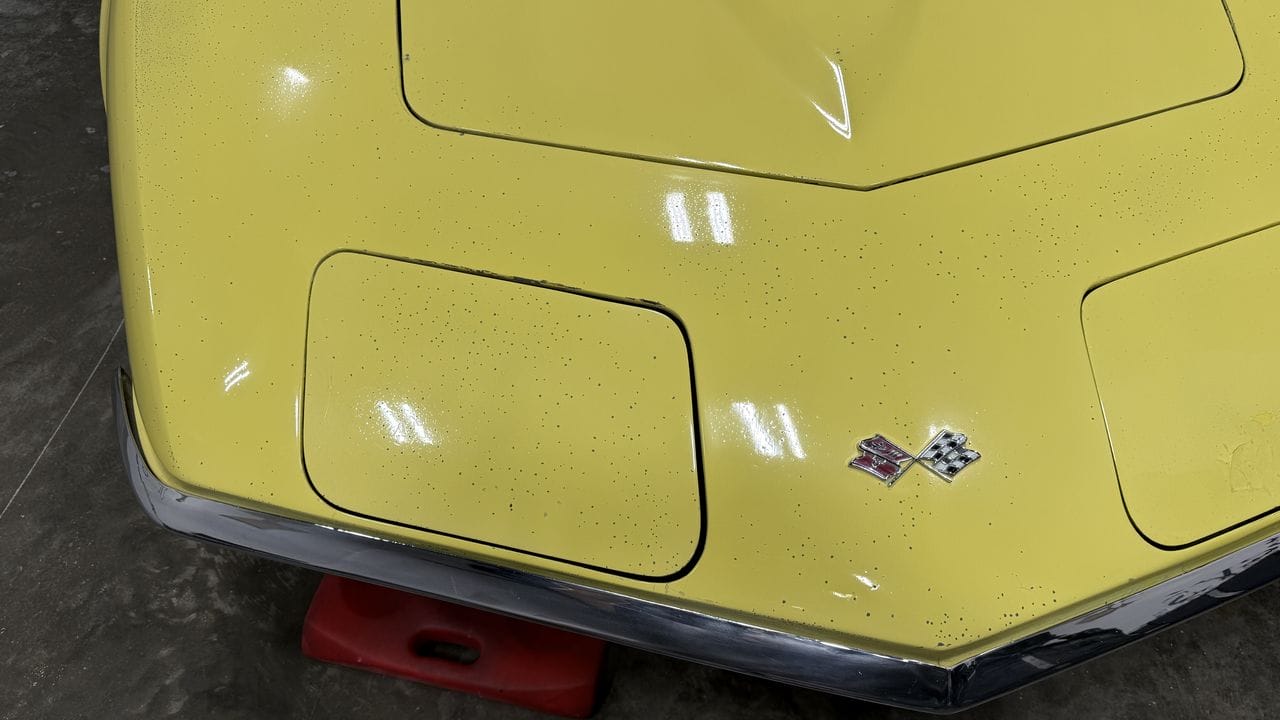
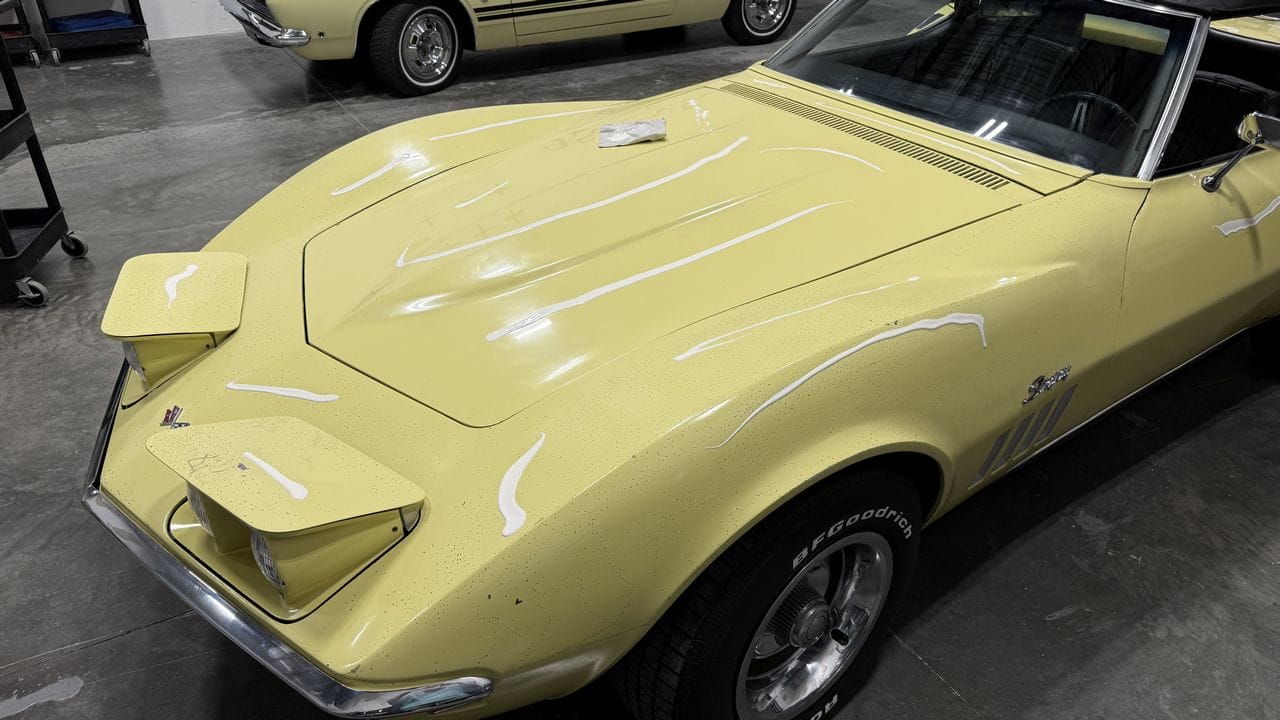
Looking at the lid on the headlight assemblies was shocking! But they came out great using the Shoe Polish Technique.
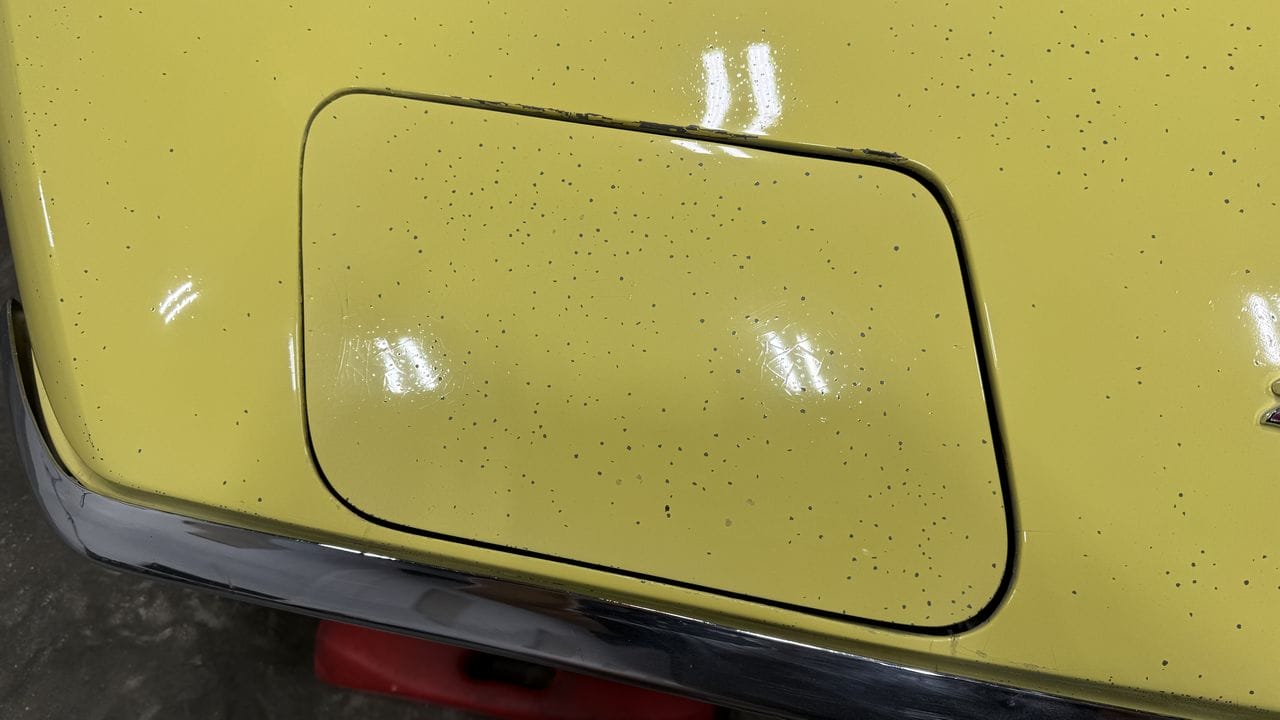
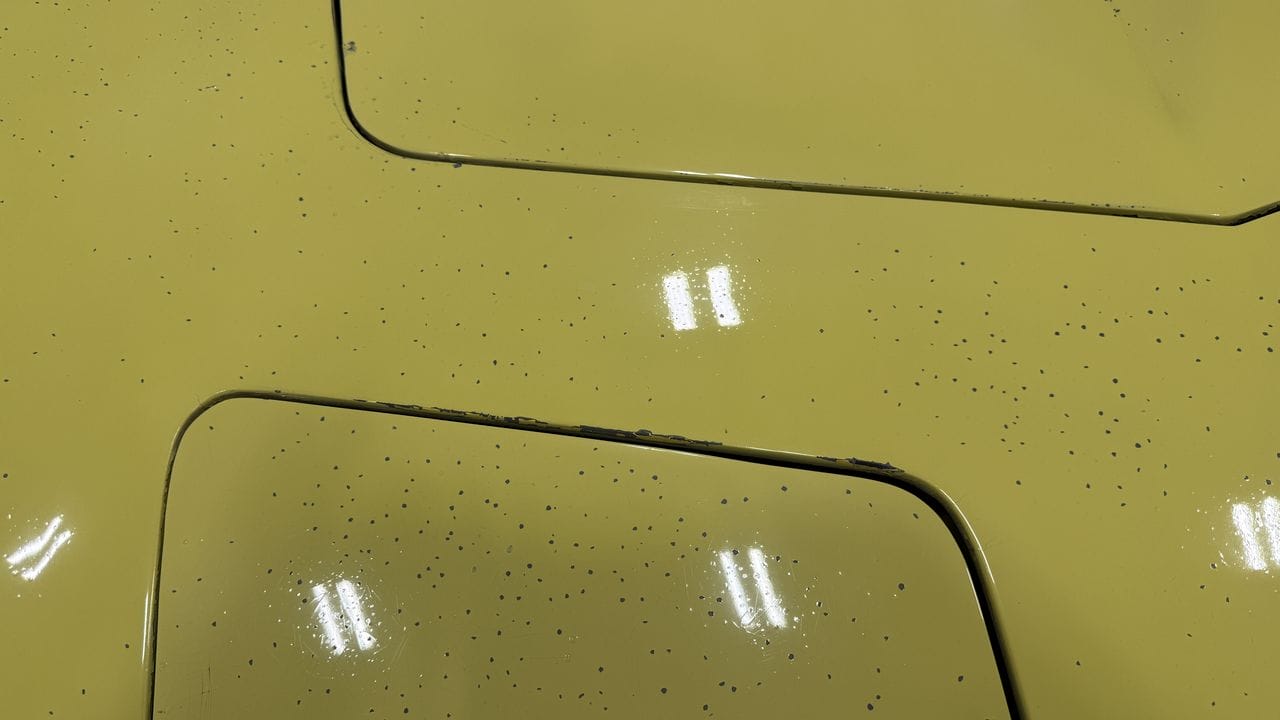
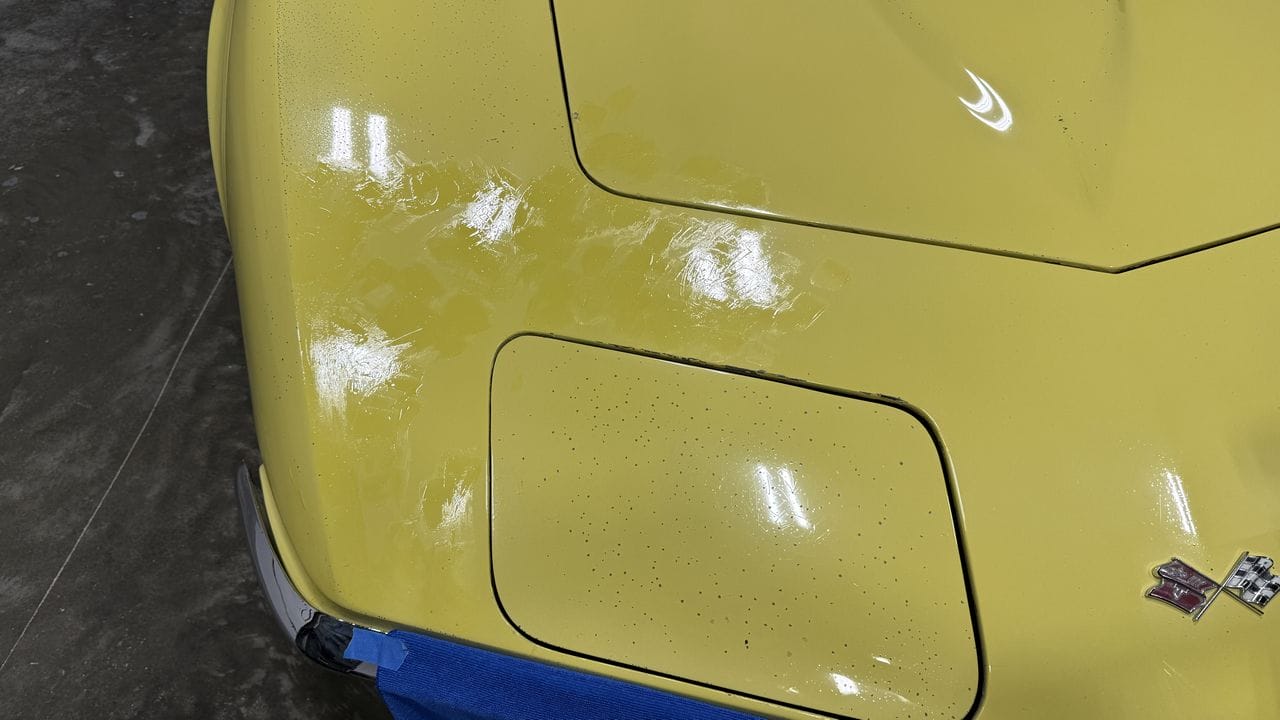
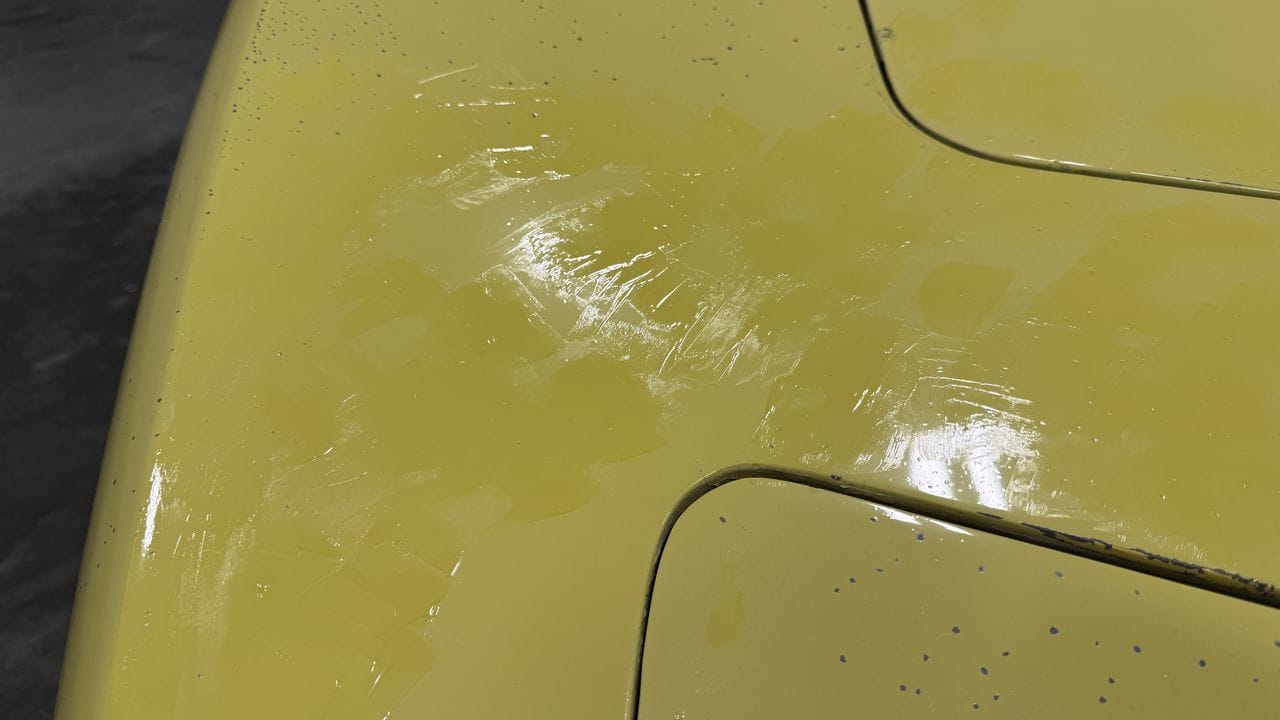
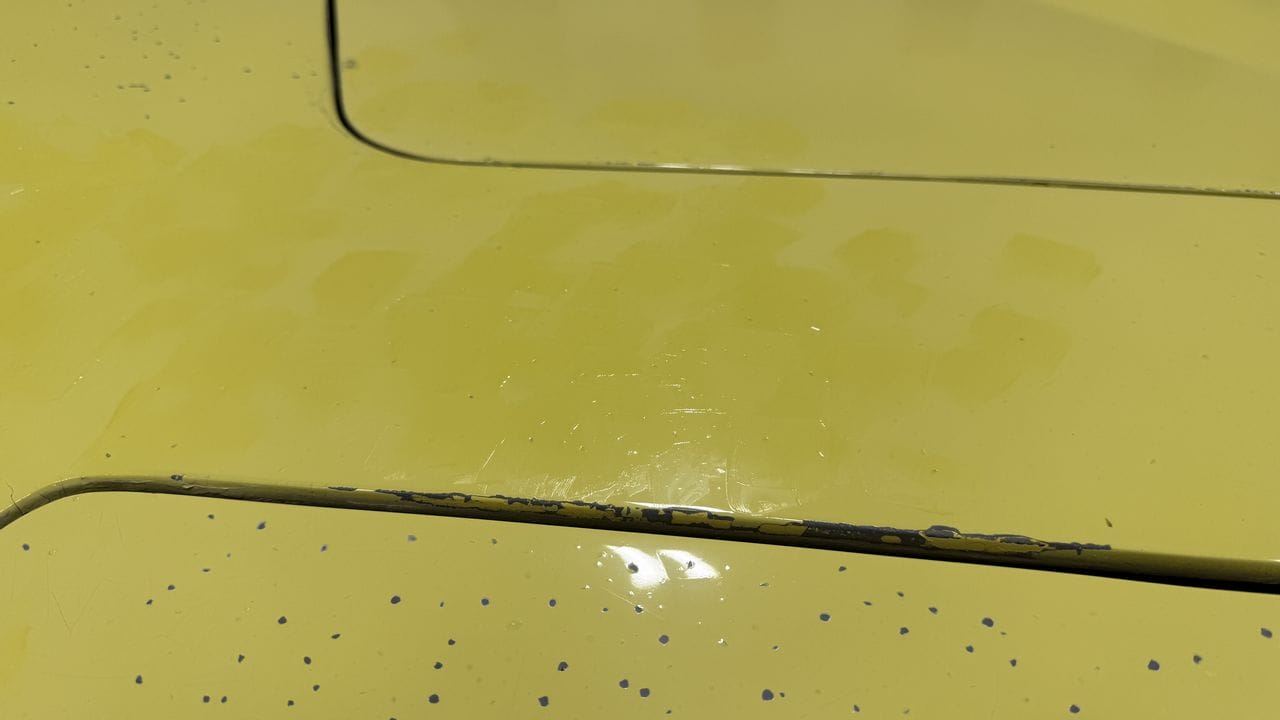
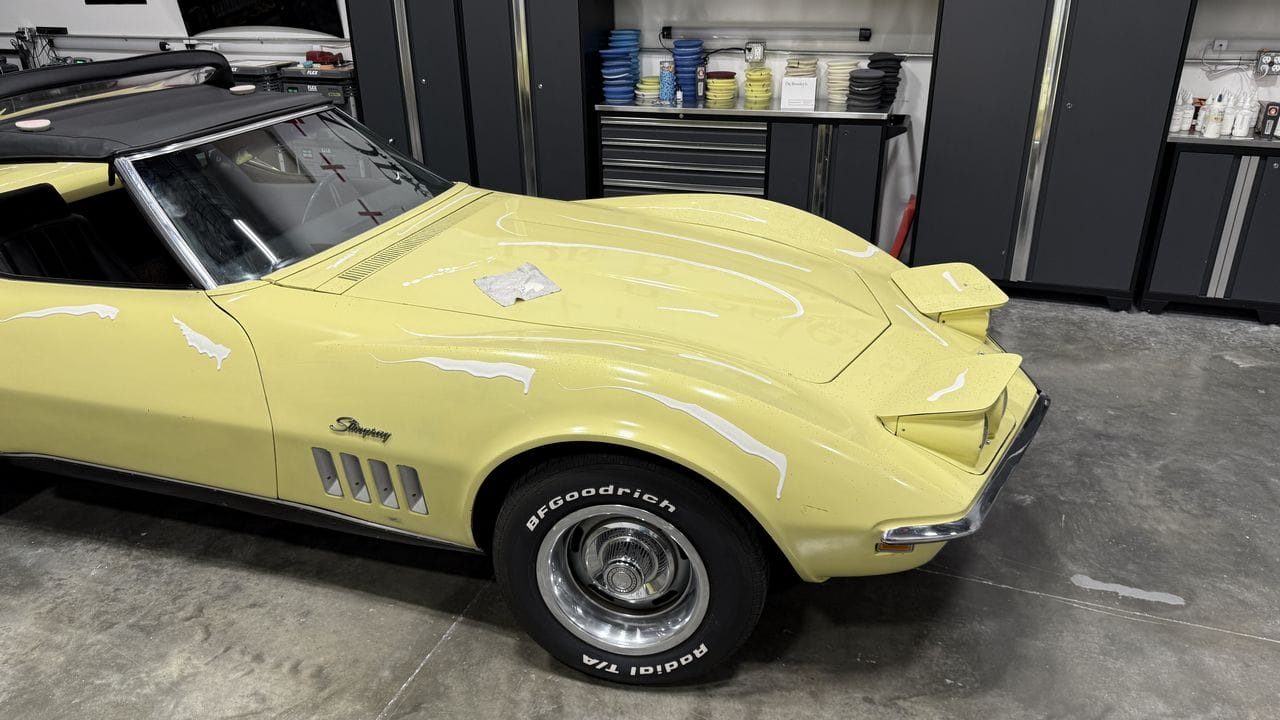
In the below picture, I’ve already blended away the excess paint above the headlight assembly lid and to both the right and left side of the lid. You can also see that I have applied a LOT of paint to the lid on the headlight assembly. As in a LOT of paint in order to fill in all the chips.
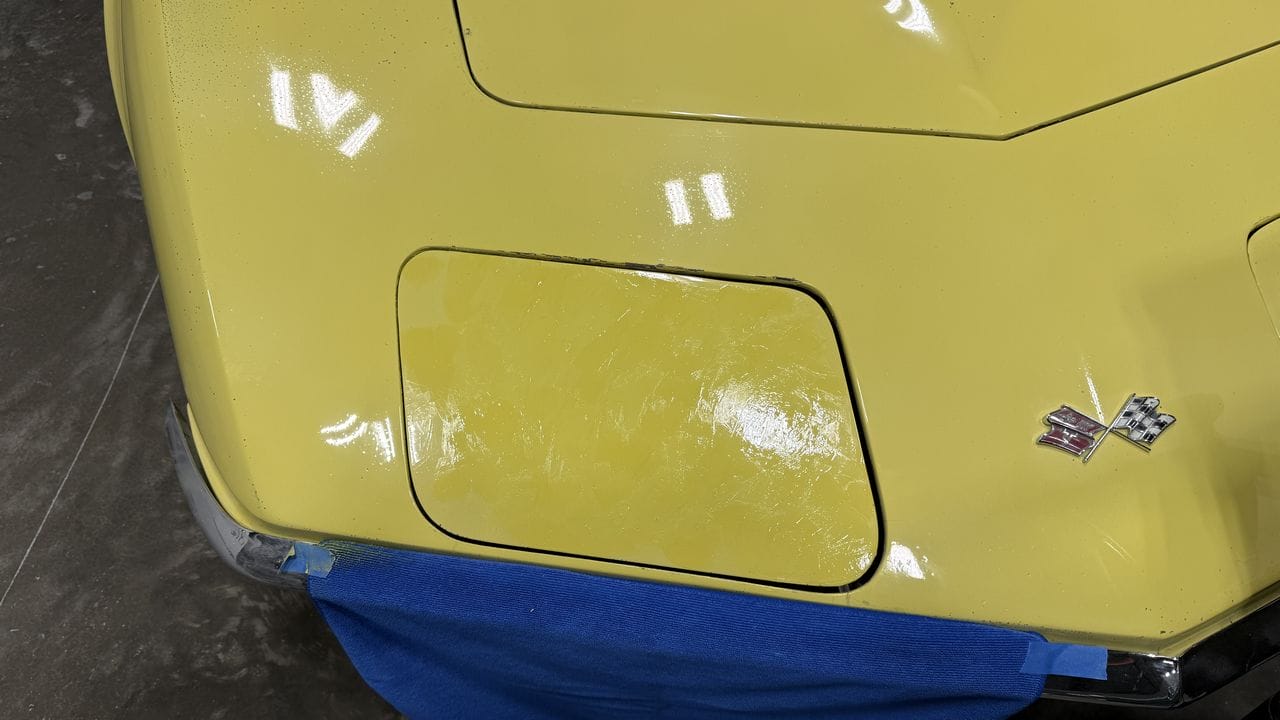
Here’s a close-up showing touch-up paint over the entire lid.
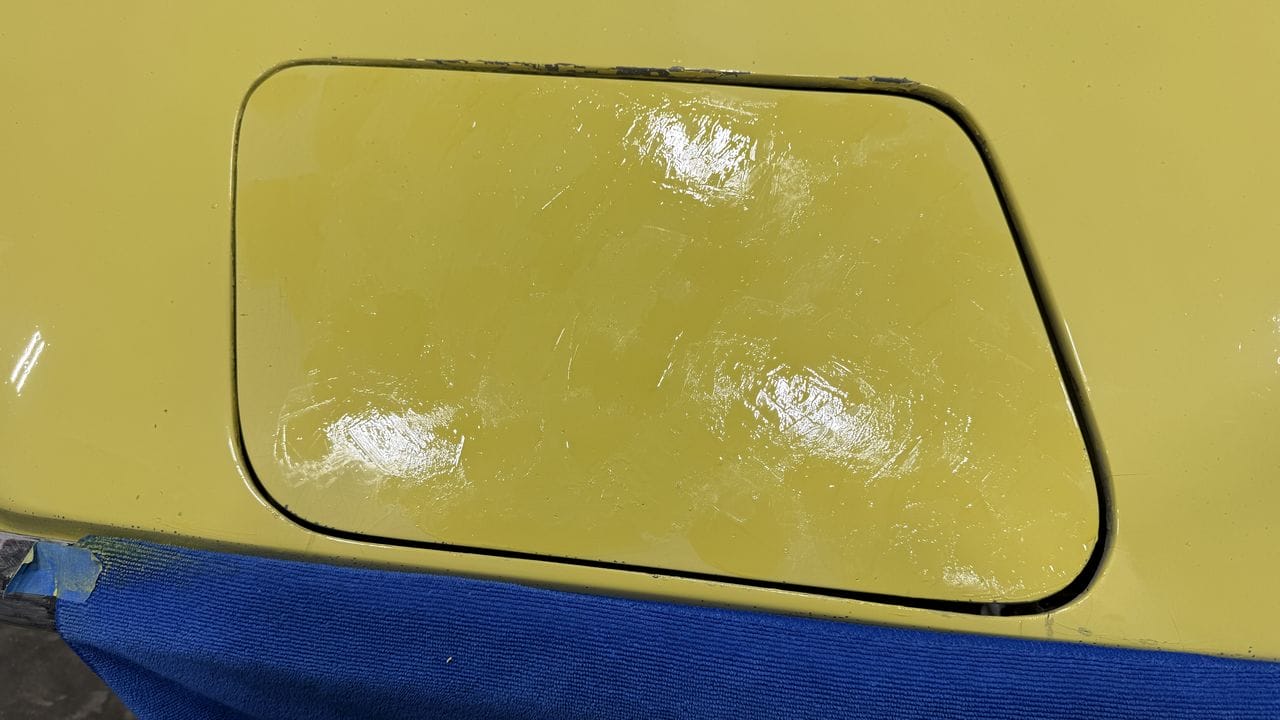
If you look closely, you can see sections with paint that still needs to be blended away and section of paint where the excess paint has been removed via blending with the SealAct and a wiping cloth.
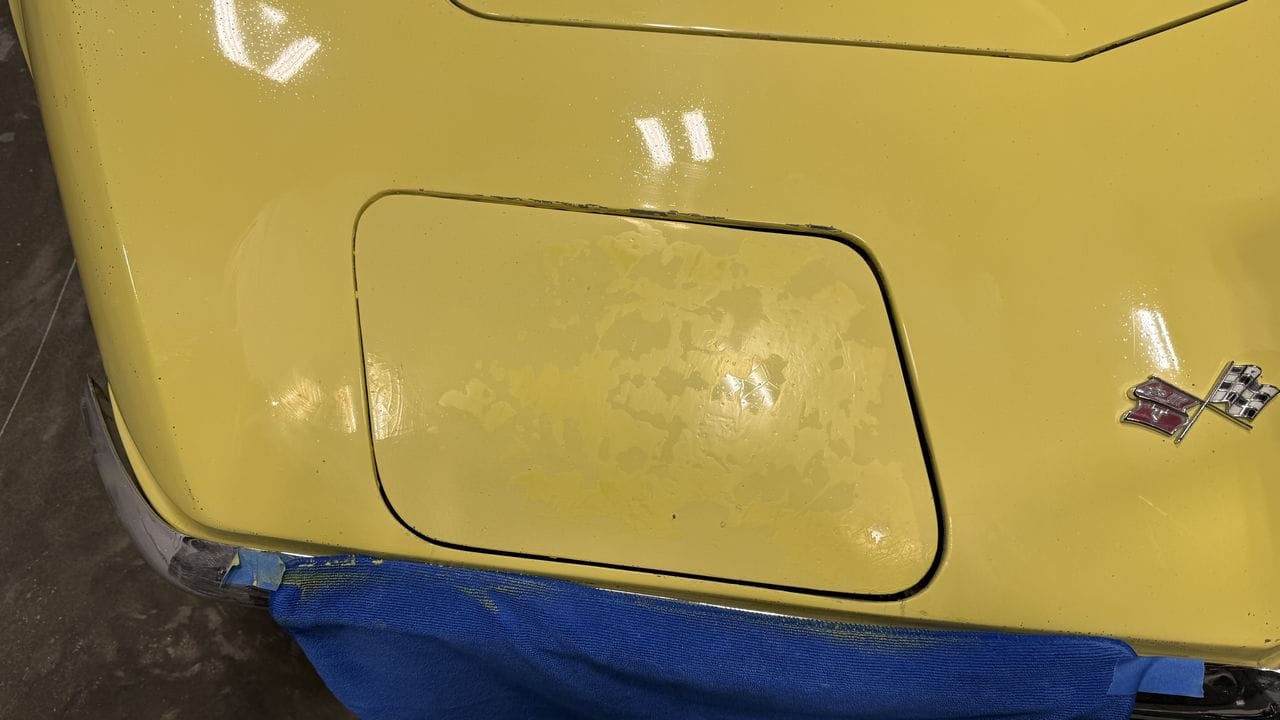
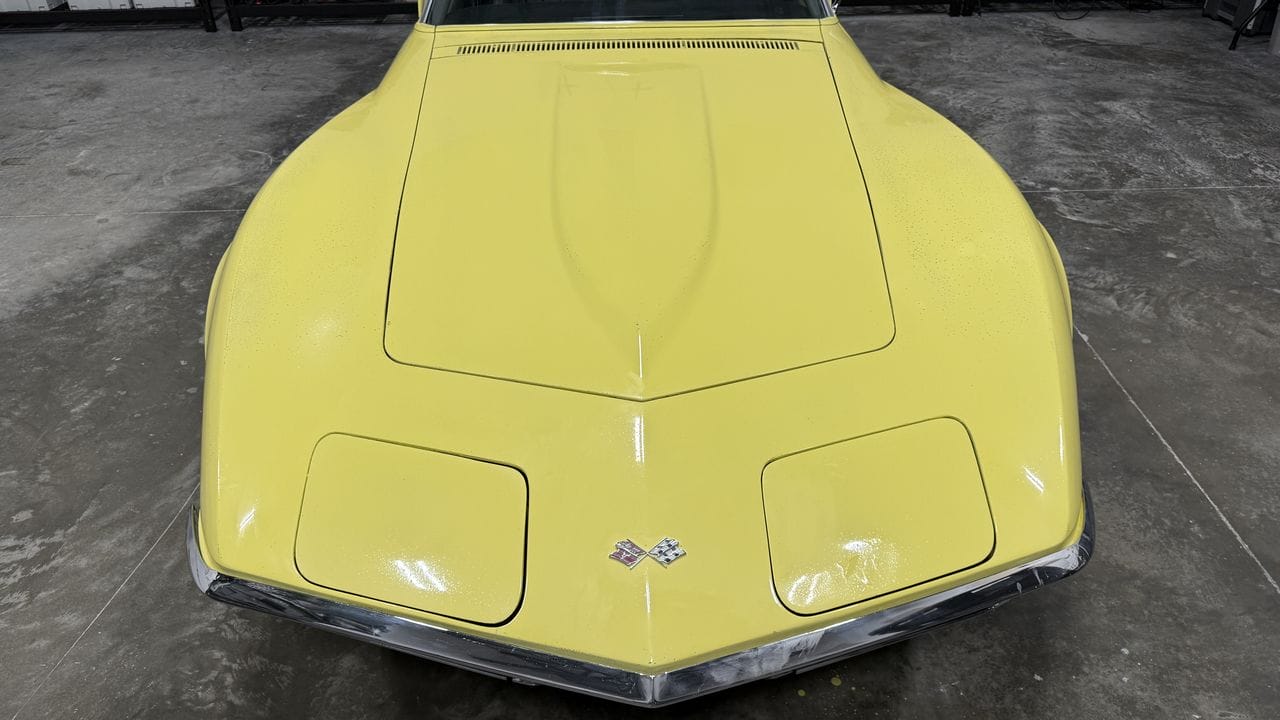
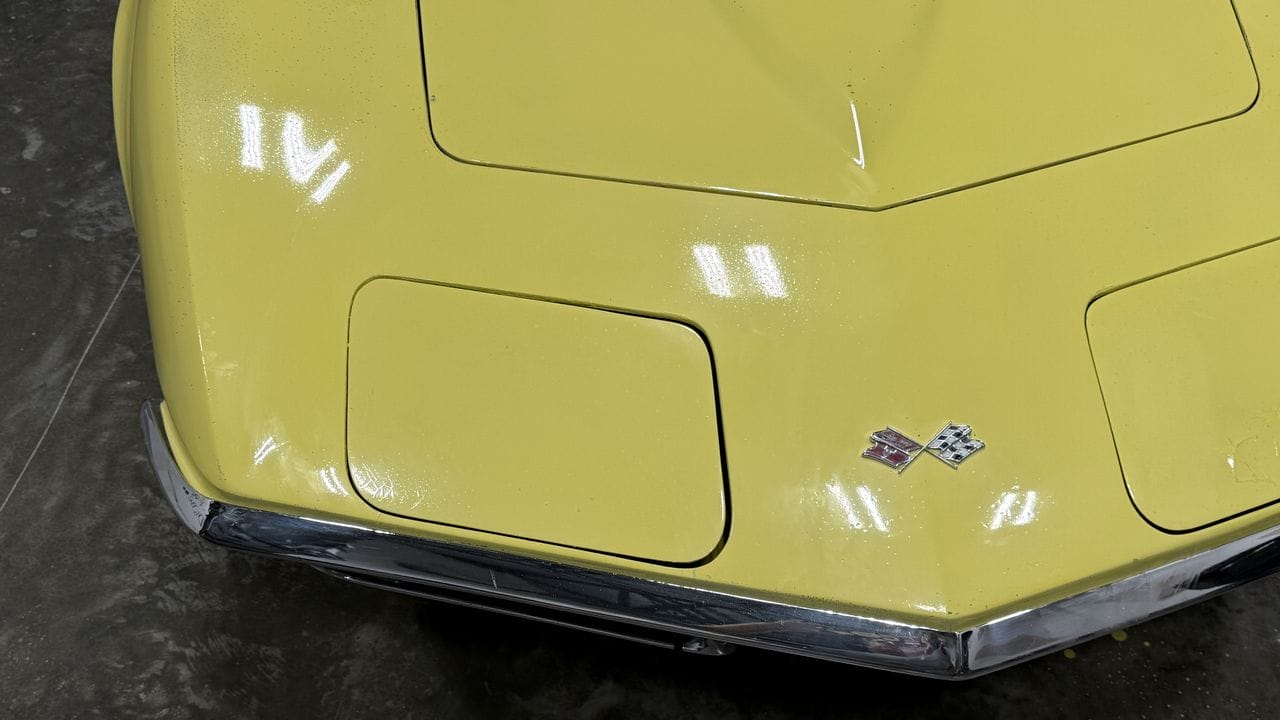
Not bad considering where we started and the goal was to preserve the paint while improving the appearance. The other goal was to NOT re-paint the Corvette.
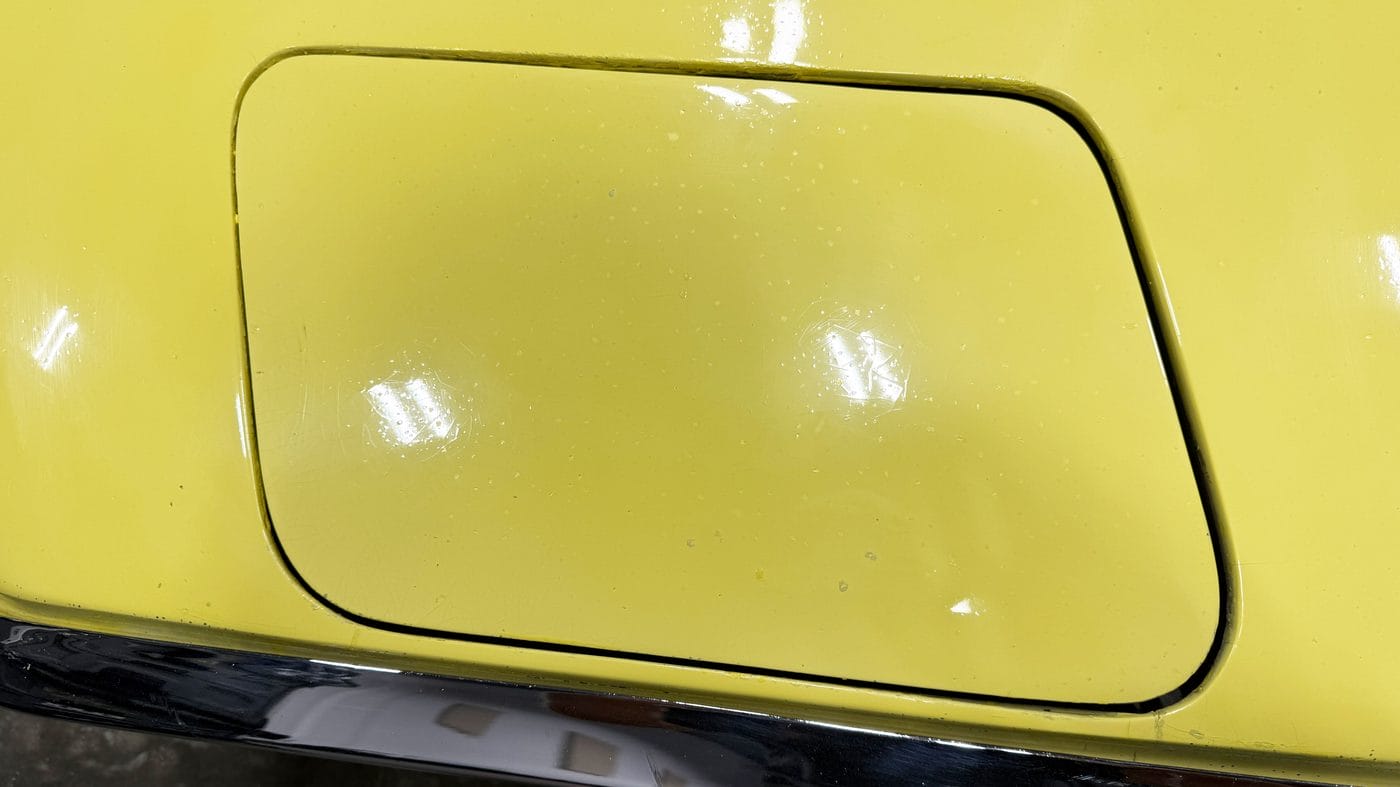
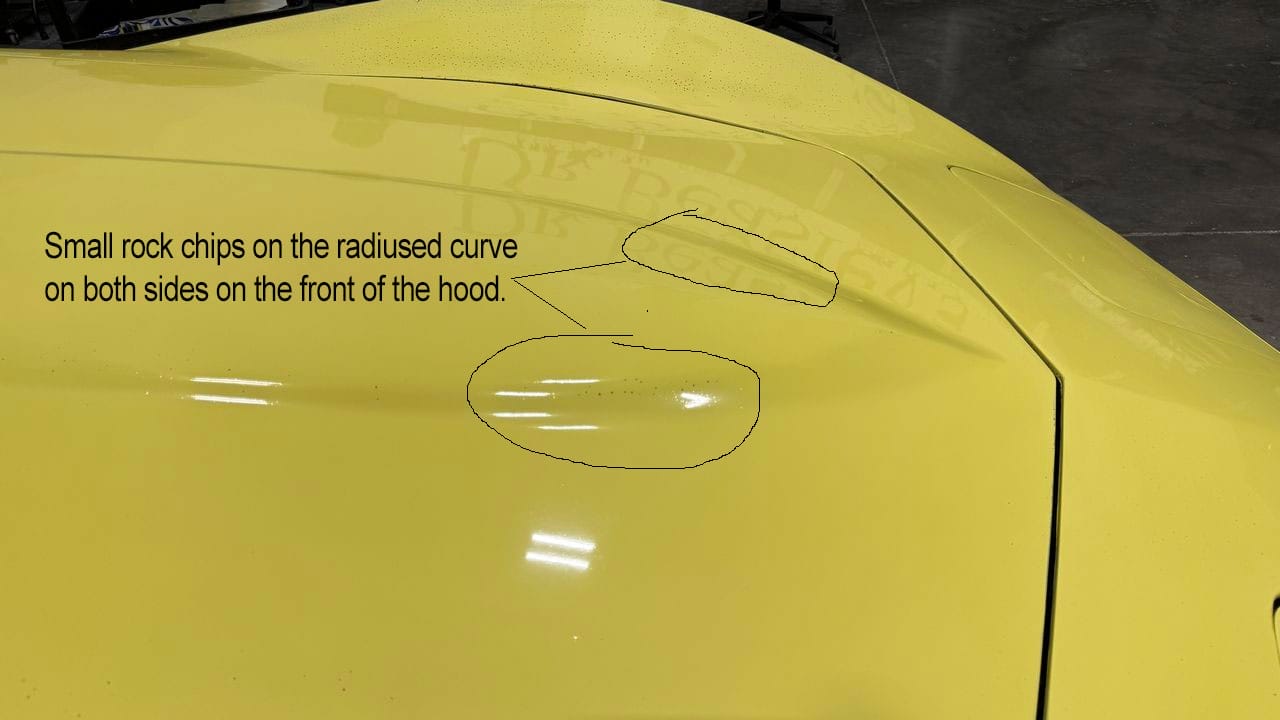
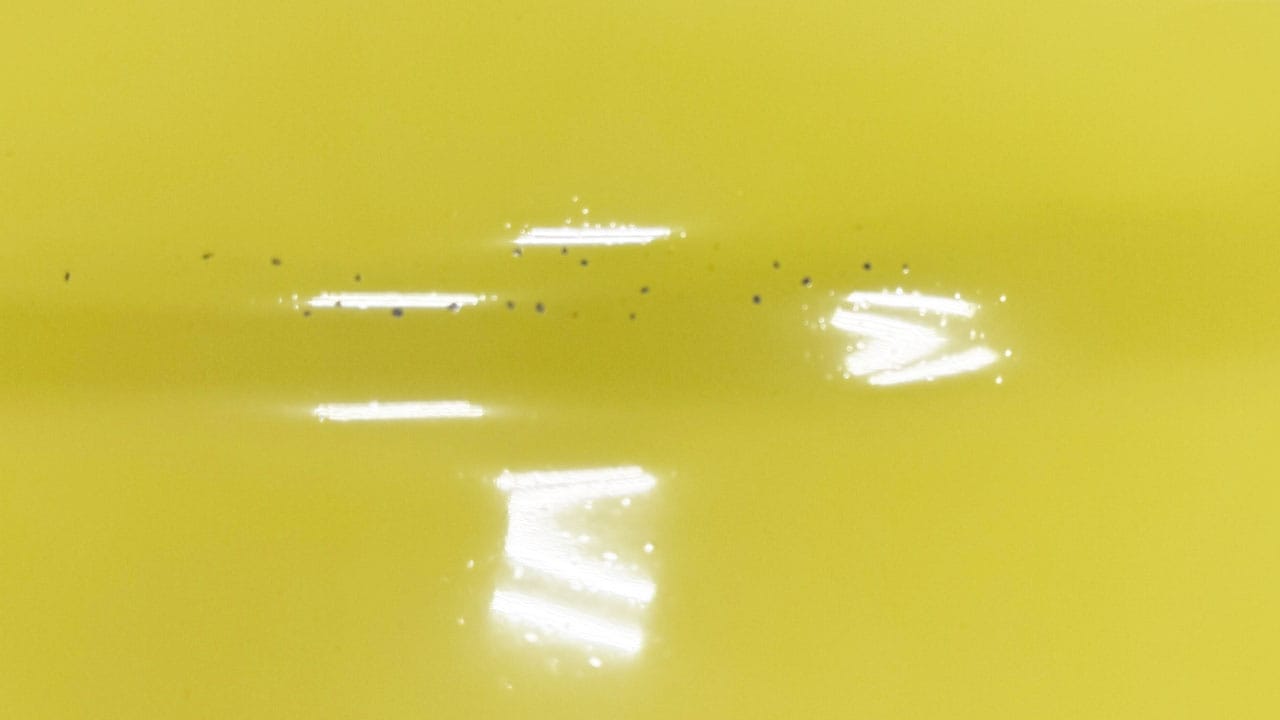
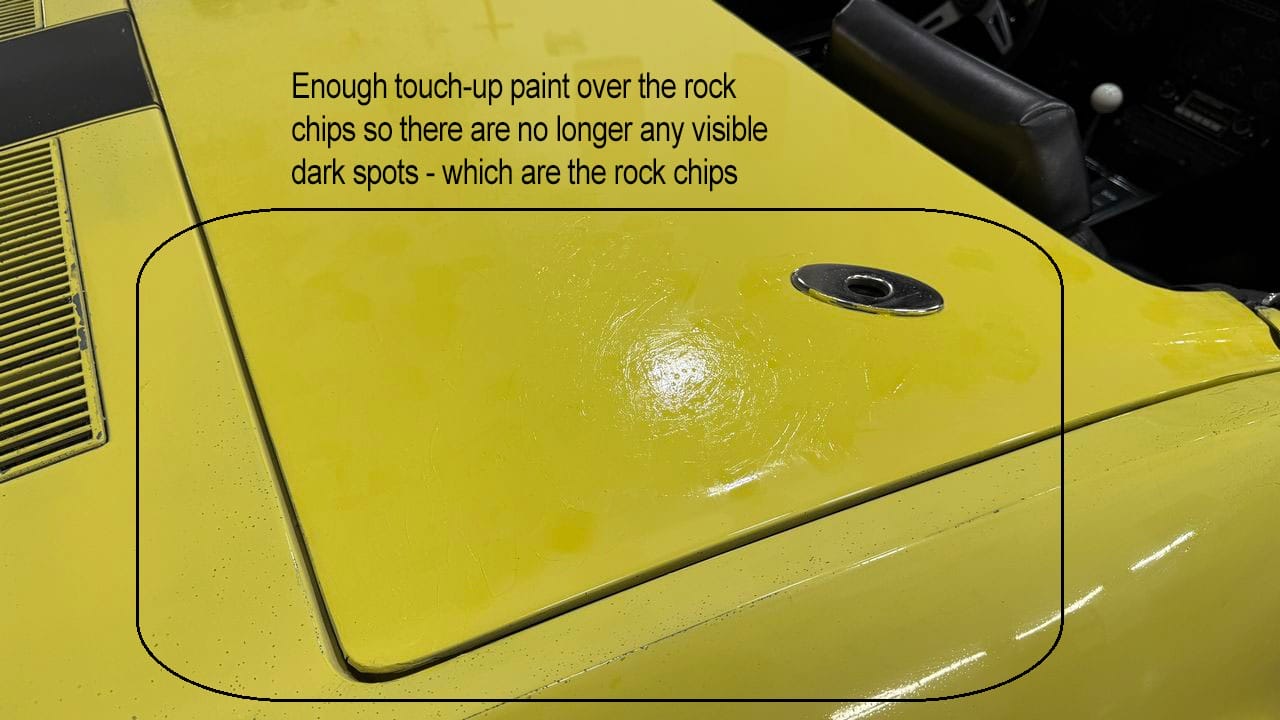
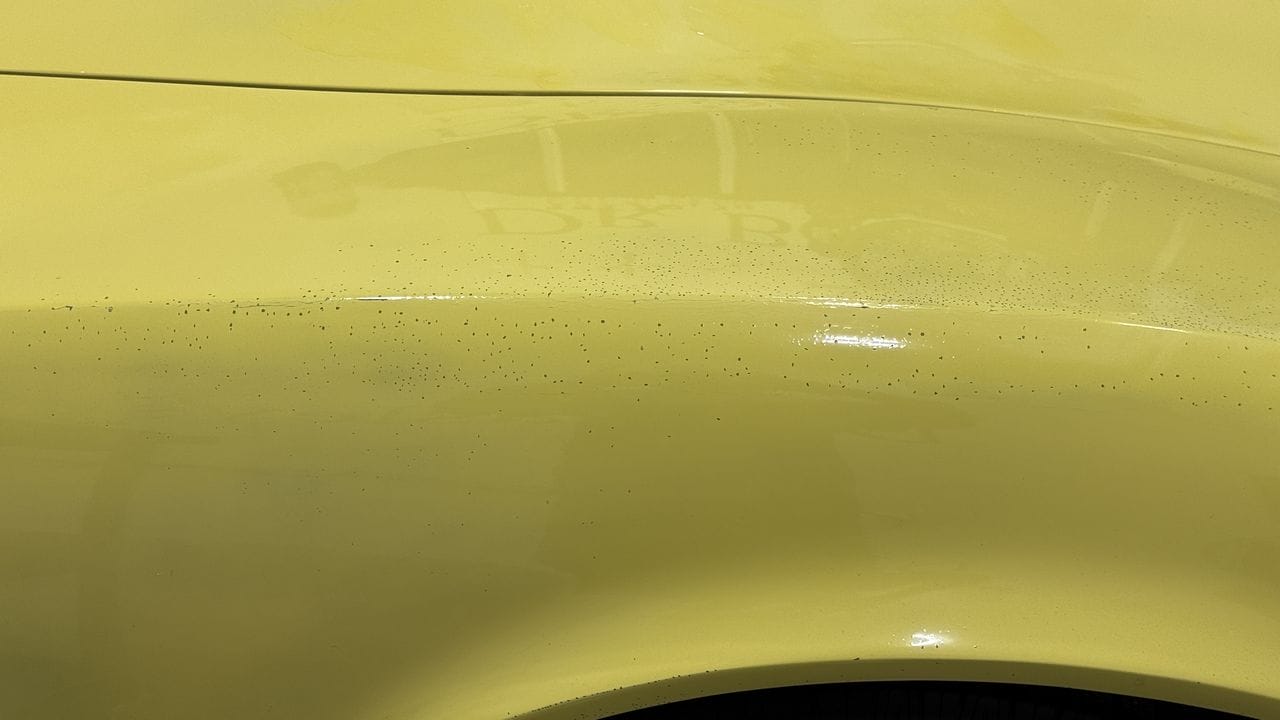
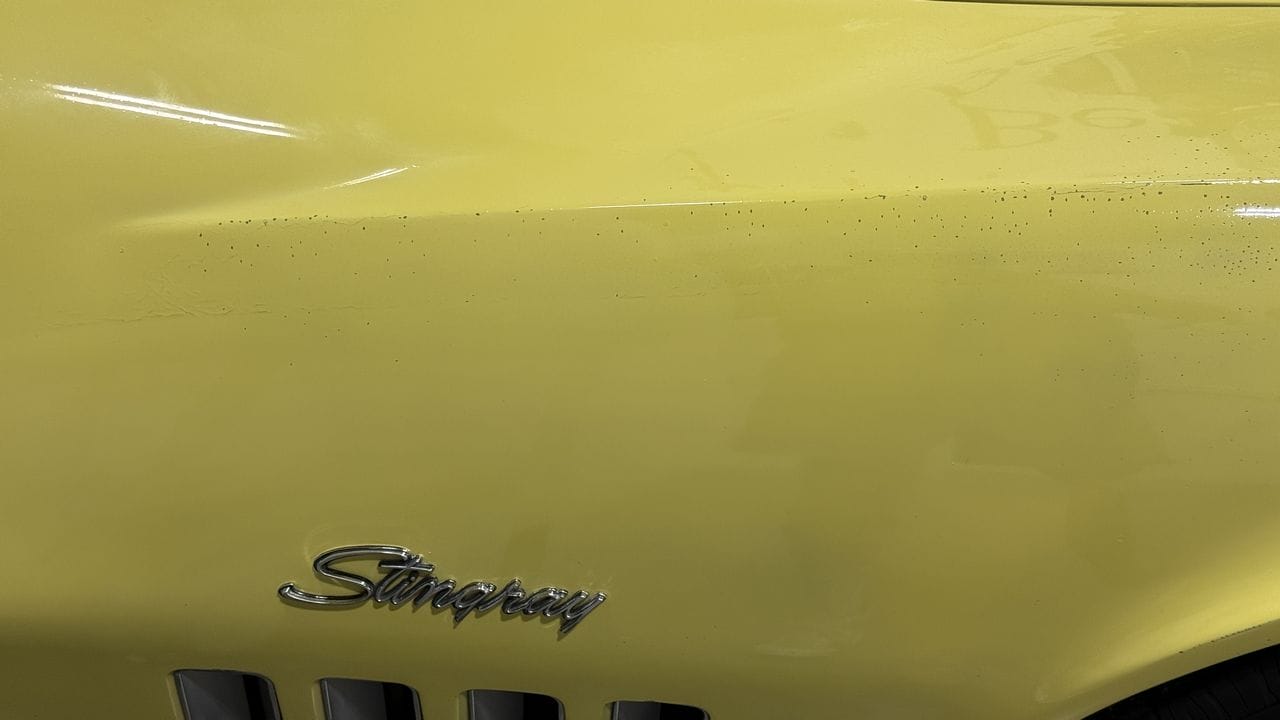
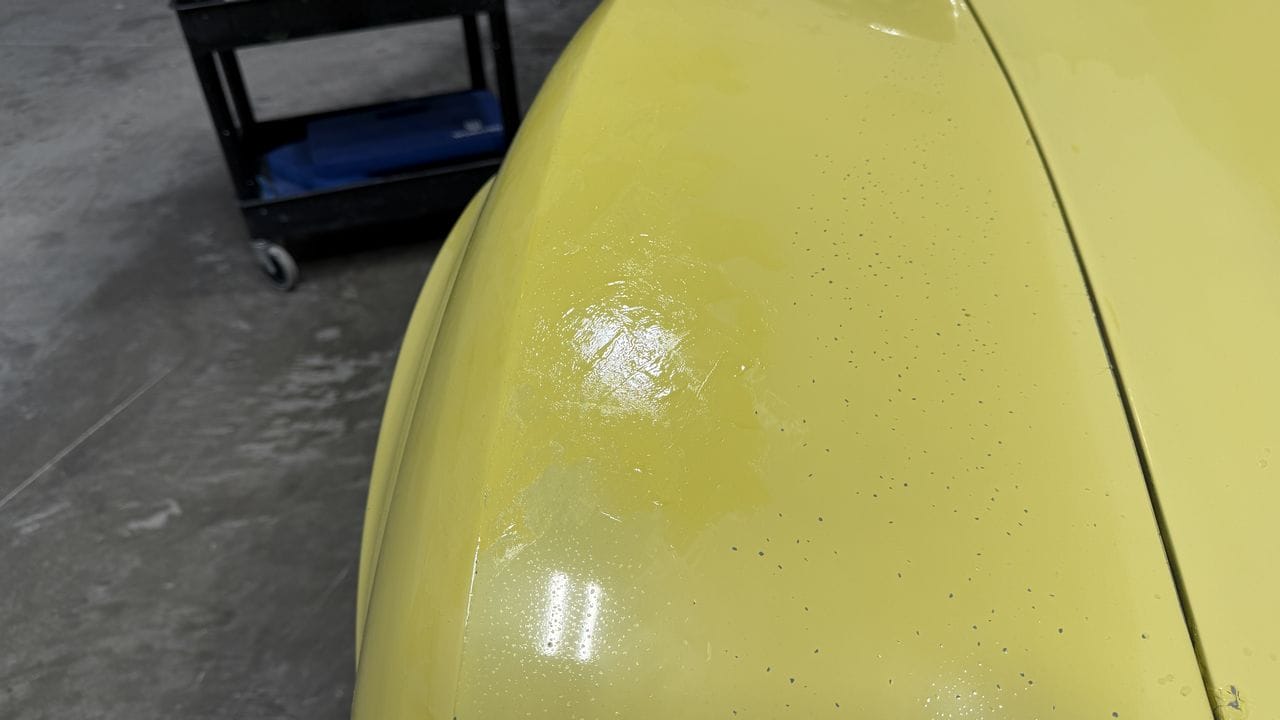
Here’s rock chips on the passenger side fender, both on the top of the fender and on the verticle side.
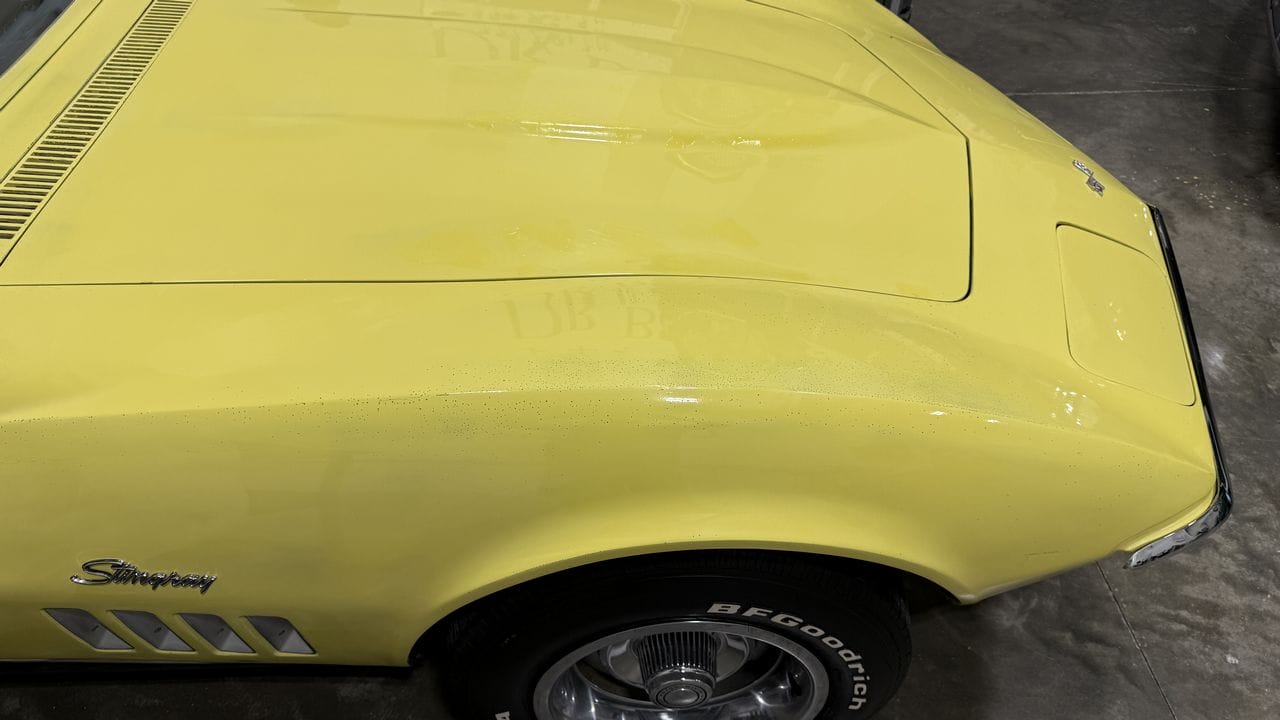
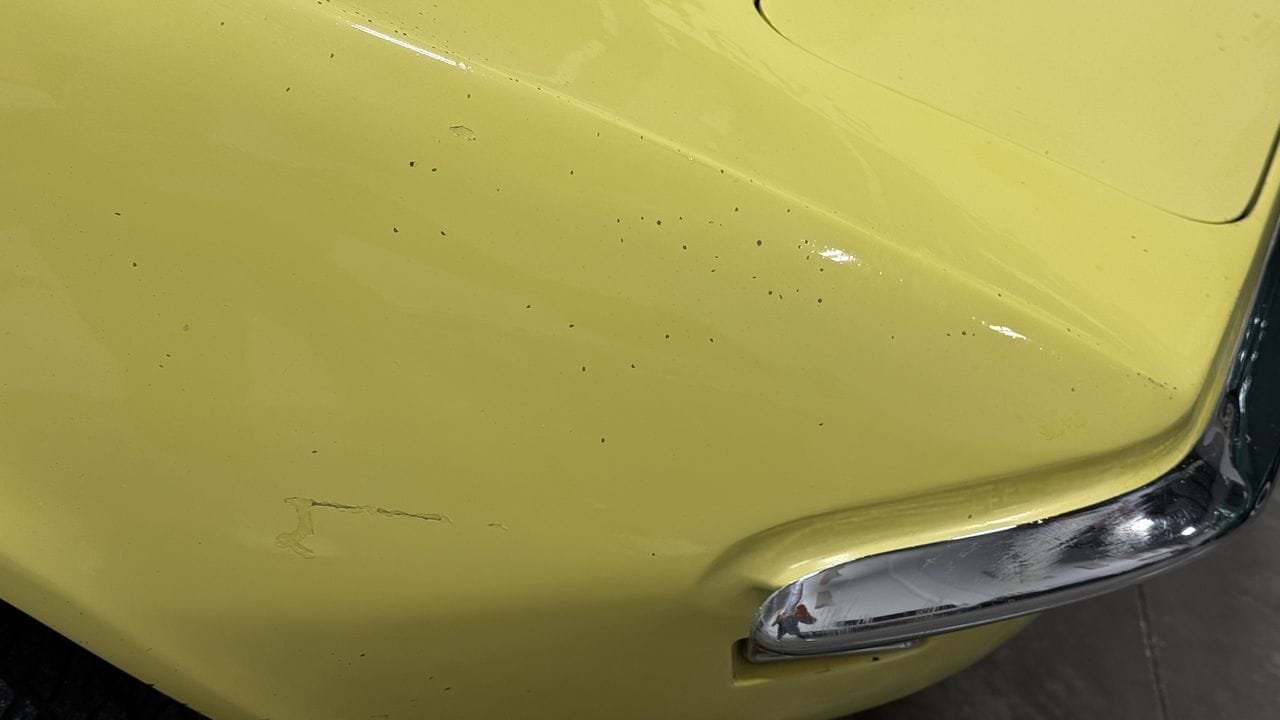
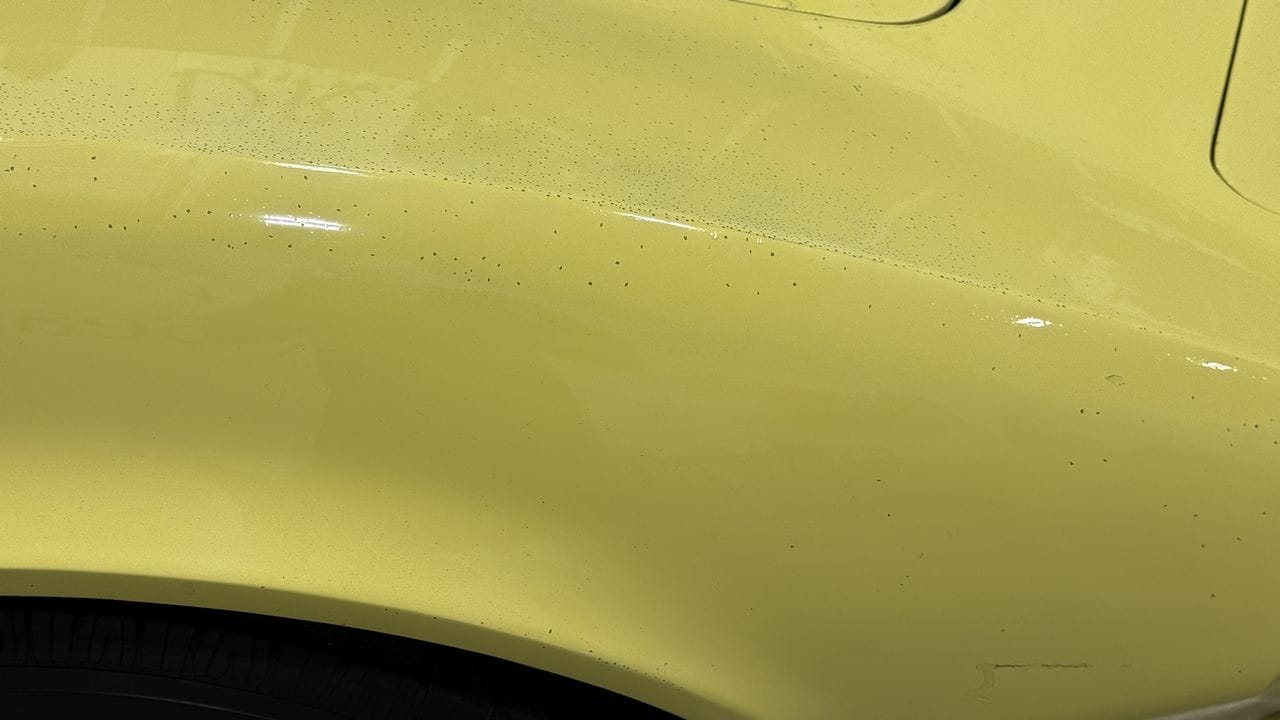
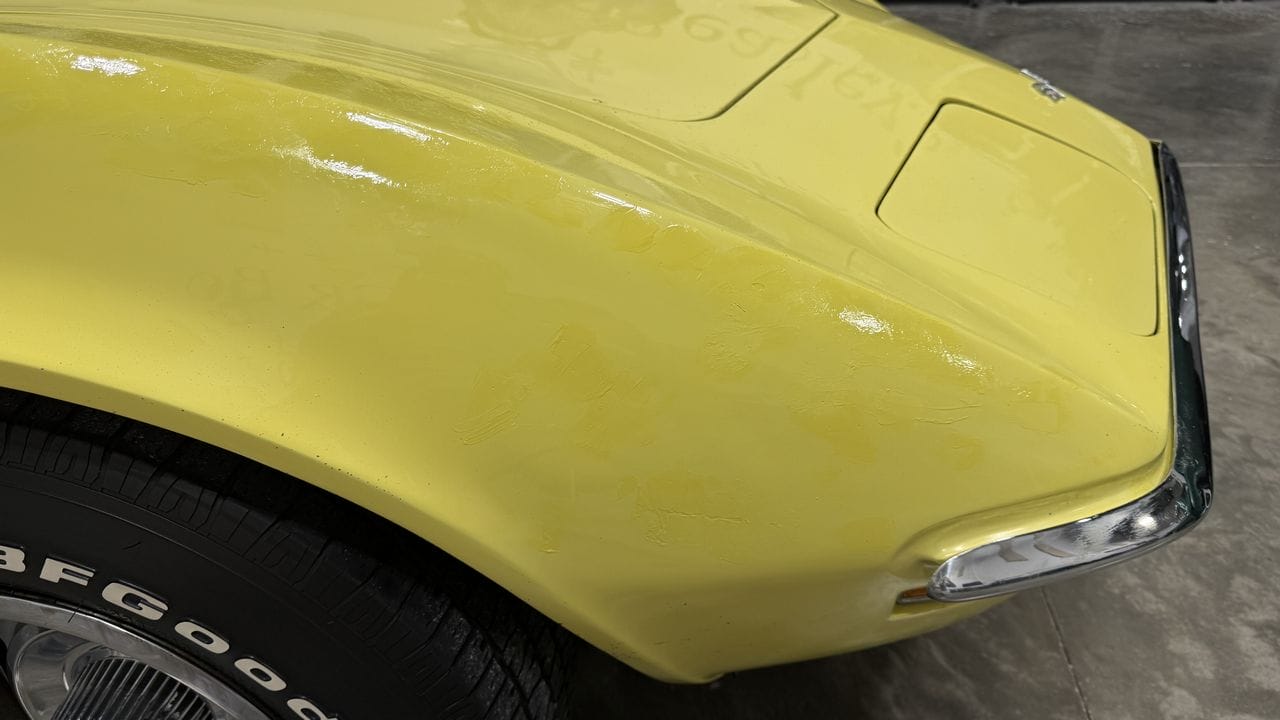
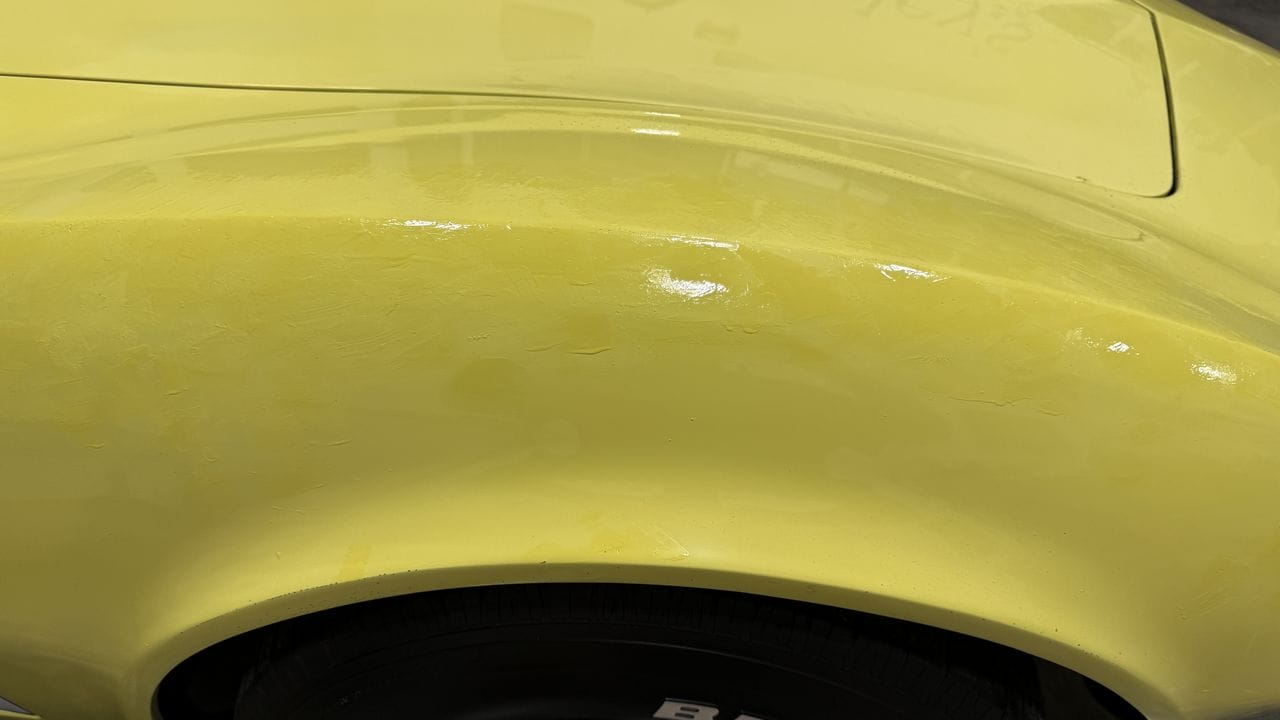
In the below pictures you can see where I’ve applied the touch-up paint to the affected areas.
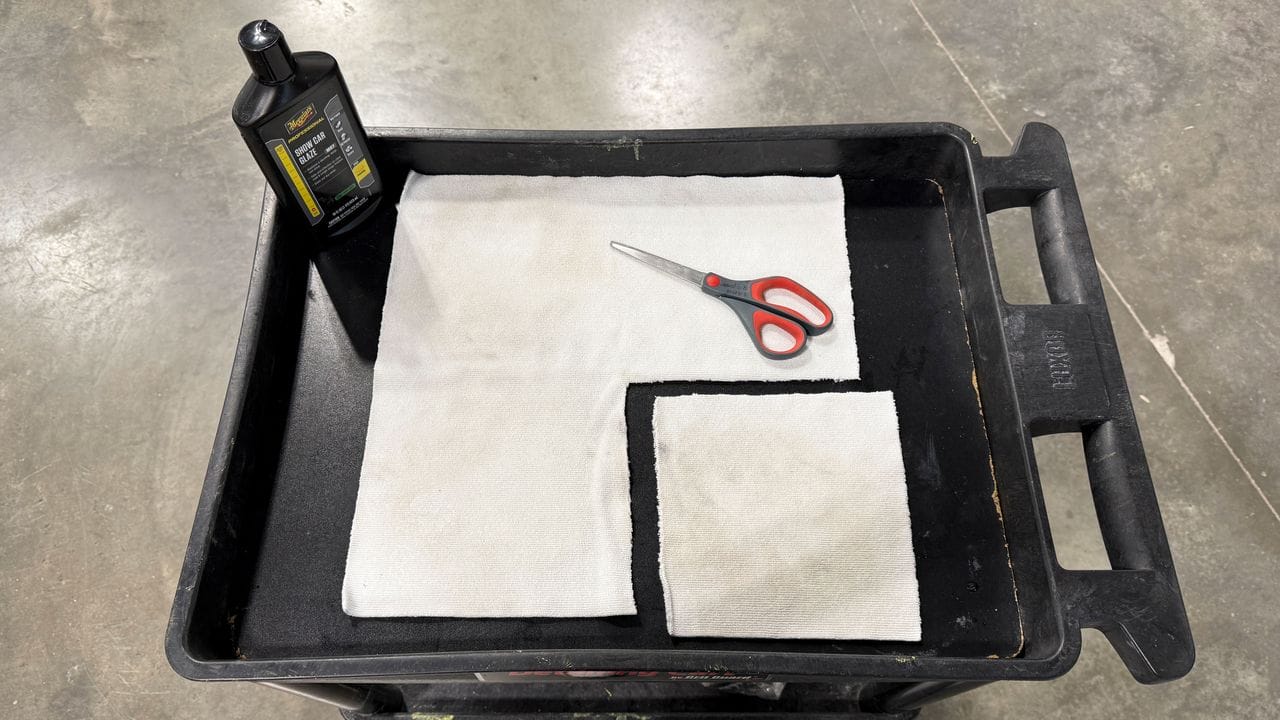
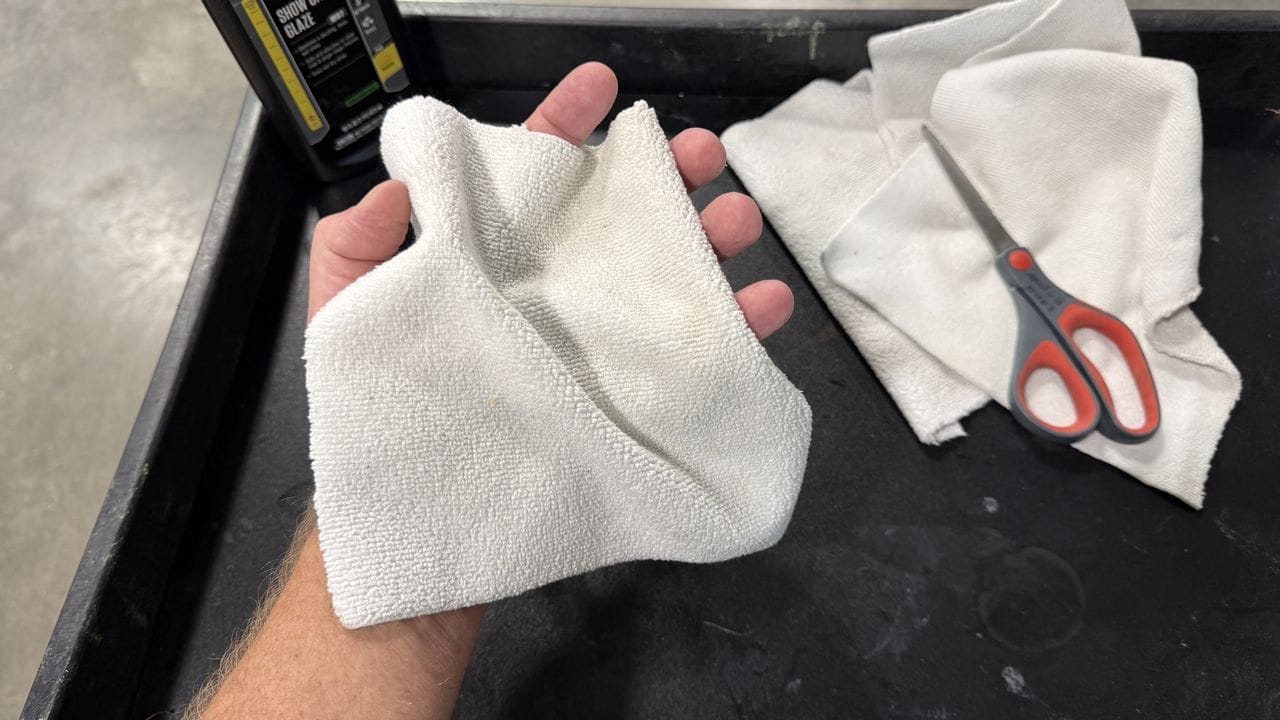
Pre-cleaning the area using the Dr. ColorPrep Panel Cleaner using a clean, uncontaminated piece of microfiber towel. I cut up about a half a dozen 16″ by 16″ microfiber towels into 4 pieces to use as I worked around the Corvette.
After cleaning this section, next I used a fresh, dry piece of microfiber towel to re-wipe the area to ensure all residues were removed.
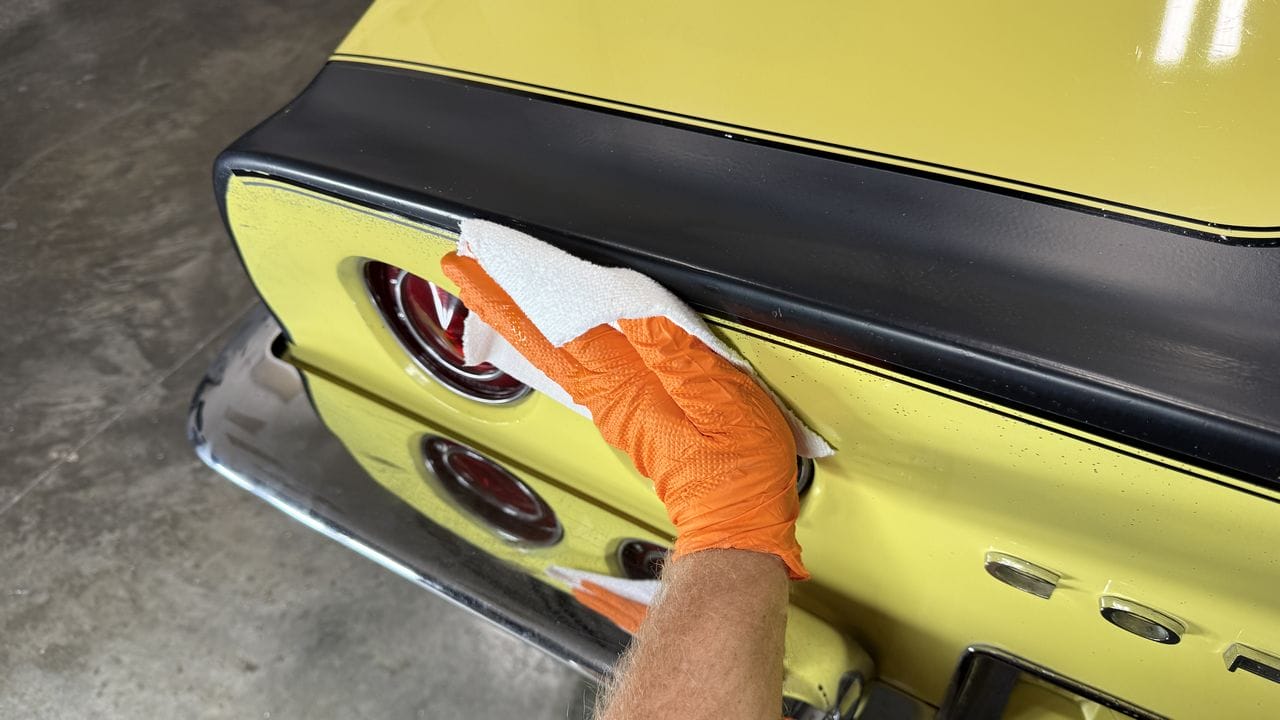
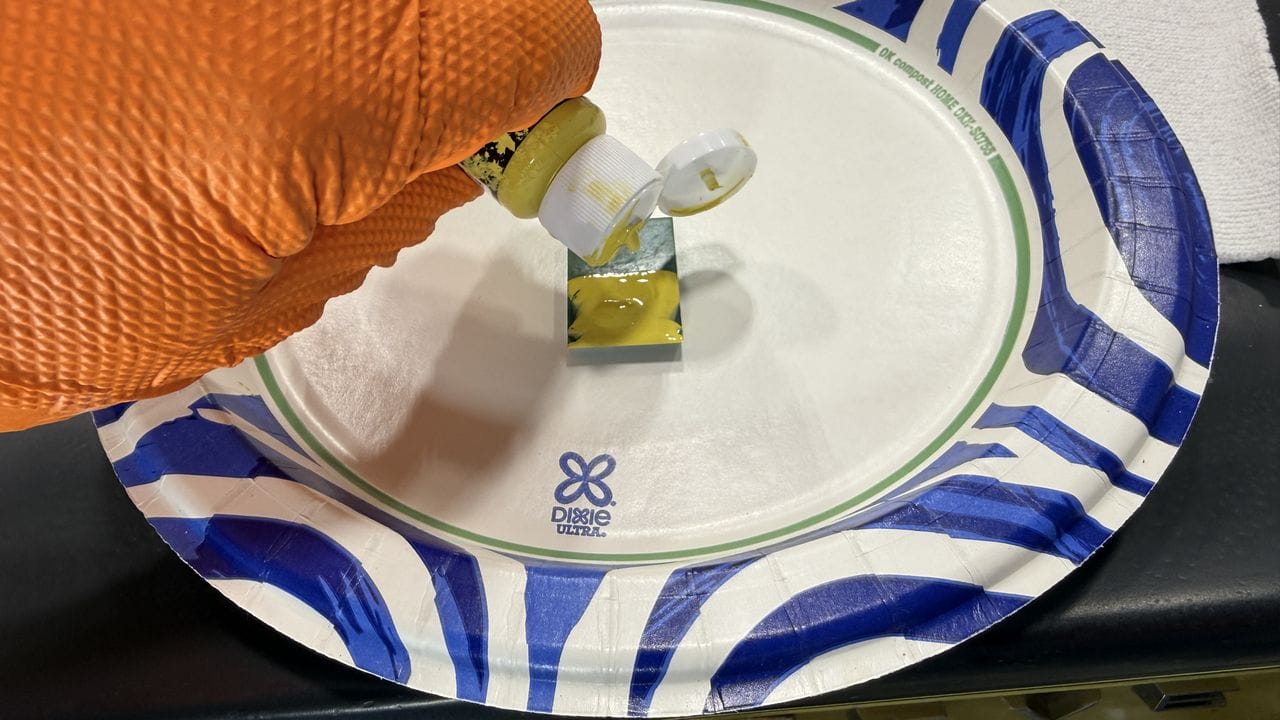
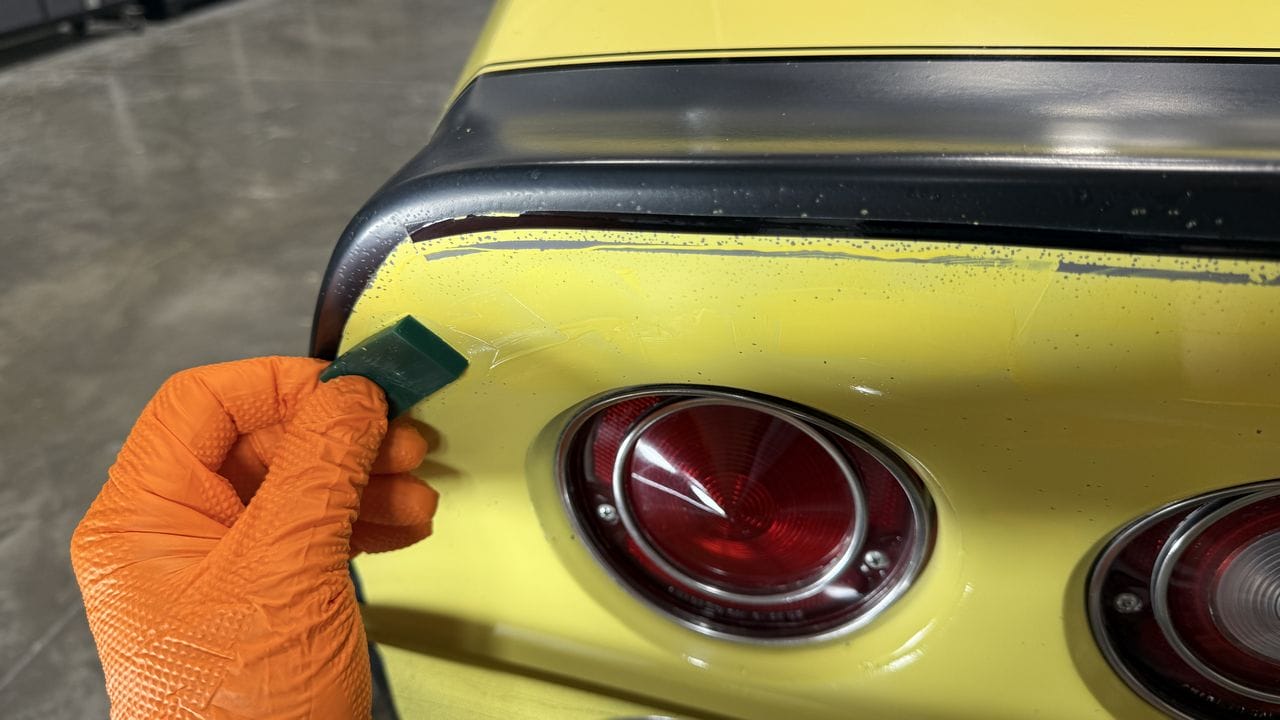
Next I placed a few drops of paint on the flat side of the beveled edge of the small, green squeegee and then with a quick flip, pressed the squeegee against the paint and shmeared the paint over the rock chips.
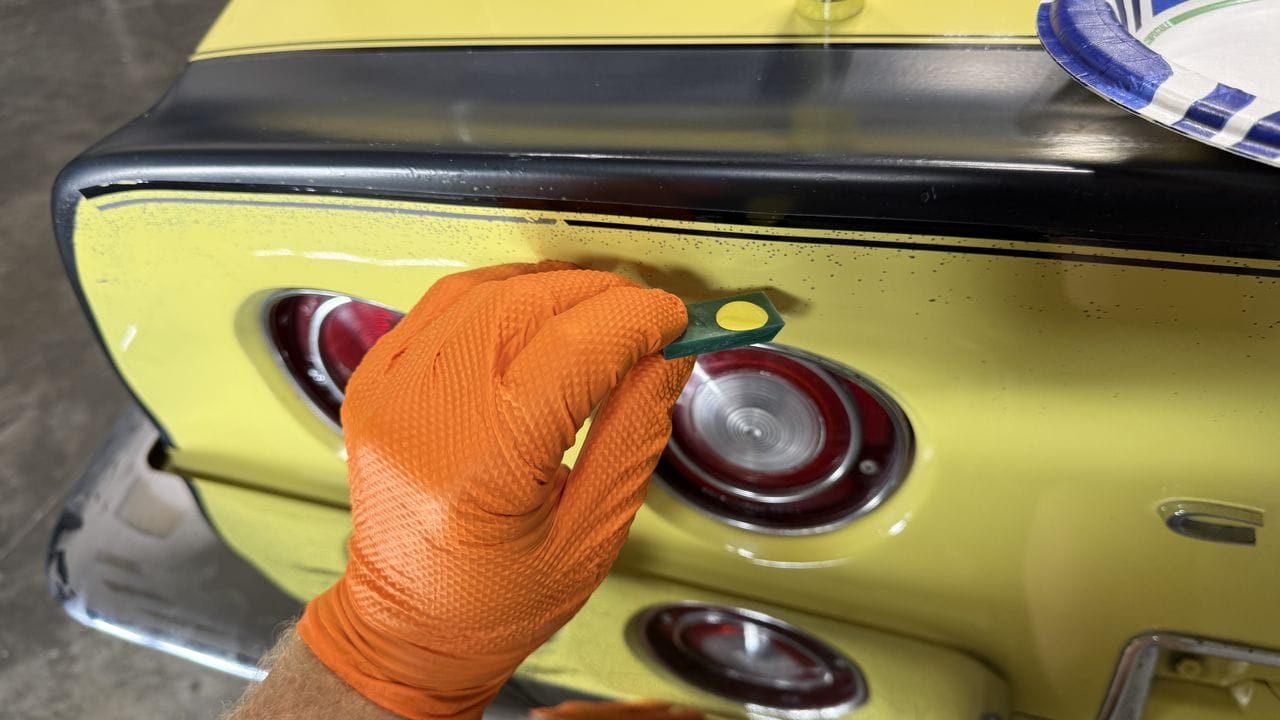
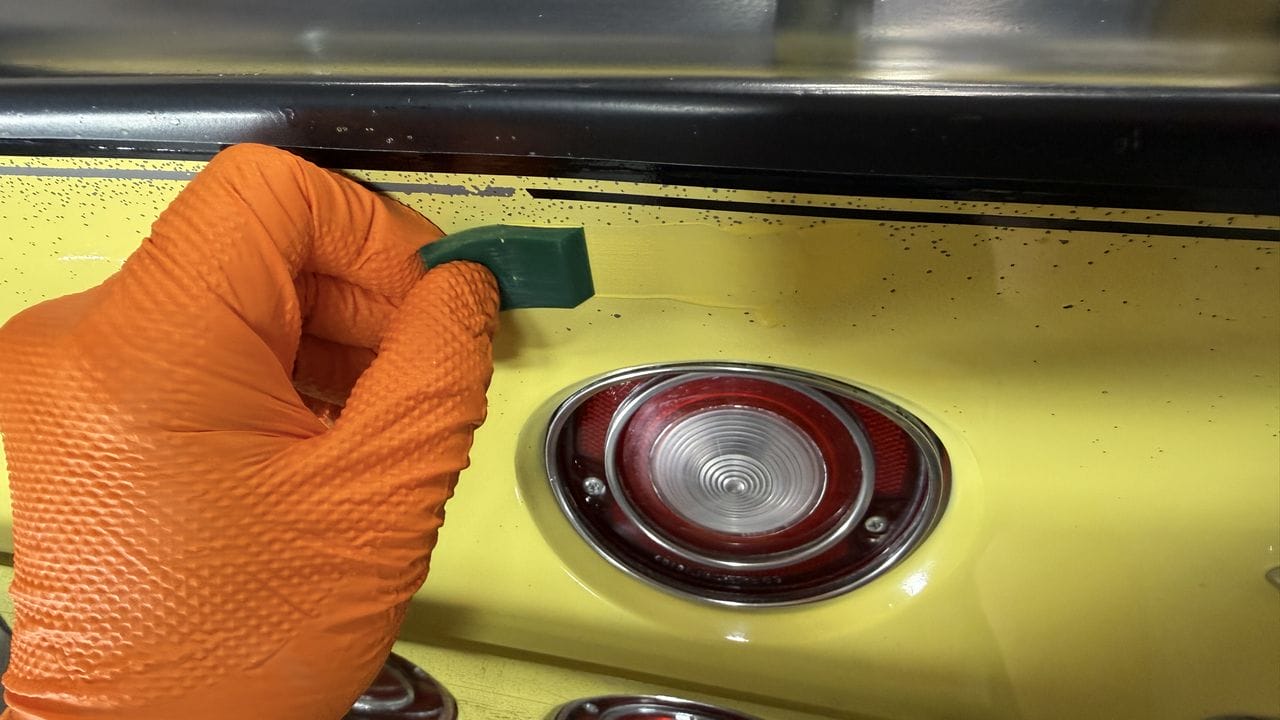
Adding more paint…
More schmearing…
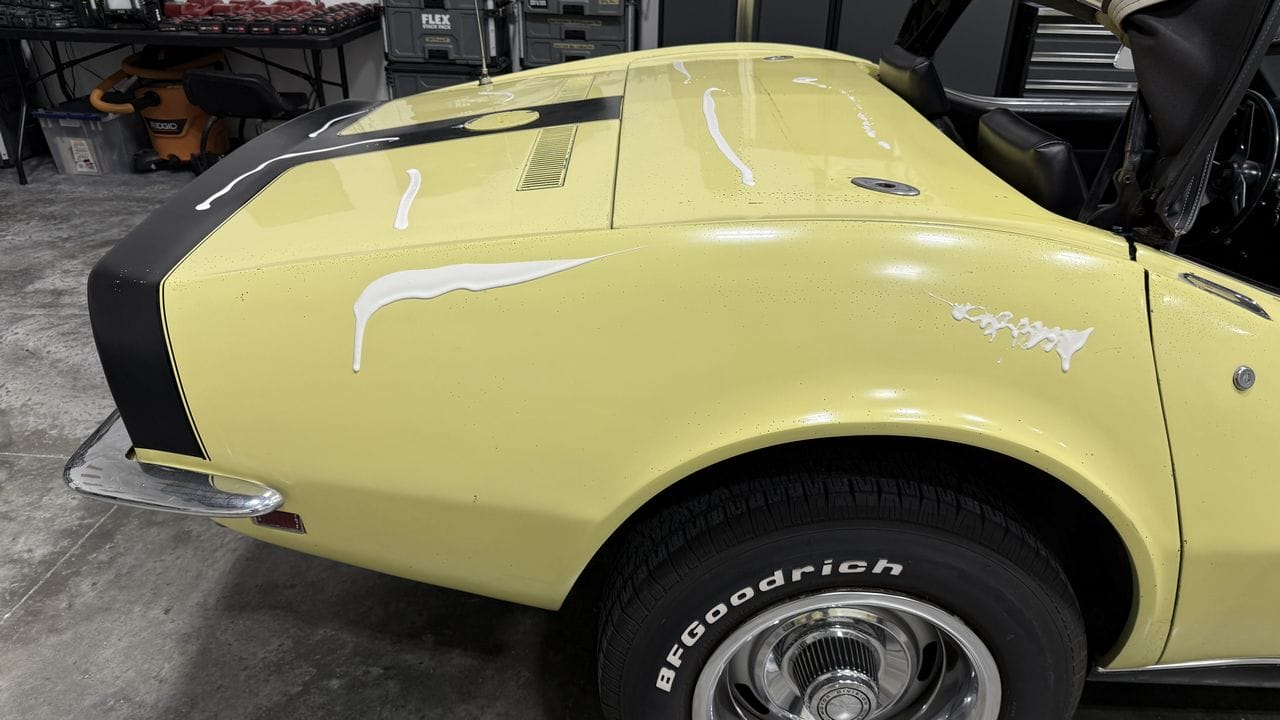
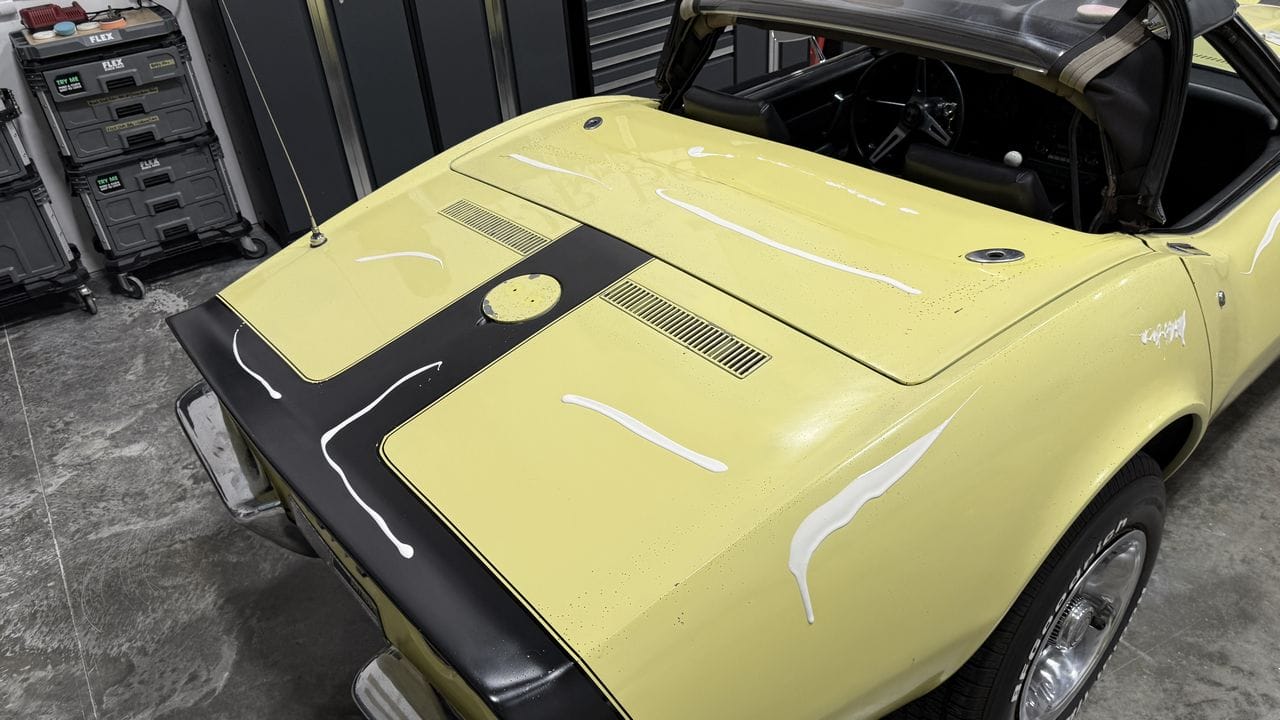
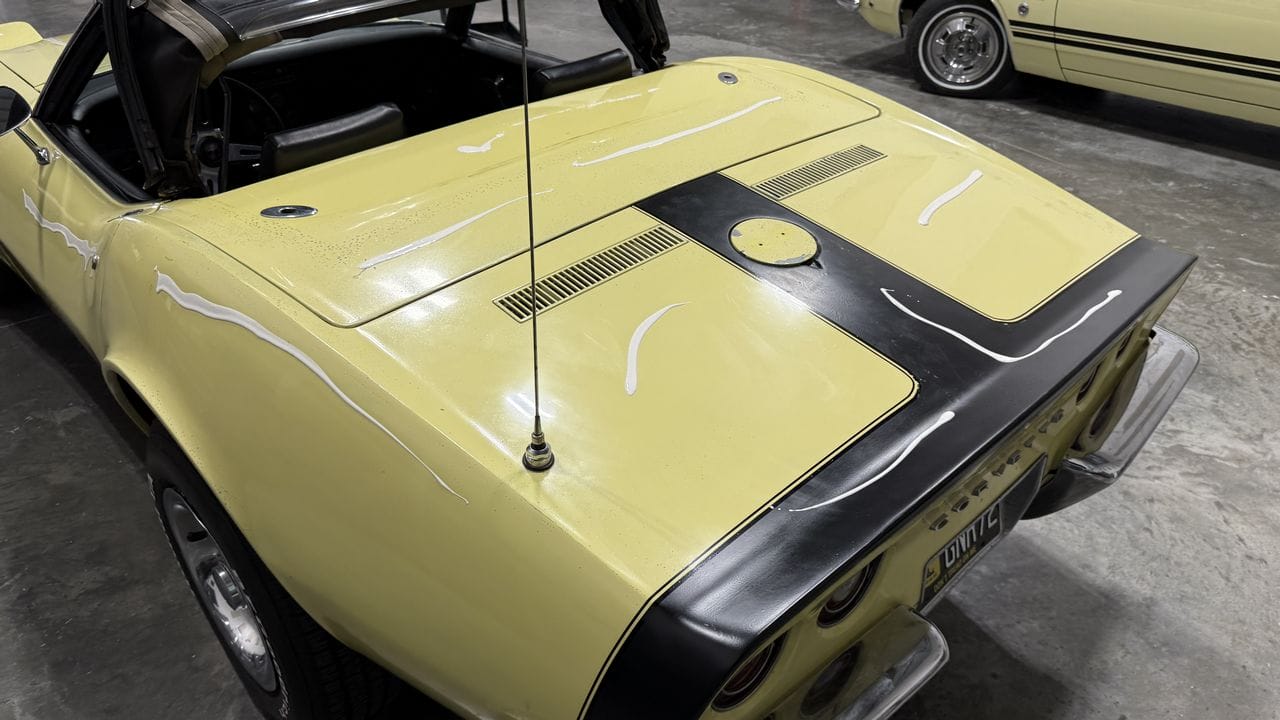
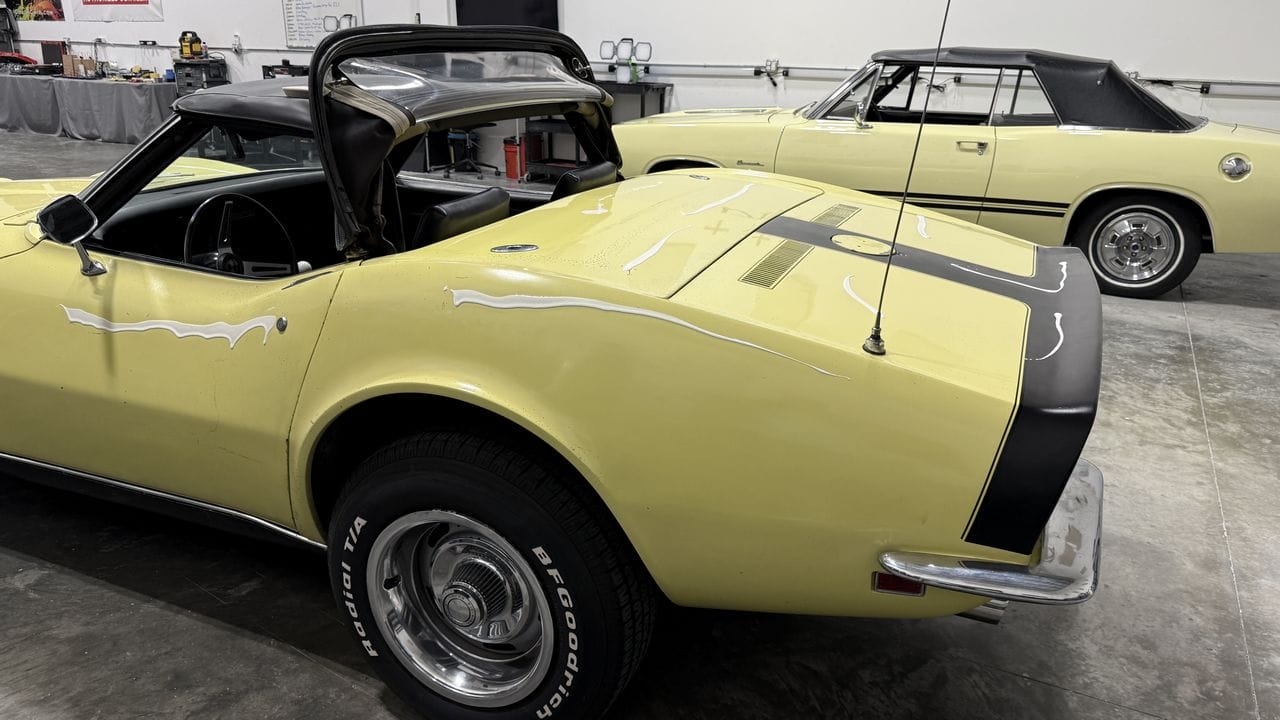
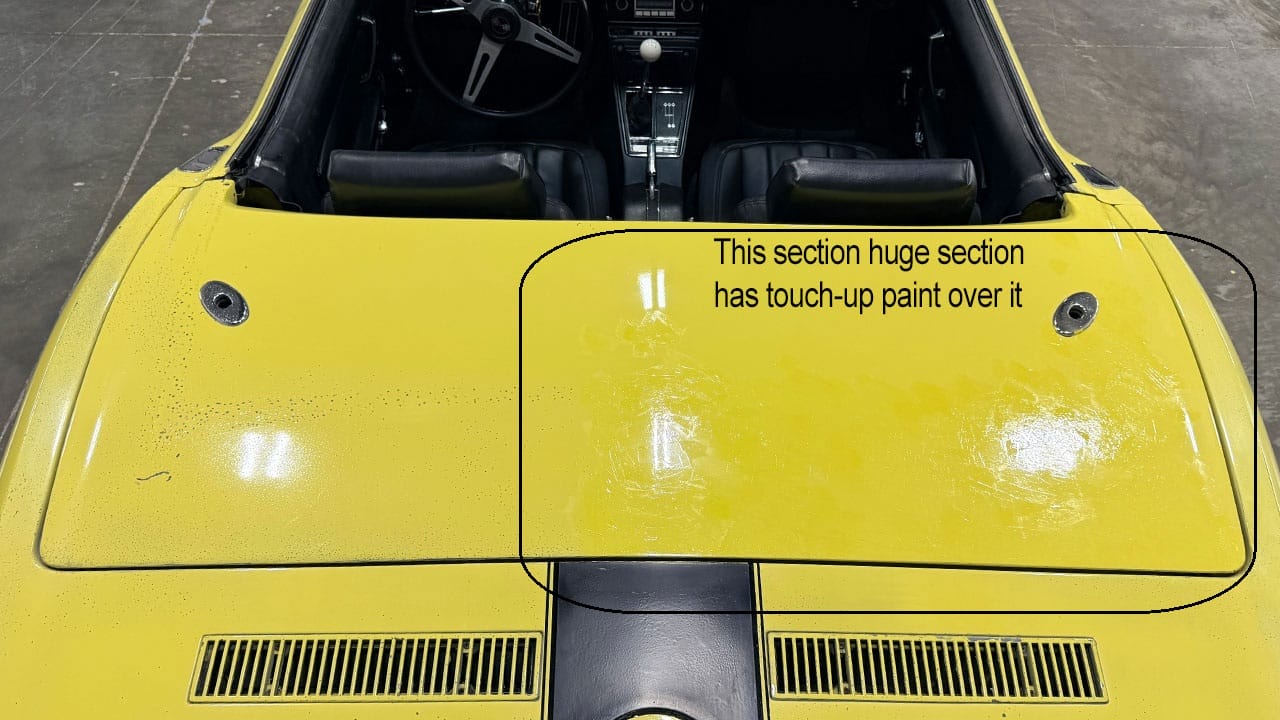
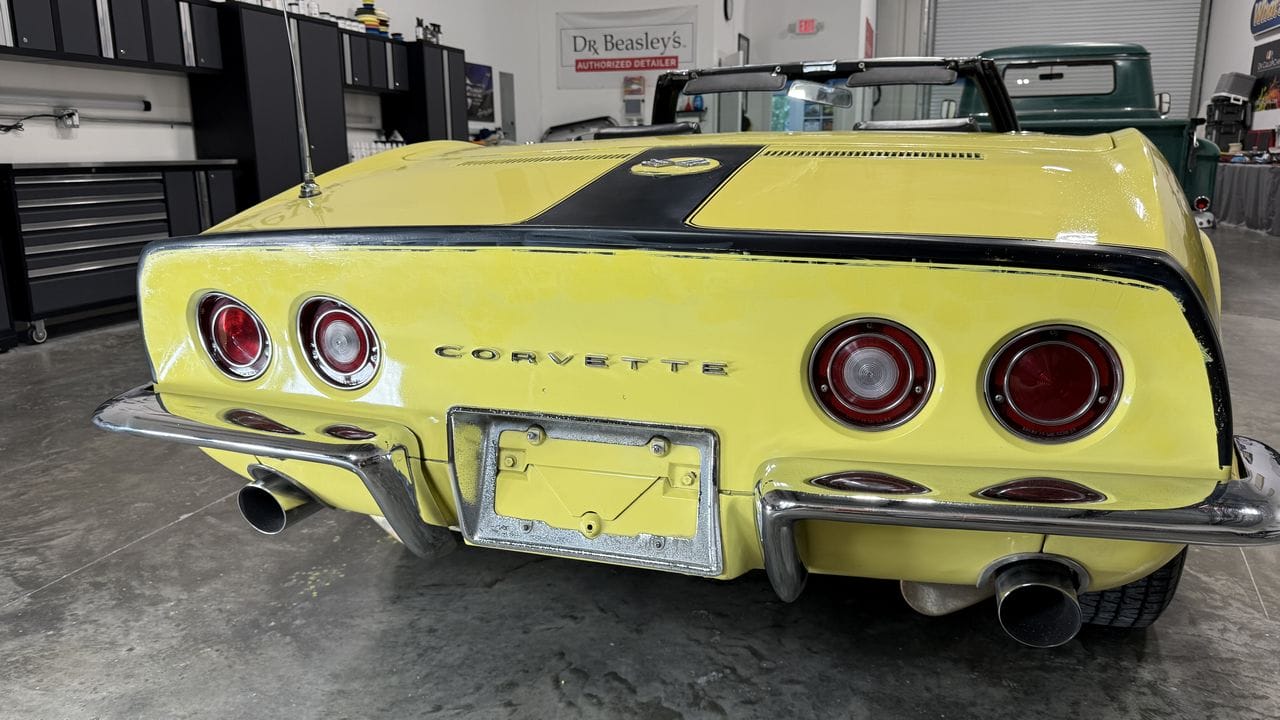
In the picture below, I’ve applied the touch-up paint over the entire back panel. Next is blending.
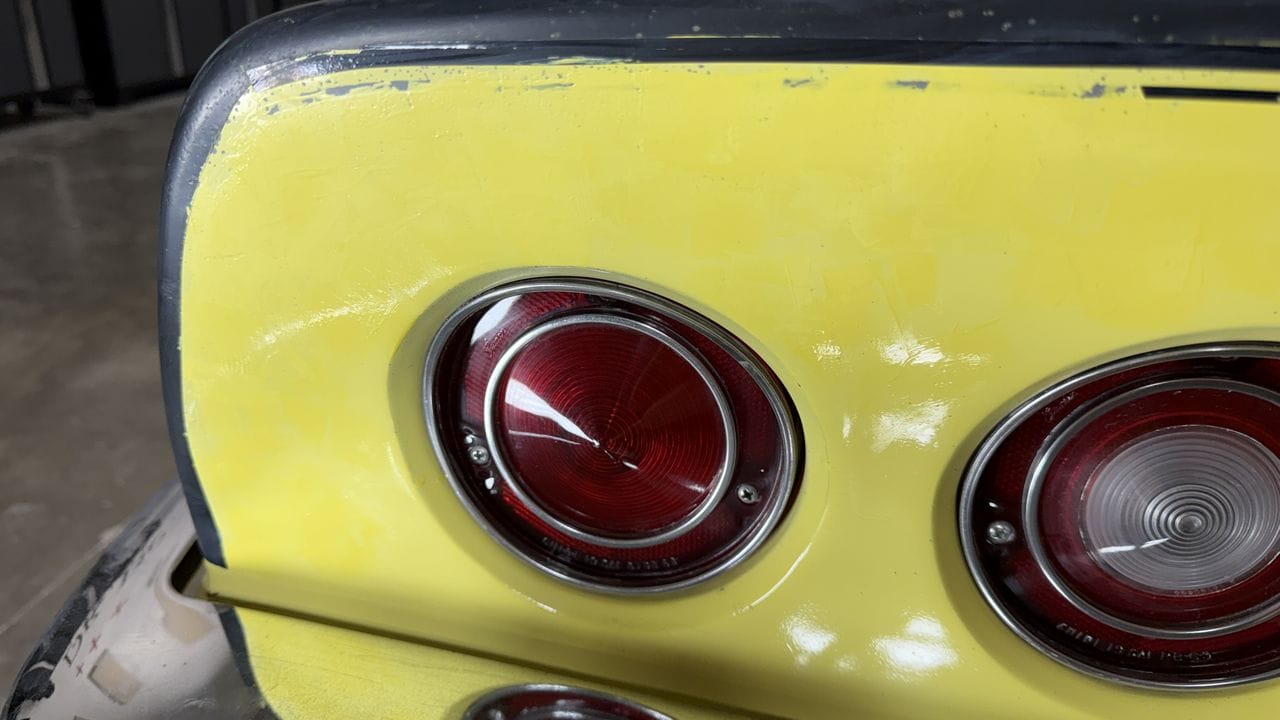
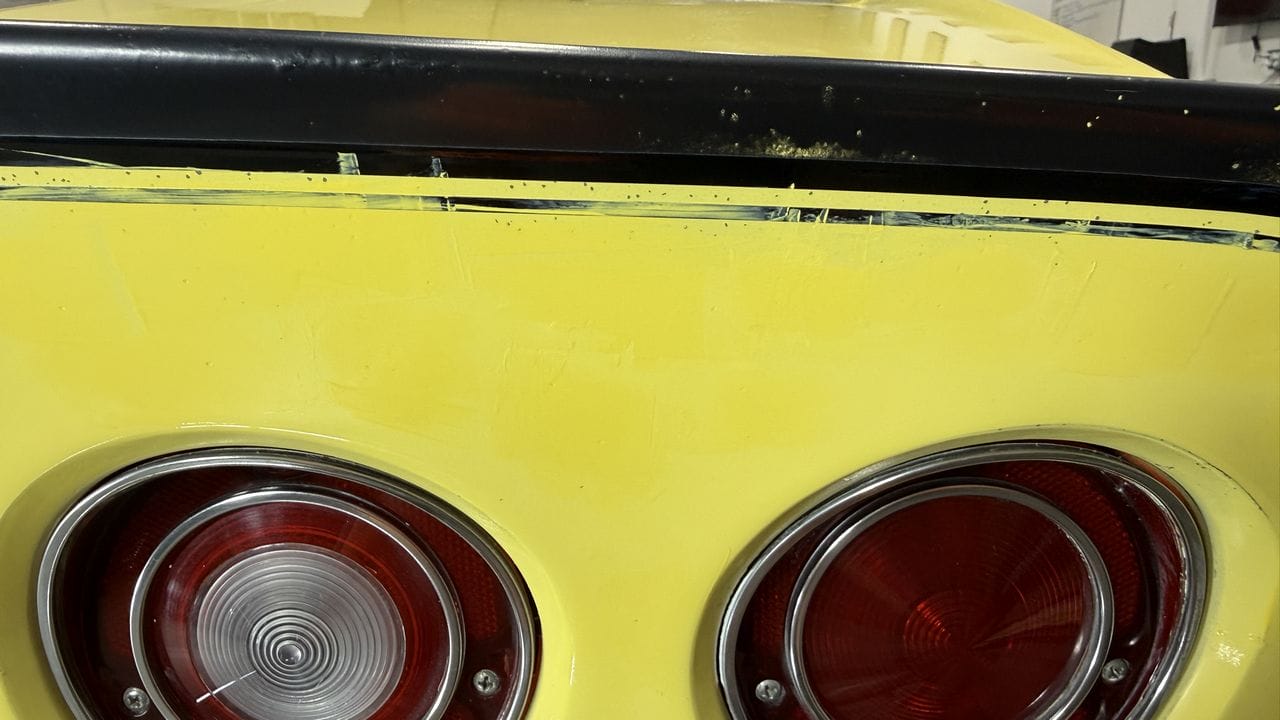
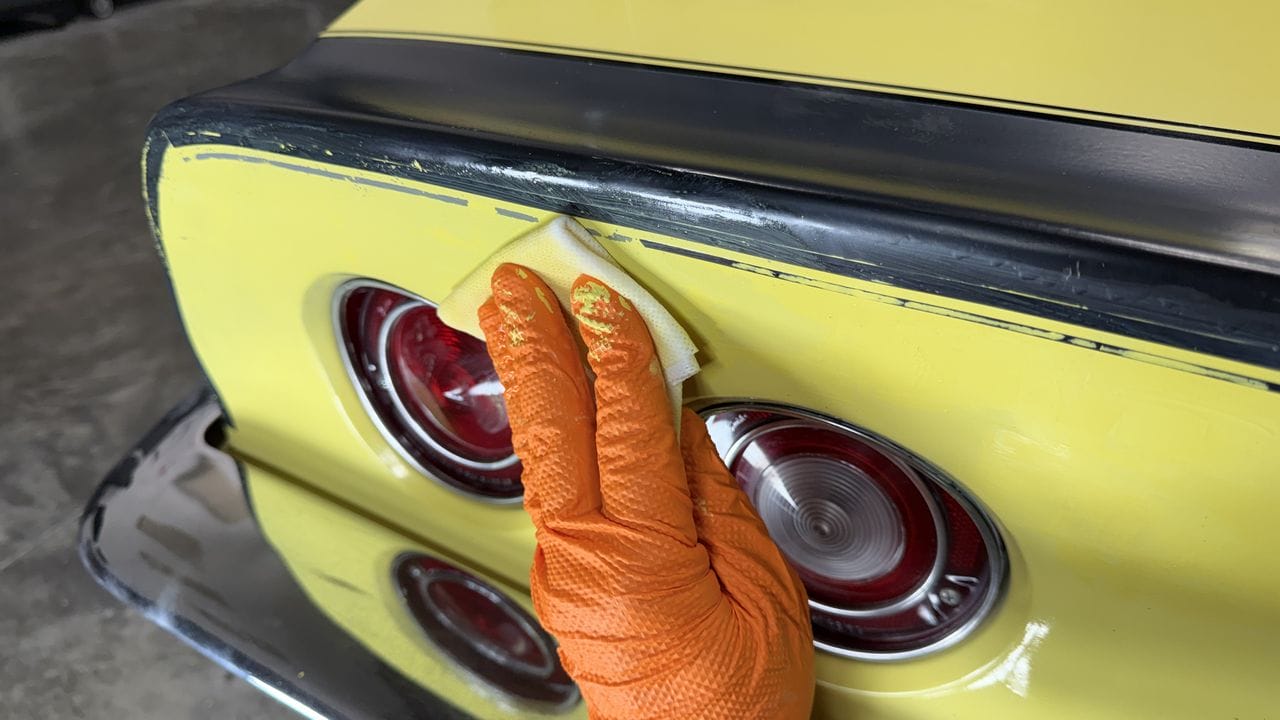
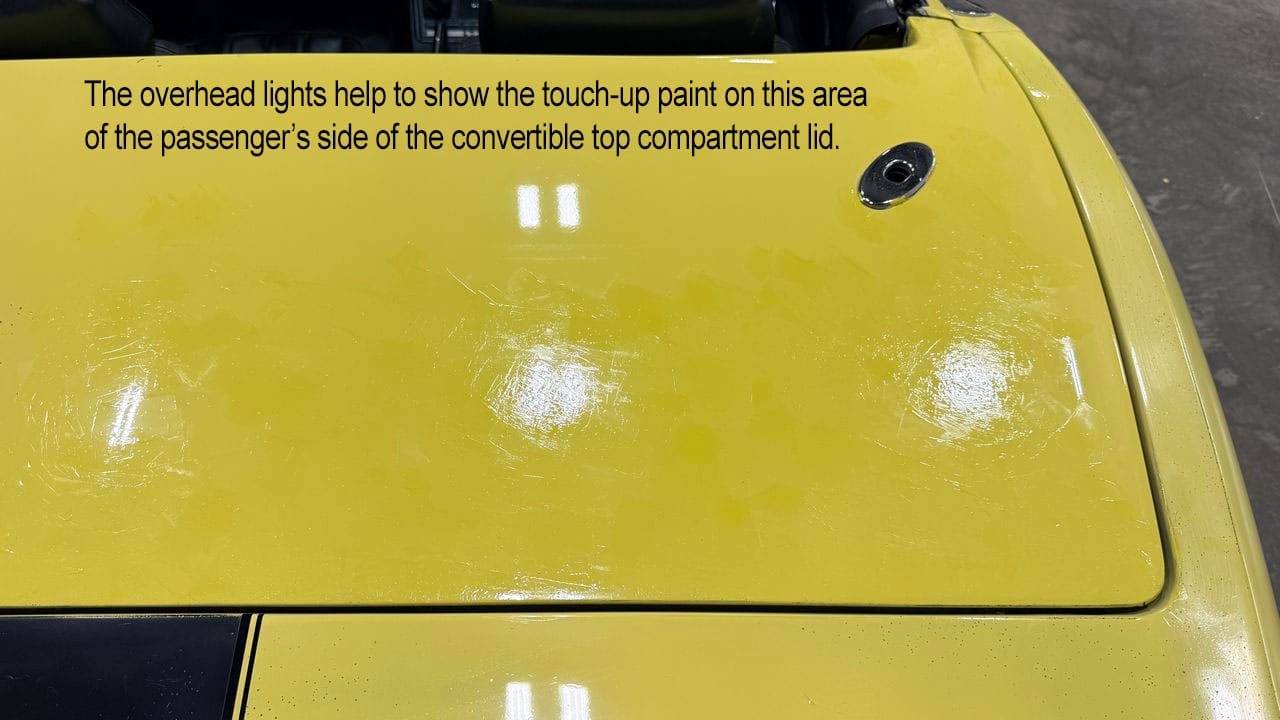
If you look closely, you can see where I’ve blended away excess paint but I still more blending to do.
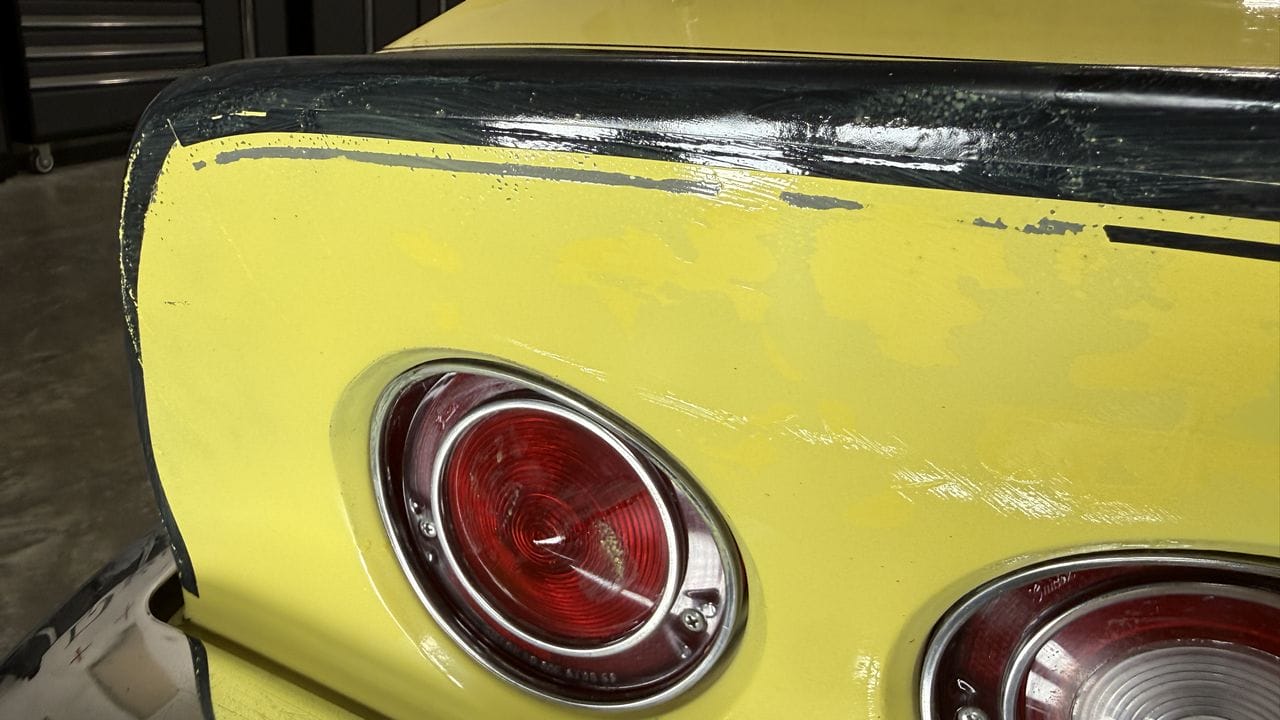
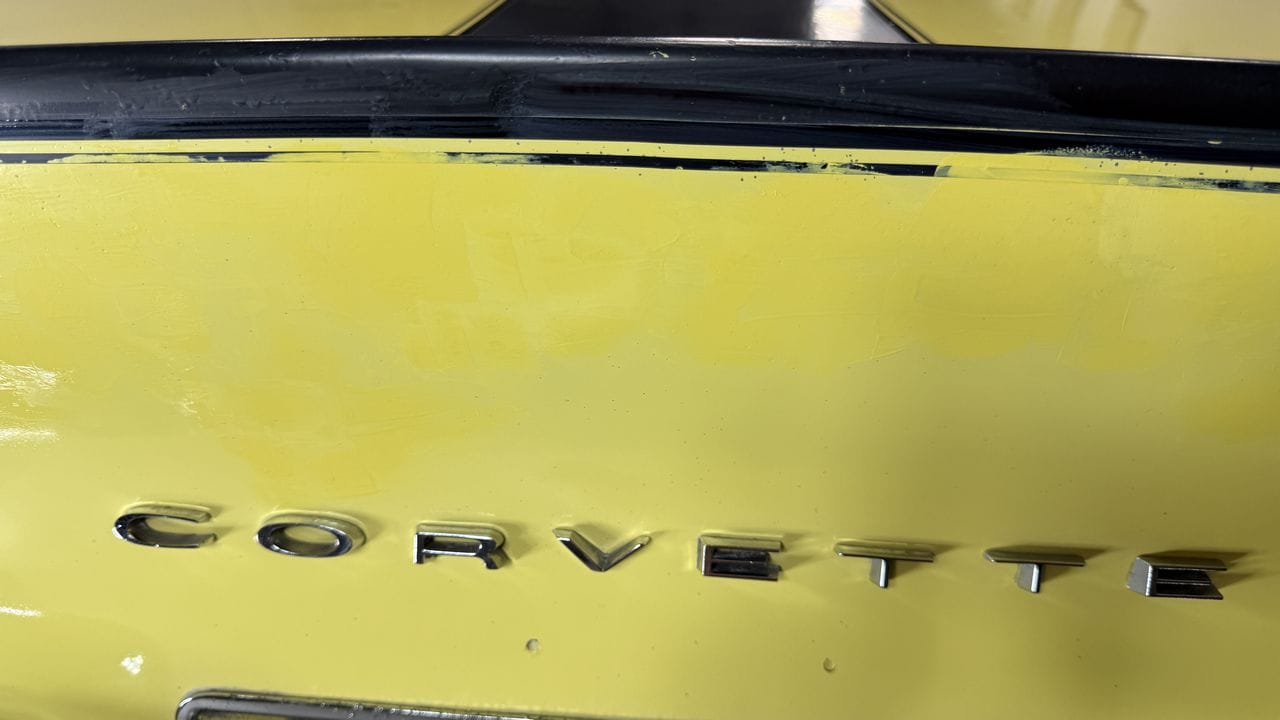
I’ve thrown some LIGHT onto this section to show you how I’ve removed all the excess paint and the rock chips are dissappearing.
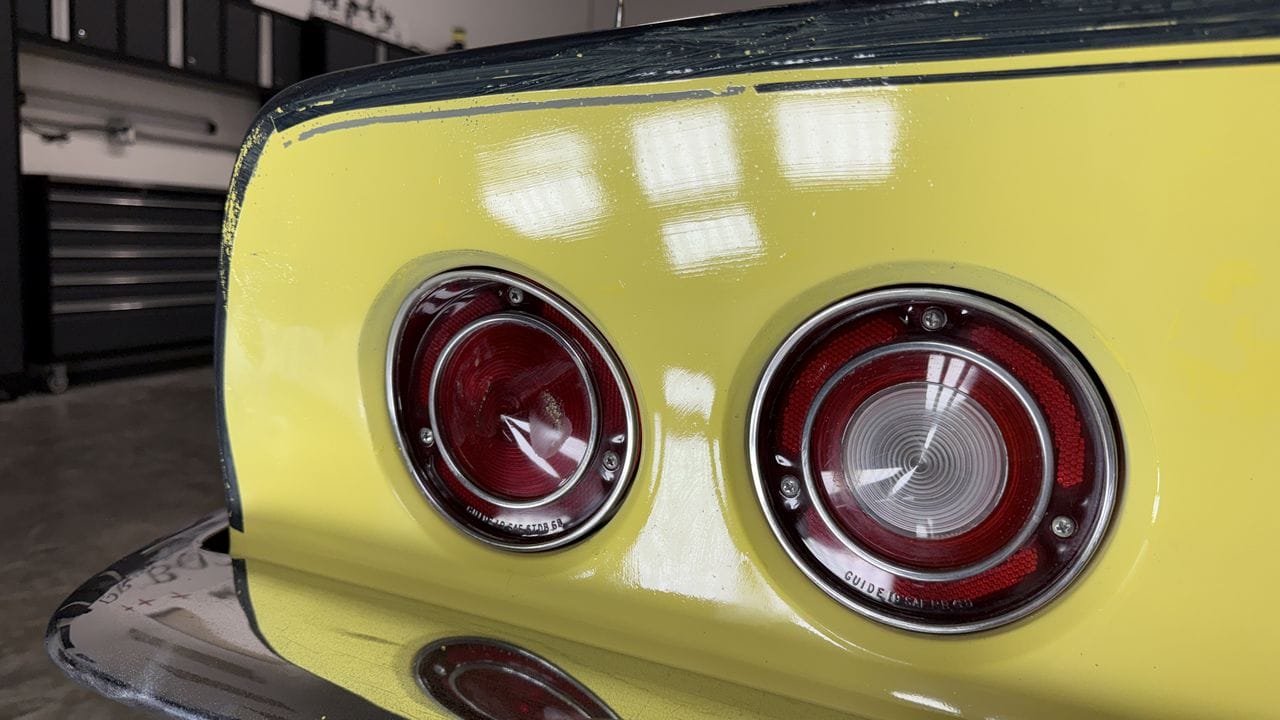
After blending an area, if you missed any rock chips or perhaps you rubbed to hard and removed the paint out of some of the rock chips – no problem – just apply more paint and repeat the process using a GENTLE touch.
AND REMEMBER – I’m still going to re-polish the entire Corvette, which will restore the gloss and shine while evening out the overall appearance.
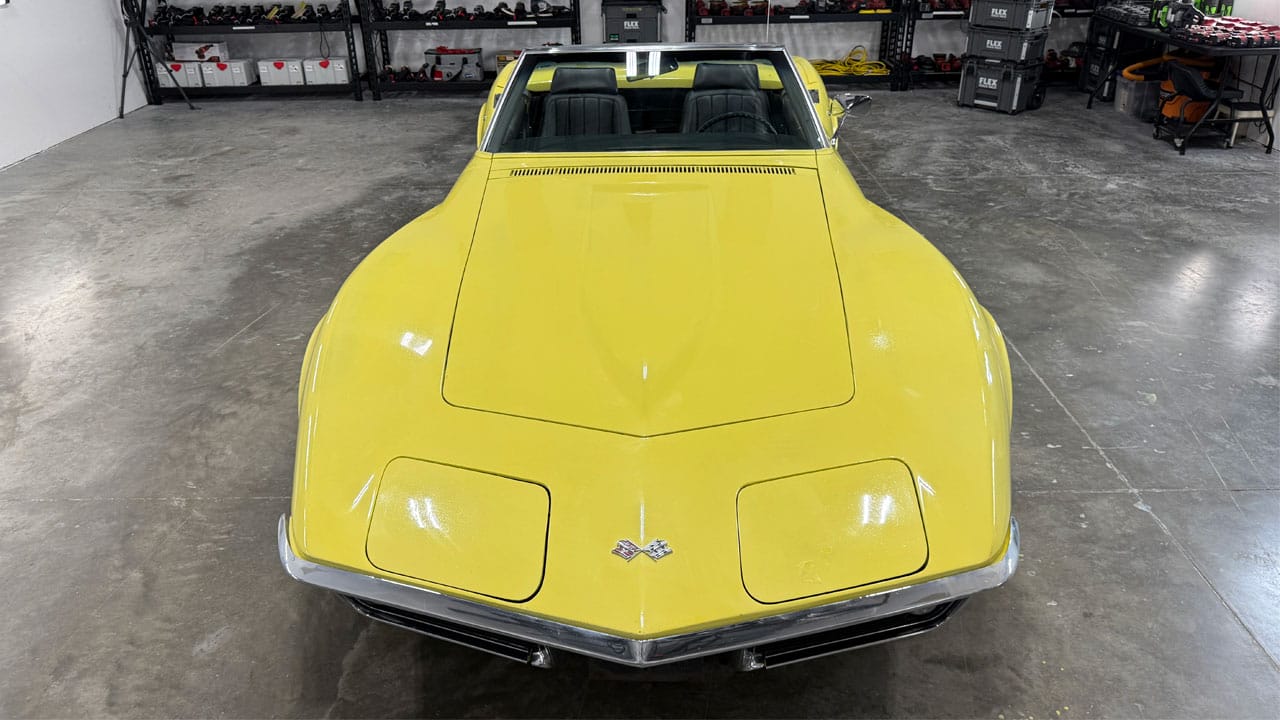
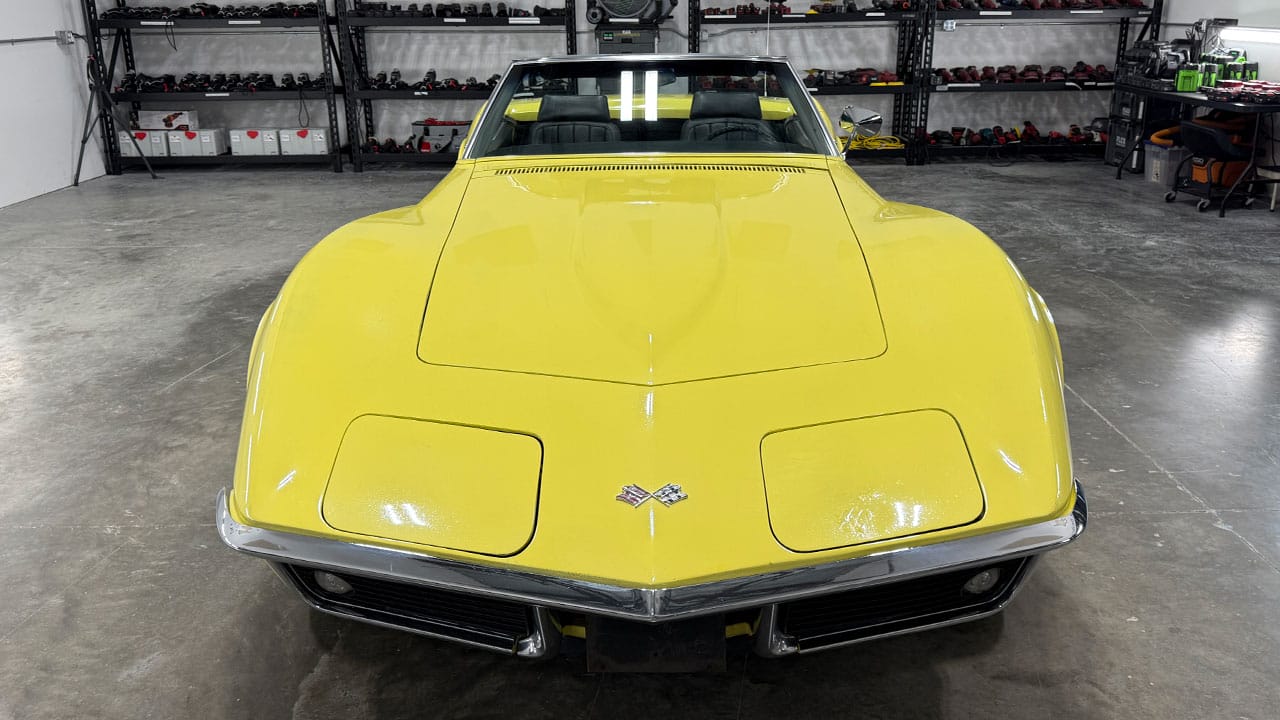
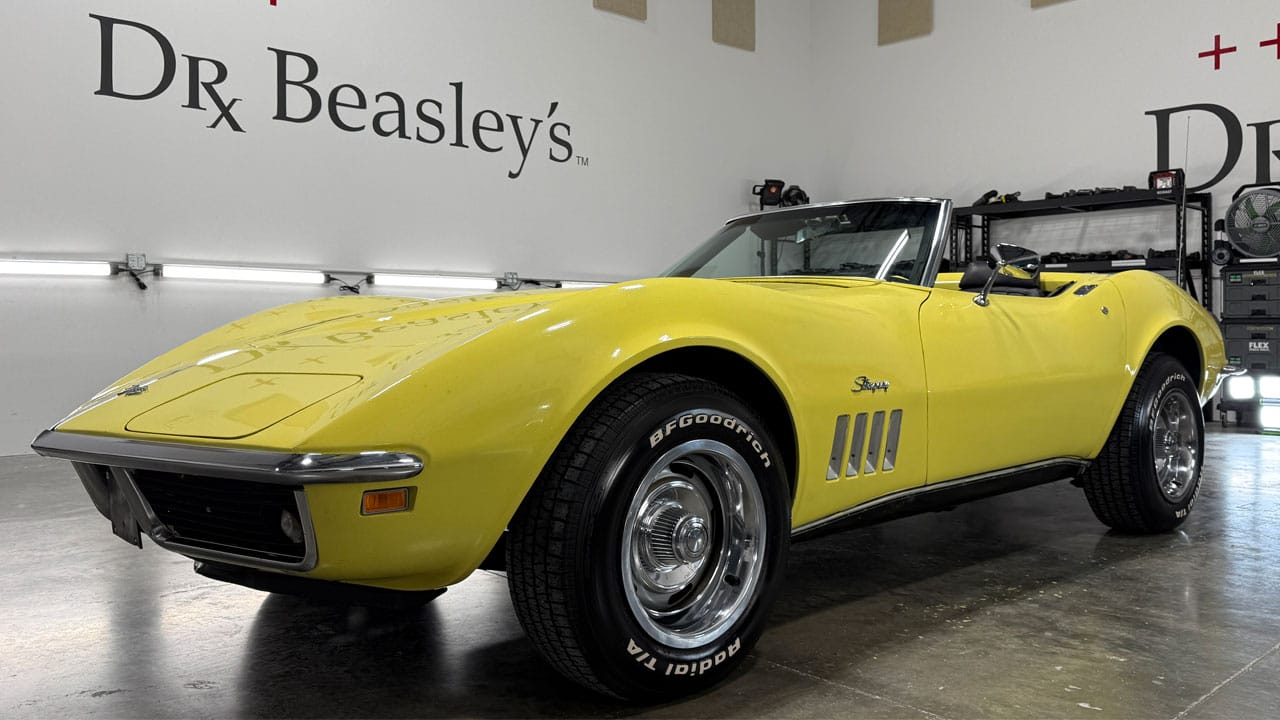
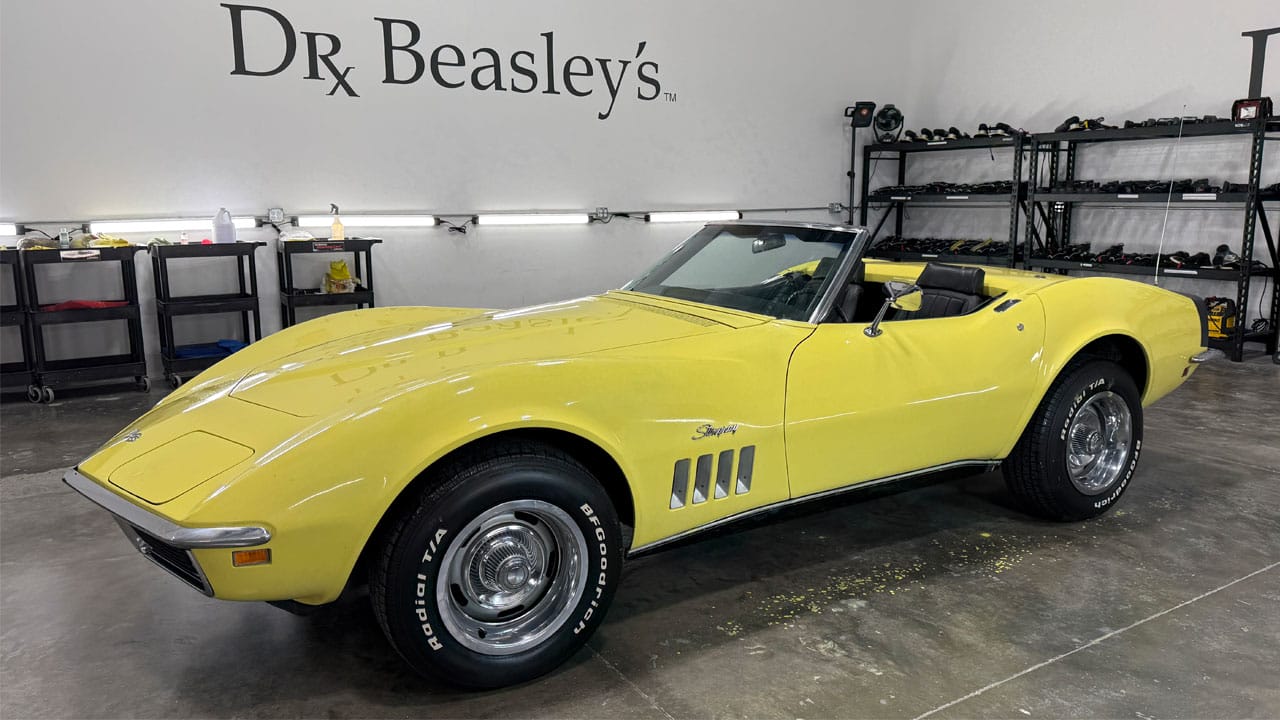
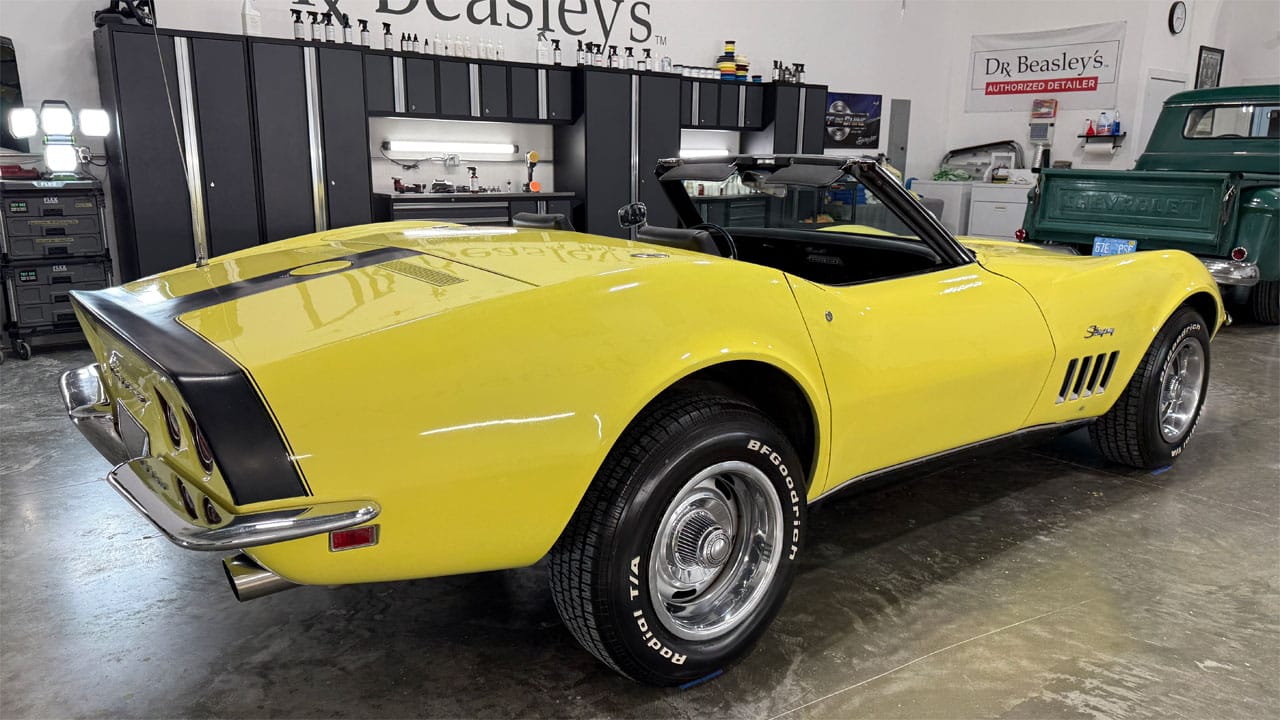
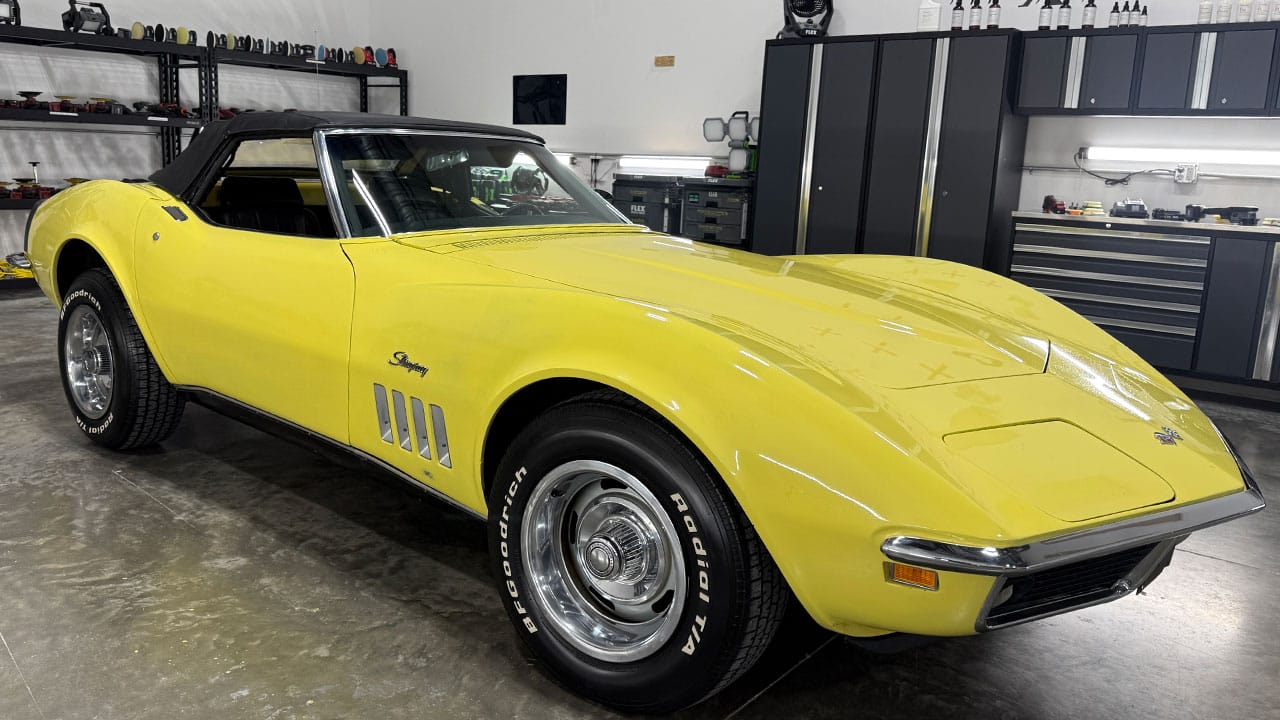
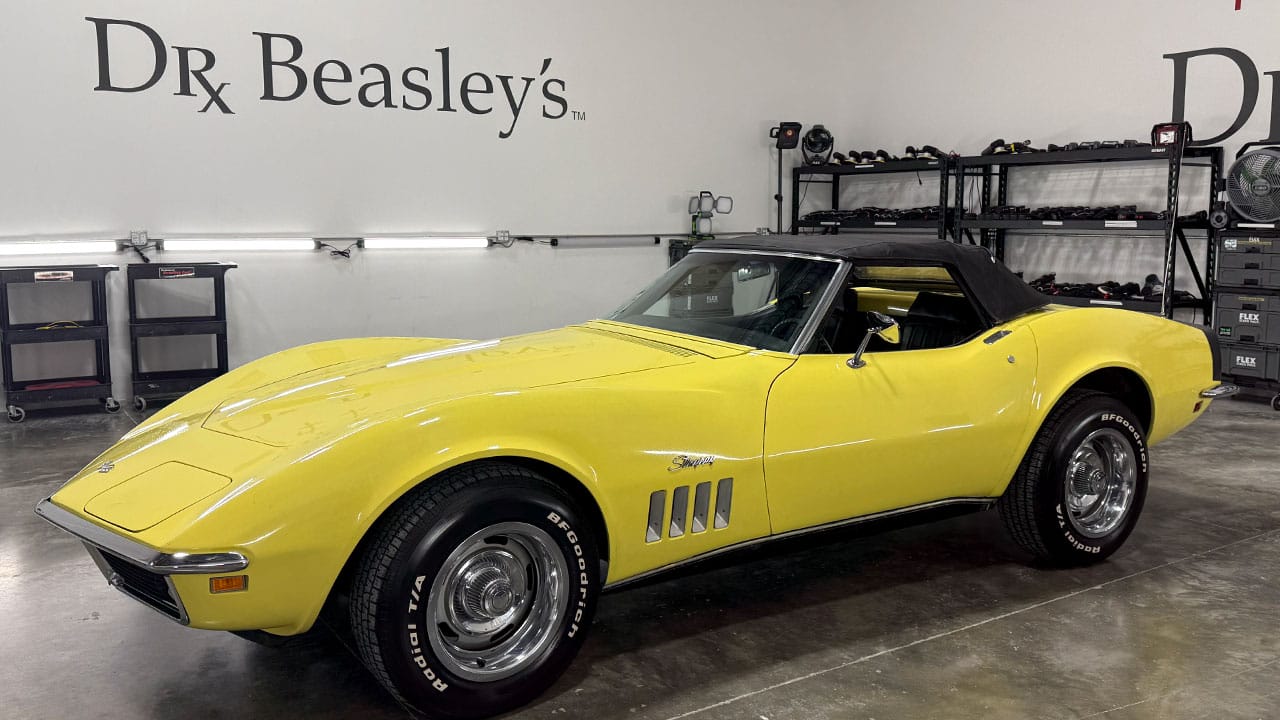
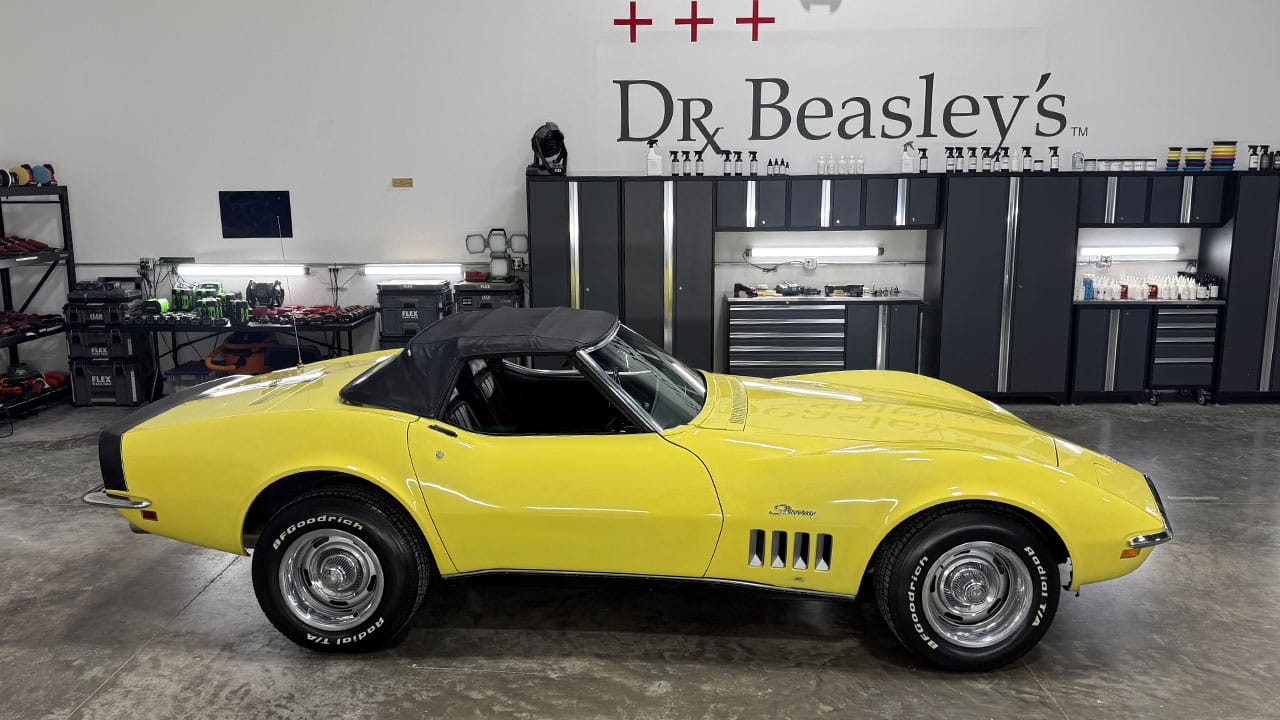
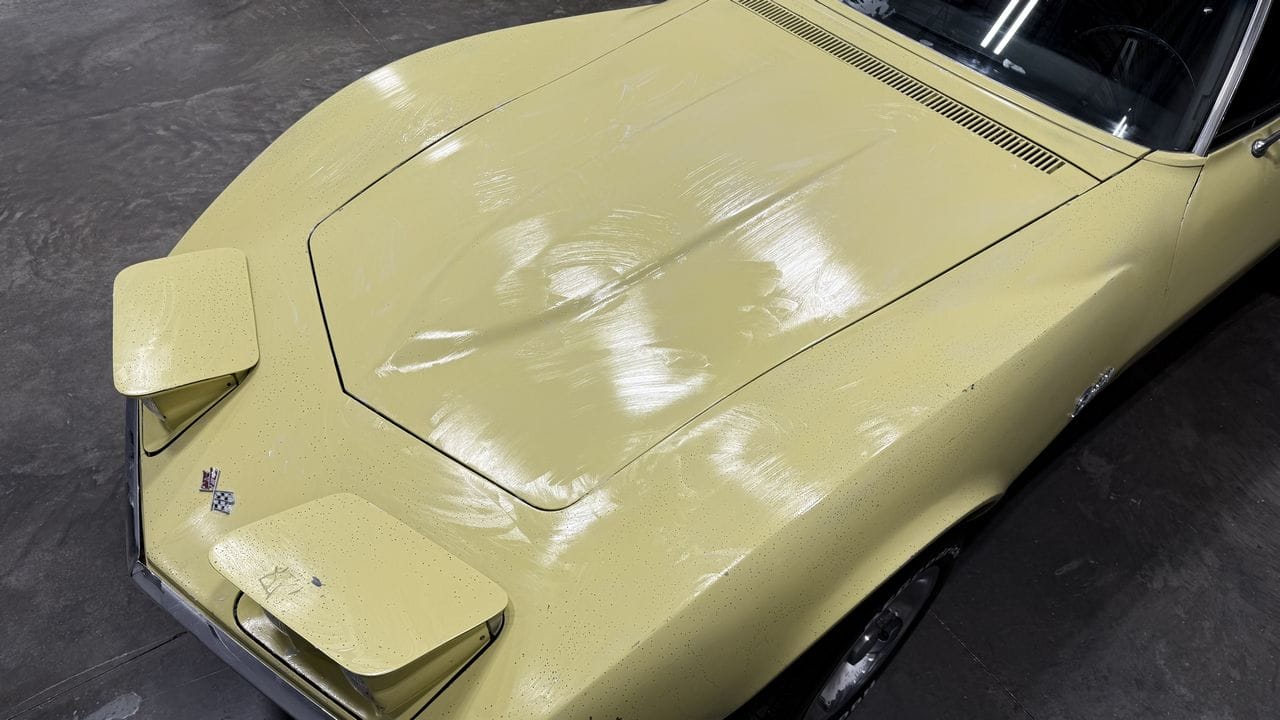
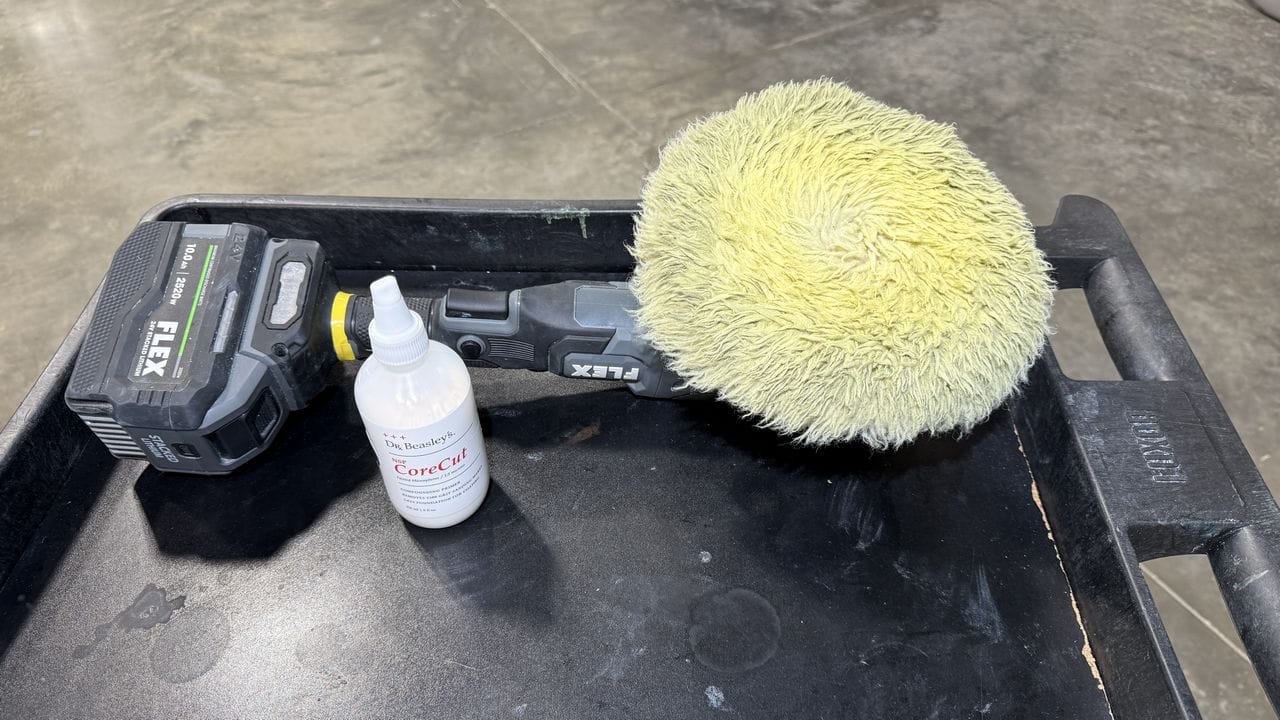
To remove decades of oxidation, swirls and scratches, I cut the paint hard using CoreCut compound with wool pads on rotary polishers. I followed this with machine polishing. For this step I switched over to the FLEX Supa BEAST, Buff and Shine EdgeGuard foam polishing pads and NSP 150.
I emptied 5 bottles of Daytona Yellow touch up paint and there was only a little paint left in bottle #6. I count 12 wiping cloths, stained with removed yellow paint during the blending process. I used a lot of the SealAct.
The below picture shows ONE paper plate, I probably used a half a dozen as I worked around the Corvette.
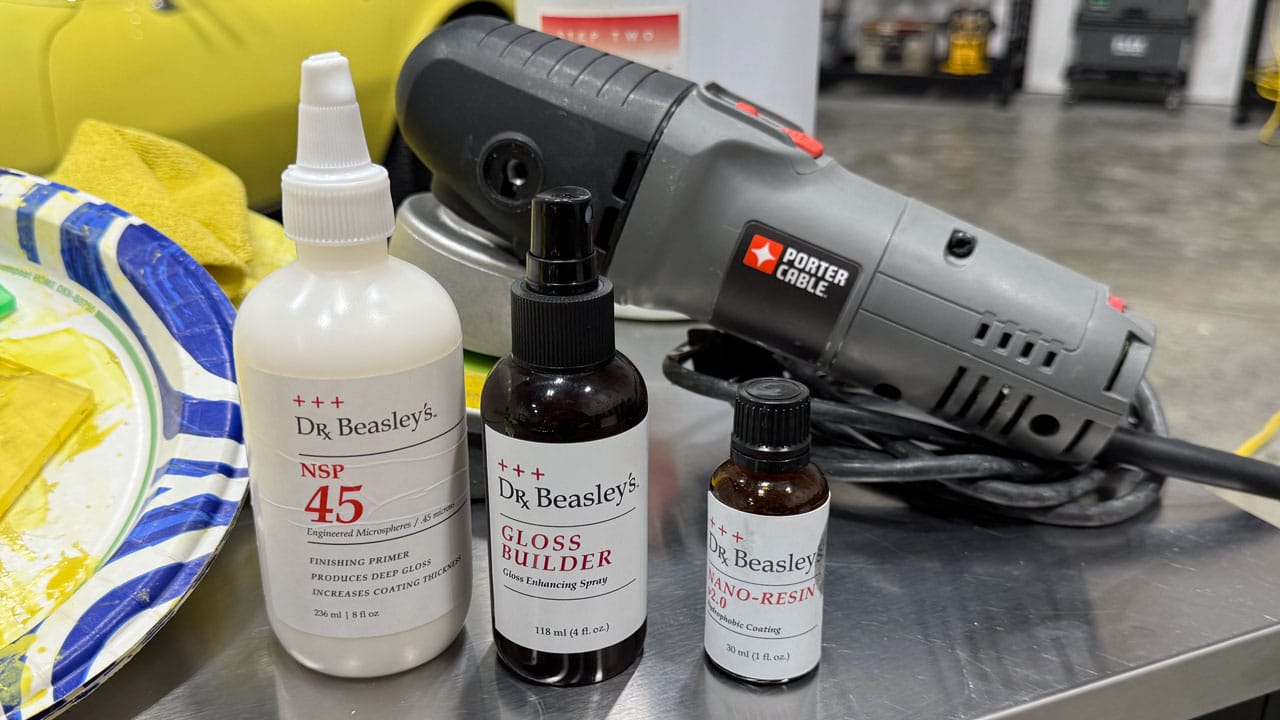
For the final paint correction step, I used a simple Porter Cable 7424XP, which is an 8mm free spinning, random orbital polisher – very NON-aggressive, which is what I needed for the final polishing step. I used this an ultra fine cut polish with a Buff and Shine foam finishing pad. Then to seal the paint, I installed the Nano-Resin 2.0 Ceramic Coating.
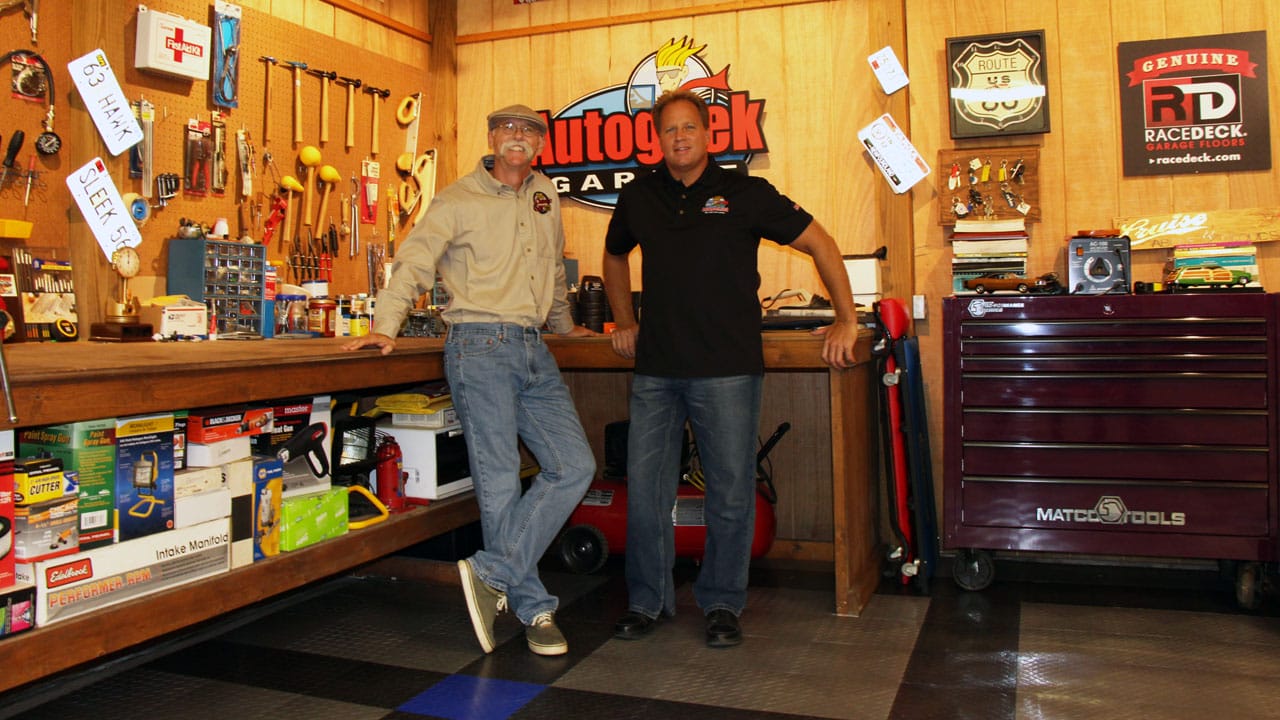
If you ever watched My Classic Car with Dennis Gage, Mike Phillips was a frequent guest on the show sharing new tools, pads and products and demonstrating correct techniques for a wide-spectrum of detailing topics.
Mike was also the co-host, along with Adrienne “AJ” Janic for their TV show, Competition Ready on Velocity Channel.

Mike Phillips has been teaching car detailing since 1987. He has worked with industry powerhouse companies such as Meguiar’s, Autogeek, 3D Products International, and now Dr. Beasley’s.
He has served as host for two TV shows on car detailing:
• Competition Ready on the Velocity Channel
• Autogeek’s What’s in the Garage
He is the author of five car detailing books and one boat detailing book. Another book is in the works and set to publish in the spring of 2027.
He’s been the guest detailing expert for multiple TV shows including
He has written more than 1,000 articles on the topics of auto and marine detailing. He was the Detailing Trainer for Meguiars.com from 1987-2009, as well as the Director of Training for Autogeek.com from 2009-2021. After that, he served as Global Director of Training for 3D International and currently is the Chief Education Officer/Trainer for Dr. Beasley’s.
For all his online life, he freely makes his email and cell phone number available for like-minded detailing, car and boat enthusiast with question or in need of help with their detailing projects.
Would You Like to Learn How to Machine Polish Like a Pro?
• Would you like to take your detailing skills to a higher level?
• Do you find you learn better by doing versus sitting in a chair looking at a PowerPoint presentation about car detailing?
Here at Dr. Beasley’s in sunny Stuart, Florida, we teach the most hands-on car detailing classes on planet Earth. And we prove it too. You can find write-ups on the Dr. Beasley’s Blog that photo-documents just how hands-on our classes are plus you’ll see the kinds of cars you’ll be training on.
Click the link below to find the dates, locations, topics, and prices for all upcoming detailing classes.
Upcoming Detailing Classes – Prices – Info – Topics – Locations
And if you ever have any questions, always feel free to reach out to me personally via text, phone call or email.
I hope to see you in a future detailing class!
Sincerely,
Mike Phillips
Chief Education Officer for Dr. Beasley’s
Mike@drbeasleys.com
Cell: 760-515-0444
Mike
The Dr. ColorChip Shoe Polish Technique – Preserving the Original Paint on a 1969 Corvette!
Insert Video Here
What is the Dr. ColorChip Shoe Polish Technique?
Dan McCool, the owner and founder of Dr. ColorChip, developed the Shoe Polish Technique to repair areas with extensive rock chips and road rash. When dozens—or even hundreds—of chips are concentrated in one area, addressing them individually with Dr. ColorChip’s standard Apply, Level, Blend technique simply isn’t practical.With Dan’s Shoe Polish Technique, you use a rubber squeegee to spread a generous amount of touch-up paint over the damaged area, working the paint into the chips.
After allowing the paint to dry for a few minutes, you use the Blending Wipes included in the Dr. ColorChip Rock Chip Repair Kit to apply SealAct blending solution. This removes the excess paint from the surrounding surface while leaving touch-up paint in the chips.
Why is the Shoe Polish Technique the right technique for the paint on this 1969 Corvette?
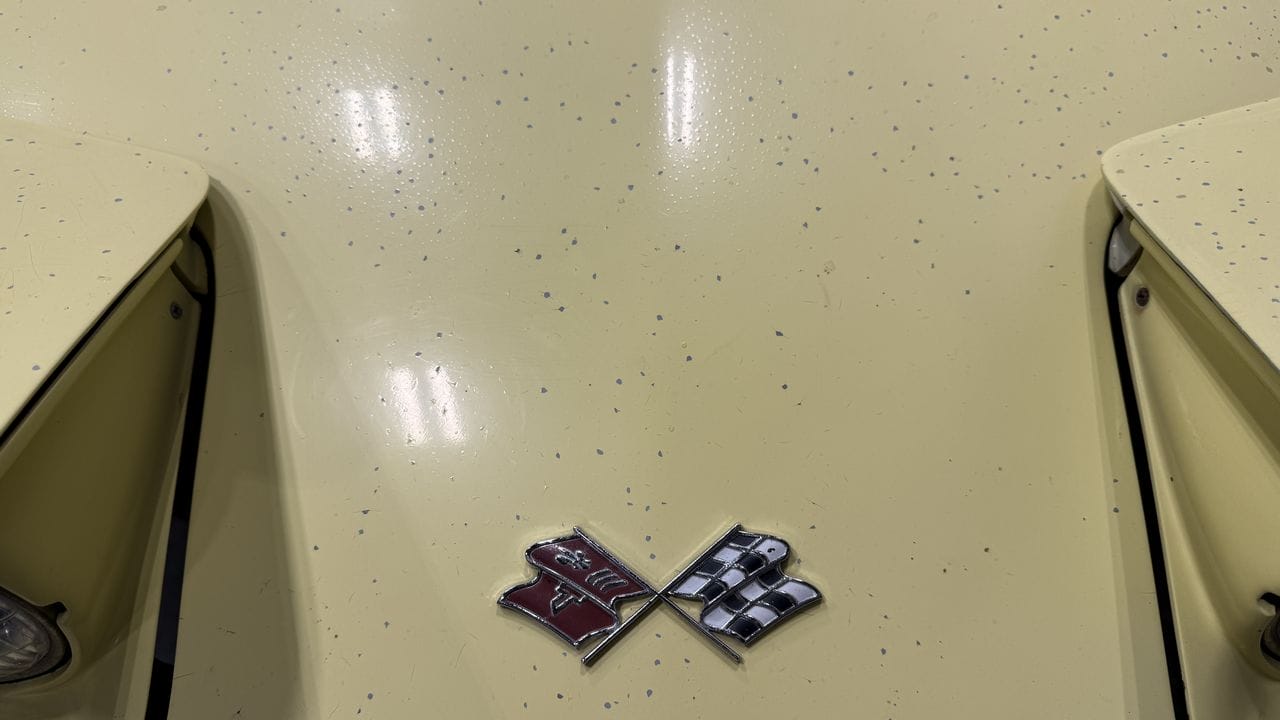
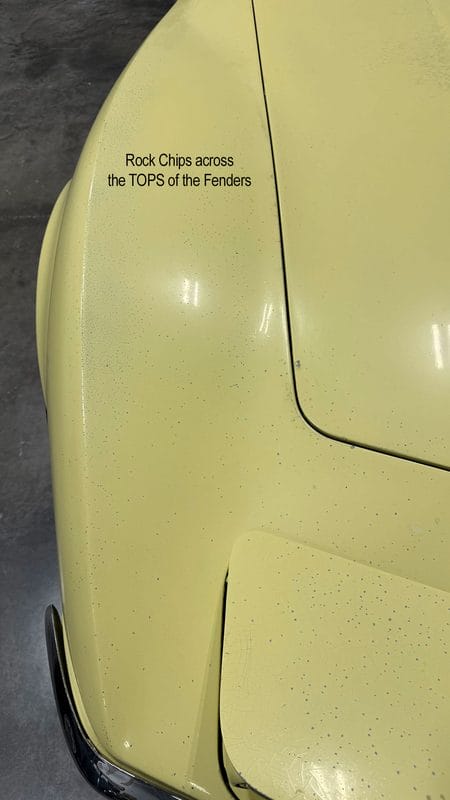
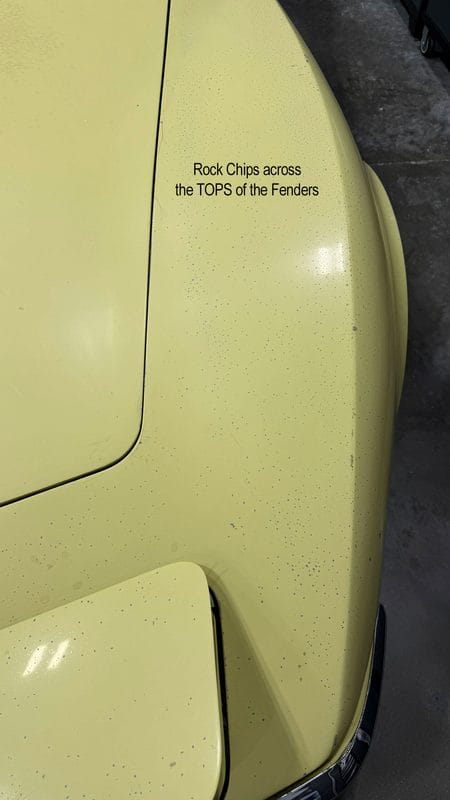
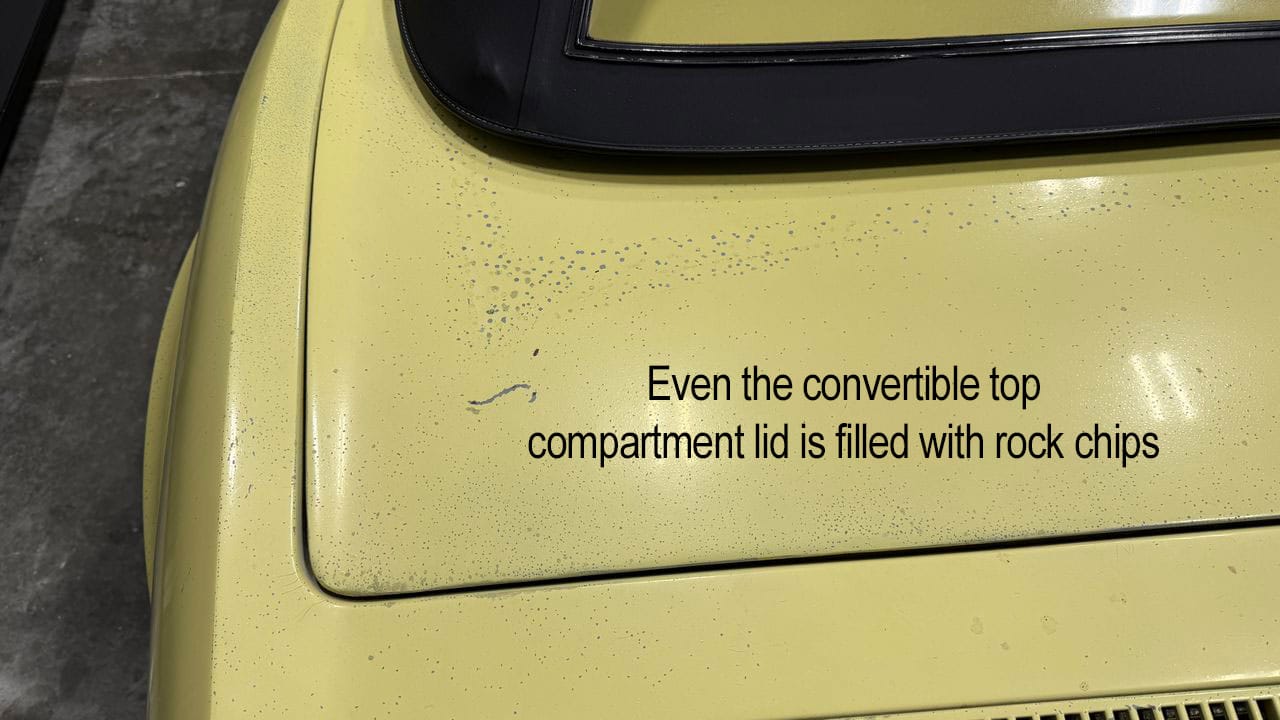
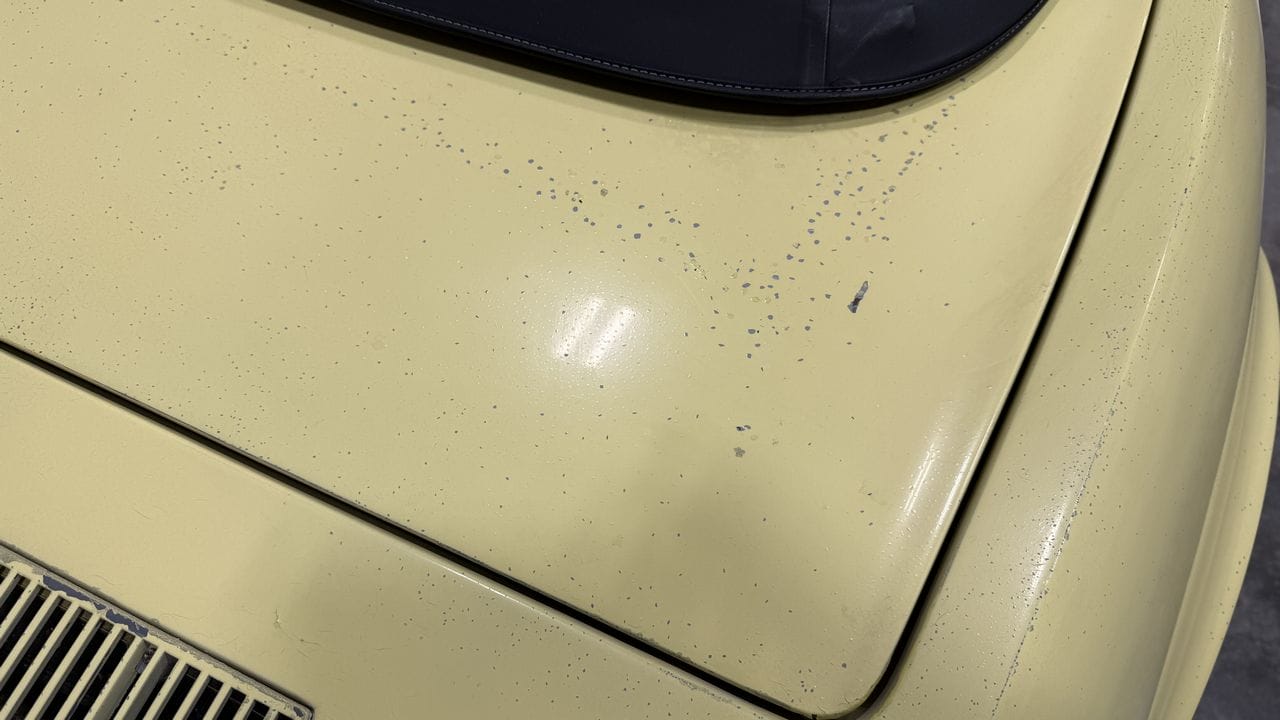
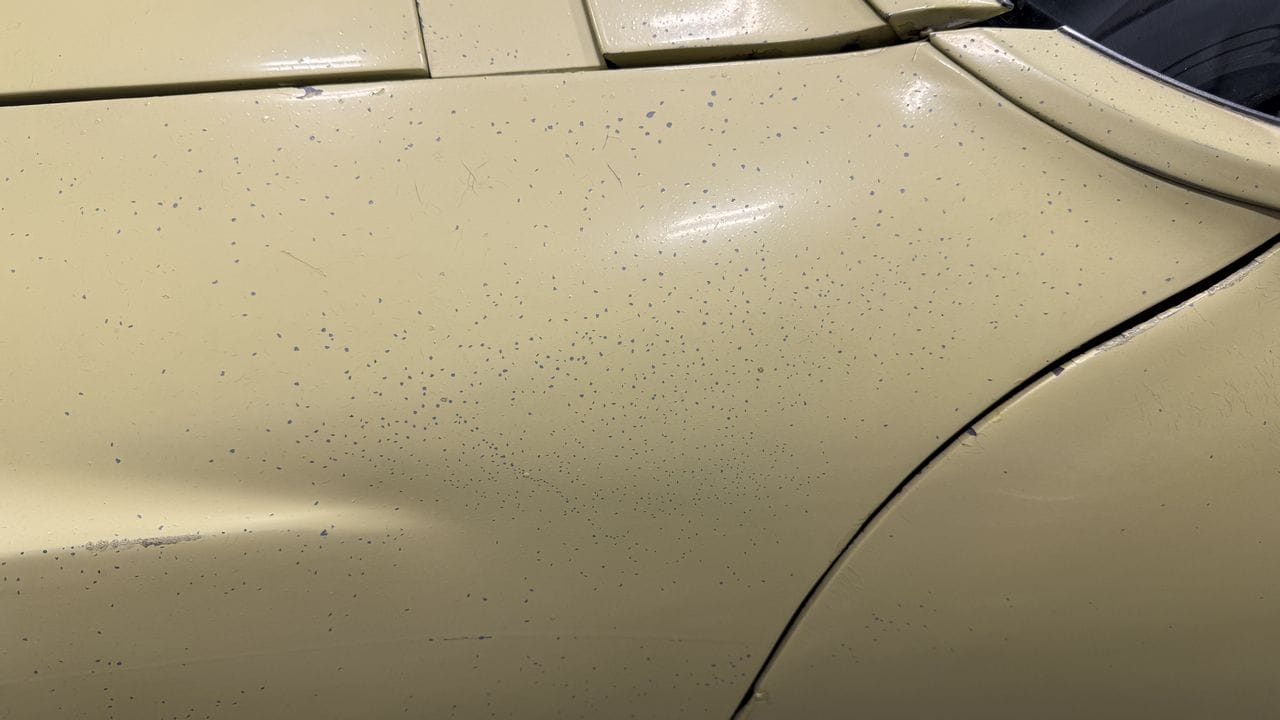
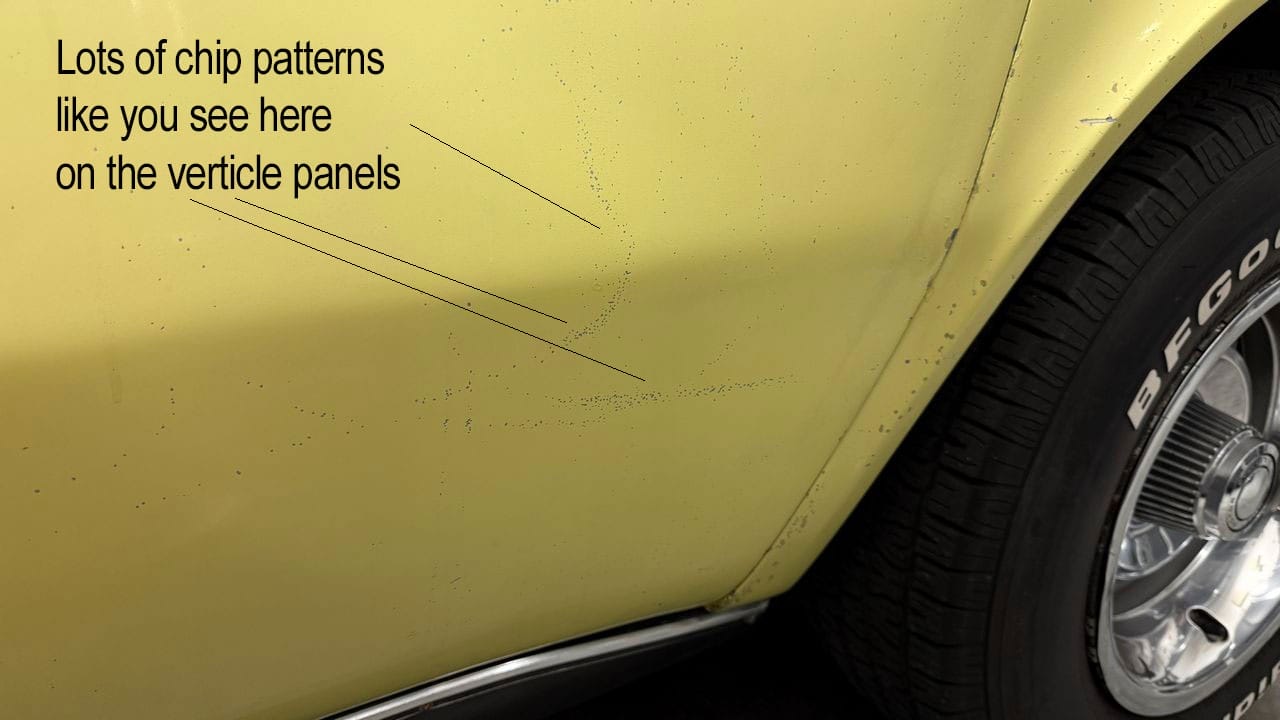
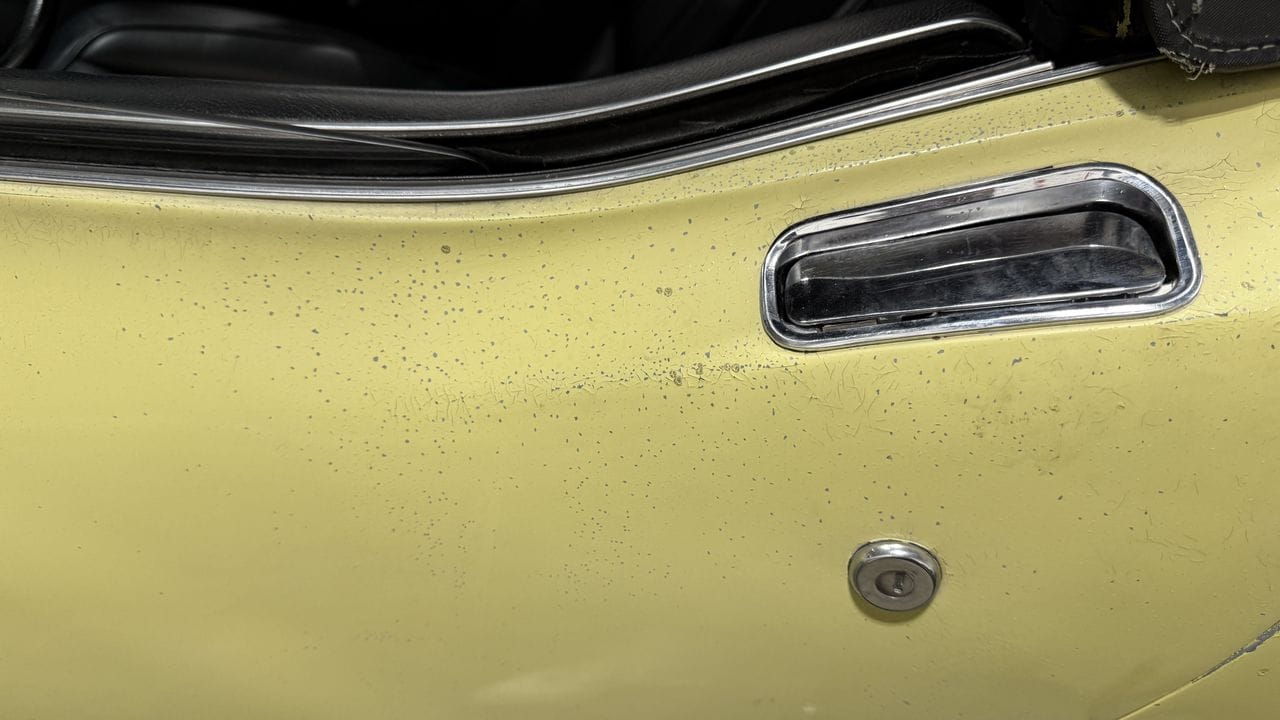
I’ll let the pictures tell the story, but I will add this: In all my years in the car detailing world, I’ve never come across a car with literally thousands of tiny rock chips scattered across virtually every painted body panel.For damage this widespread, the Shoe Polish Technique offers a practical way to fill the chips and dramatically reduce their visibility.
Original is only Original Once
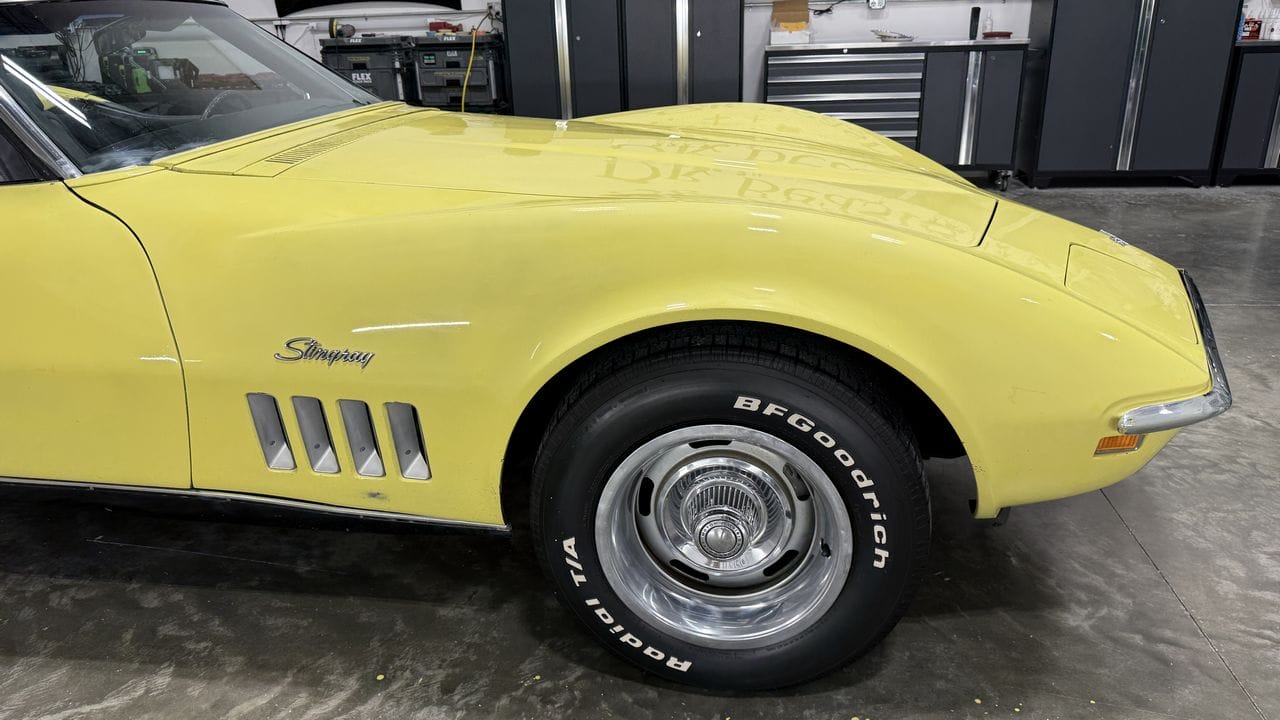
This is a largely original 1969 Corvette Stingray Convertible. The current owner purchased it from the original owner, making him only the second person to own this Corvette.Like the original owner, his goal is to keep the car as close to factory original as possible.
With its original single-stage Daytona Yellow paint and numbers-matching drivetrain, this Corvette deserves an approach built around preservation.
The goal is to PRESERVE the original paint, fill the rock chips, and improve the appearance while keeping as much of that factory finish intact as possible.
Original is only original once.
Before Pictures
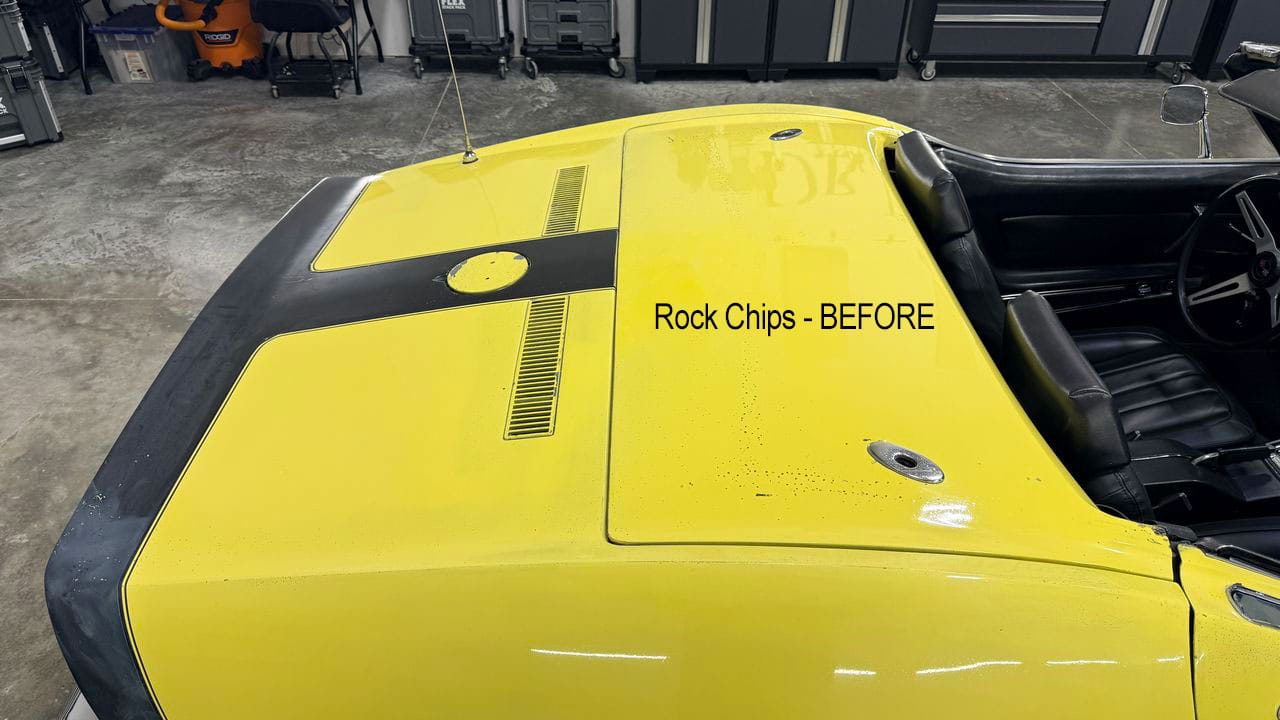
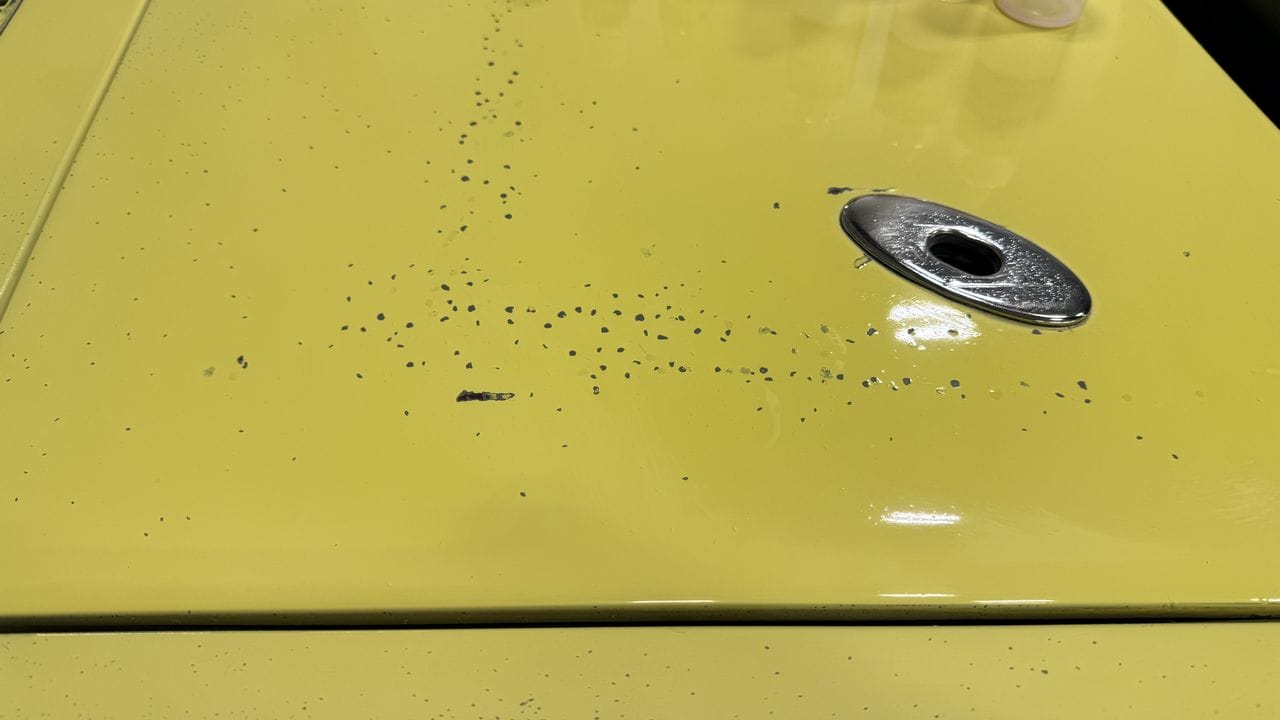
If I simply told you how many rock chips cover this Corvette’s original paint, you probably wouldn’t believe me. So I’ll let the pictures do the talking.The passenger-side headlight cover alone has dozens of chips—and this same damage is repeated across virtually every painted body panel.
Take a look at the following pictures, panel by panel, and you’ll understand why I chose the Shoe Polish Technique for this project.
Brining Neglected Single Stage Paint back to Life
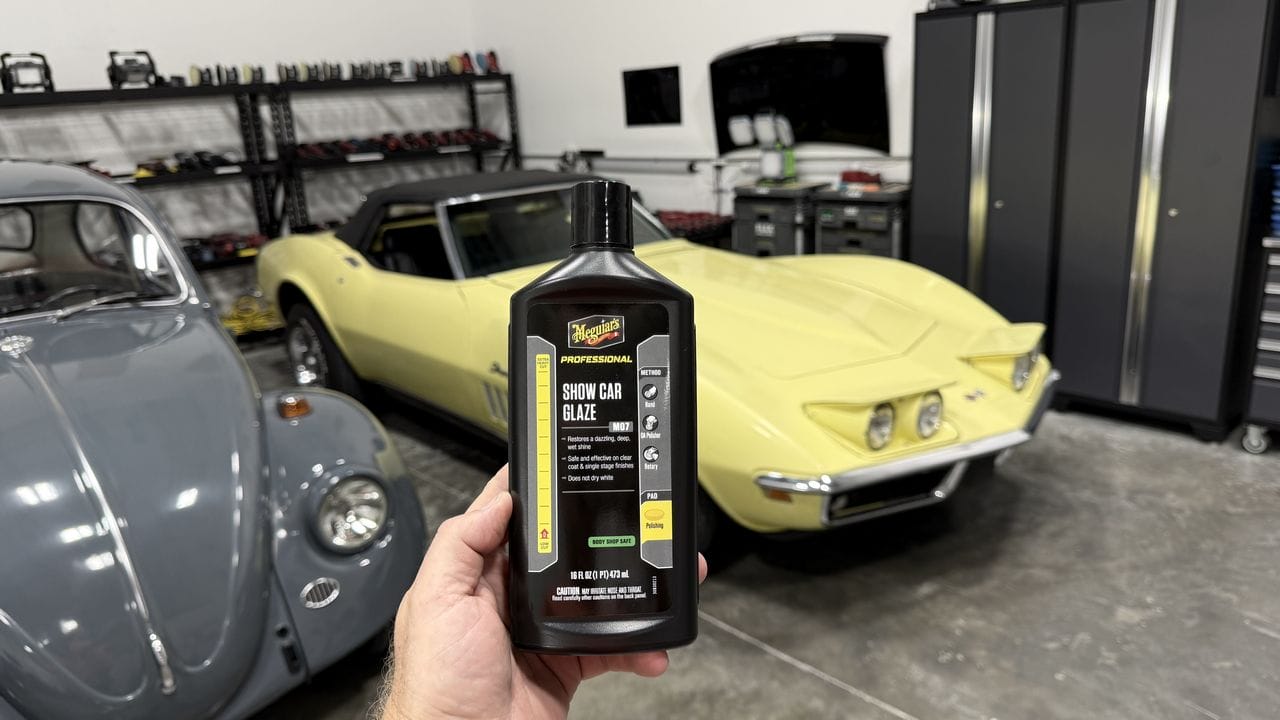
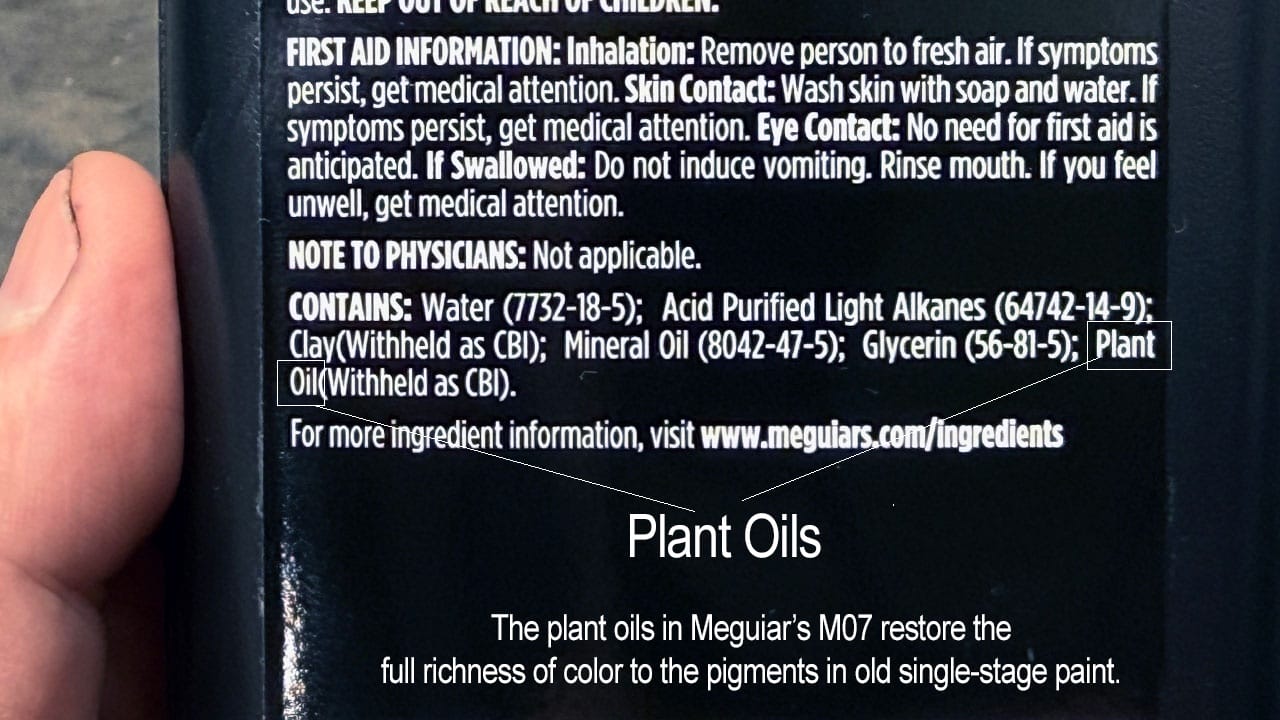
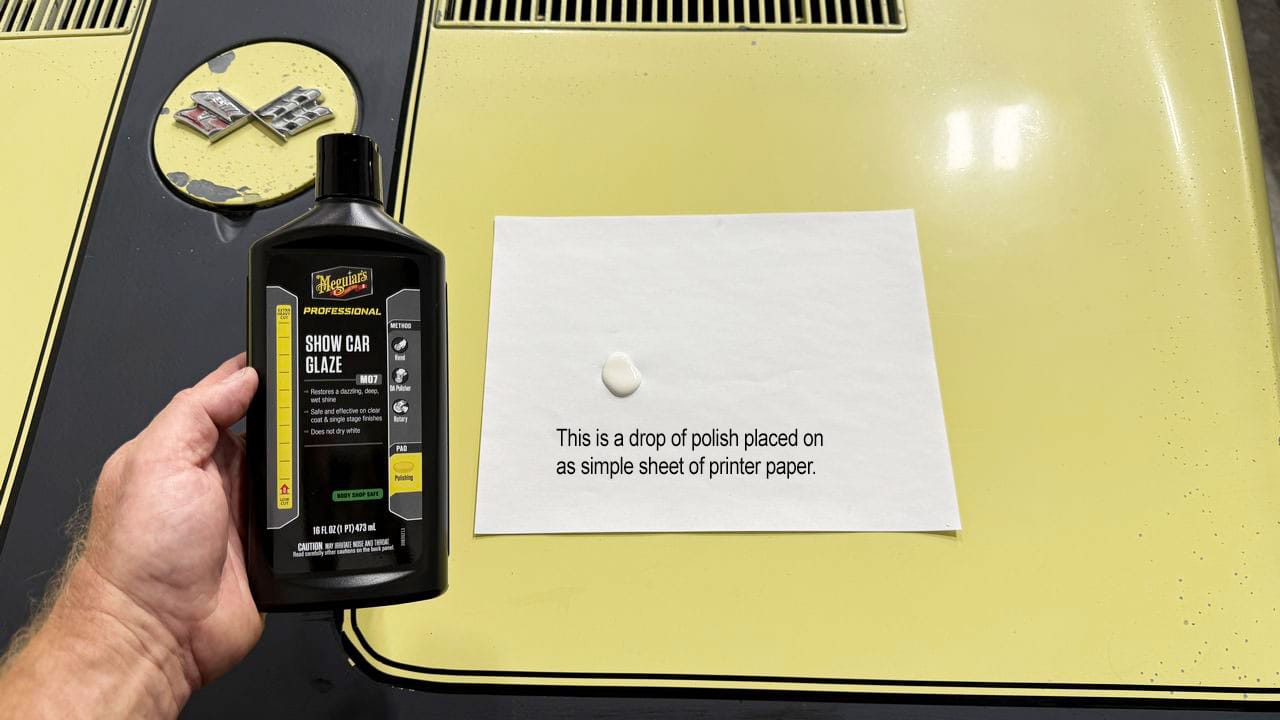
In my life, I’ve been asked to restore a lot of original paint cars. The secret is revitalizing the dull, brittle, lifeless looking paint without just abrading it with an aggressive compound. There’s only one polish around today that was around at the time of the Ford Model T, (early single stage paint), and that is the Meguiar’s M0716 Show Car Glaze.
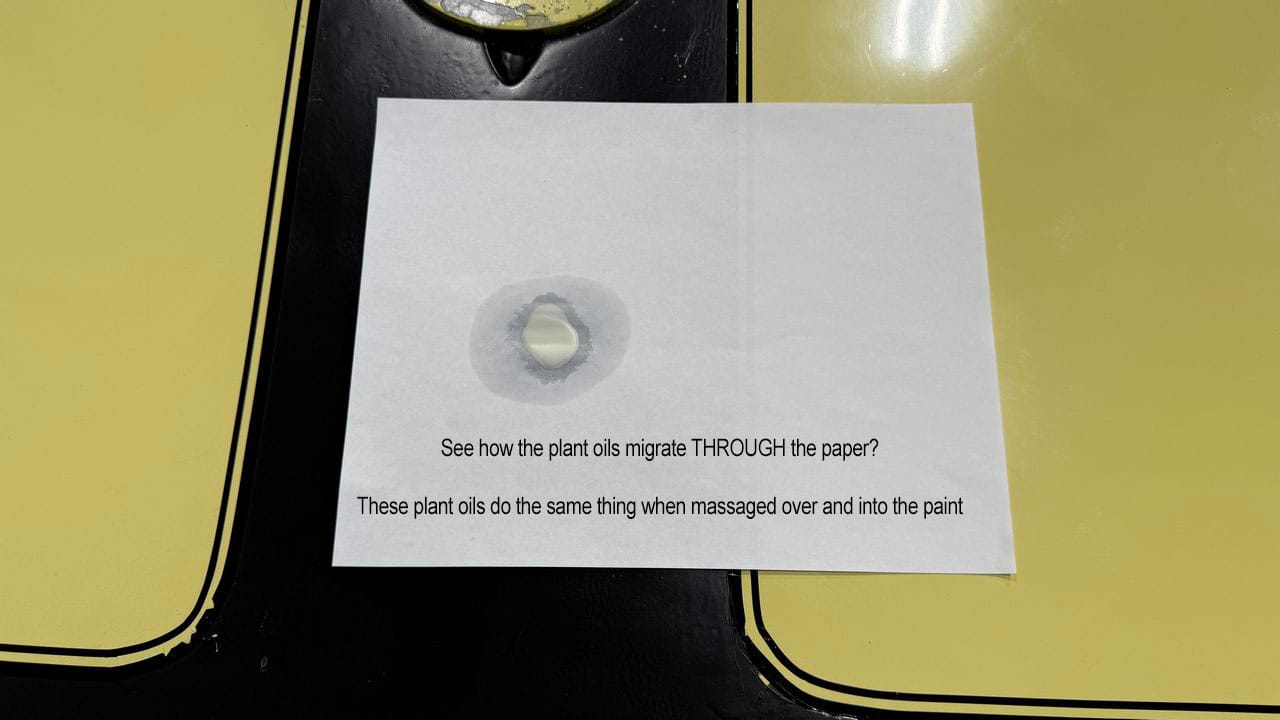
If you look at the back label, you’ll see PLANT OIL is included in the formula. This is a closely guarded secret, but my research over the years and talking to Meguiar’s old-timers, (I worked as a Trainer for Meguiar’s for about 11 years, so I met quite of few of the old-times), leads me to believe the plant oil is castor oil, which is derived from castor beans. Just a guess.
The #7 Saturation & Rub Down Technique
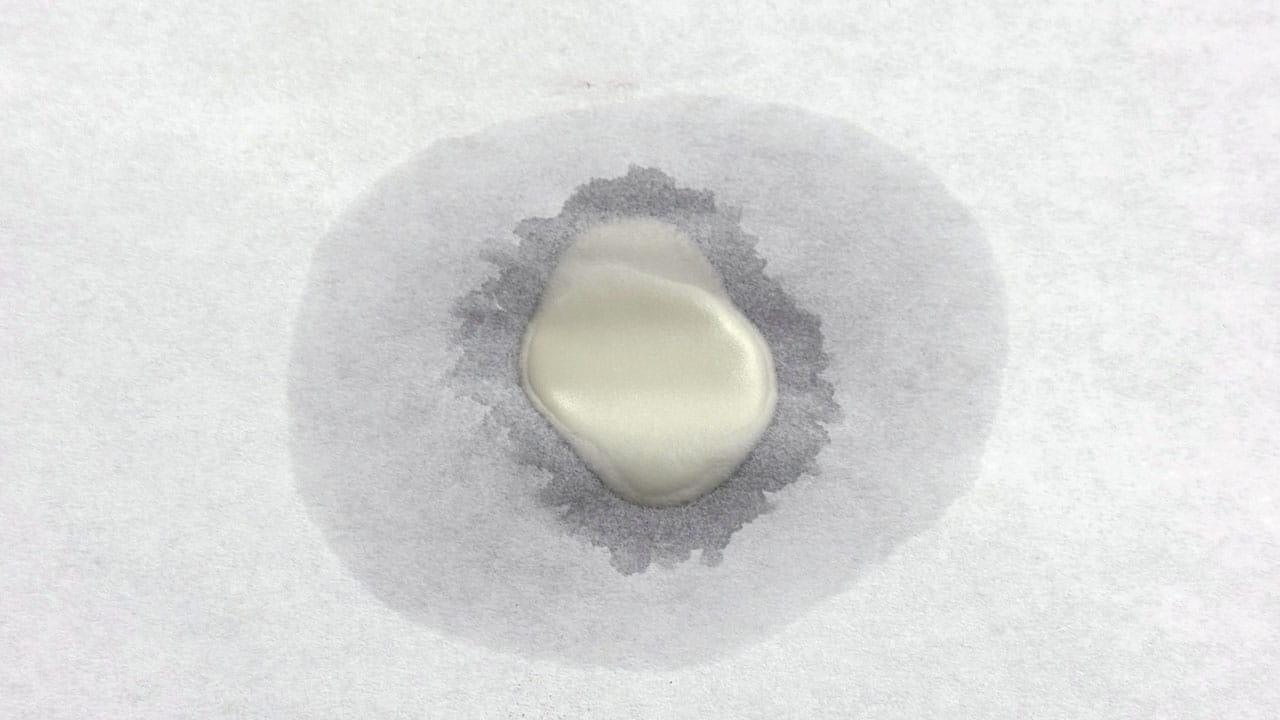
This is an optional step, but when I’m asked to preserve original and antique single stage paint, before I simply start chopping on it with a compound and an aggressive cutting pad, I start by introducing a heavy or wet application of the #7 to the paint. The plant oils in the product after massaged over and into the paint will MOVE THROUGH the paint via capillary action. The results are the oils will help to revitalize the original paint color pigments to restore their original richness and vibrancy. Plus, the oils also revitalize the paint, which by now is dried-out and brittle to make it more polishable and safter to abrade.
Apply and massage a heavy or wet application of the polish over each body panel and allow to soak for 24 hours.
Using a microfiber cloth, work the polish over the paint massaging it into the paint and leave to soak into the paint.
Remove using a clean microfiber towel and repeat.
Elbow Grease
After soaking into the paint for 24 hours, the polish will be sticky. You’ll need to use some ELBOW GREASE to carefully wipe it off the body panels. For this project, I did the #7 Saturation & Rub Down Technique twice.
Step 1: The Heavy Cutting Paint Correction Step
Now that the paint has been gorging on plant oils for over 2 days, it’s time to cut the paint. From what I can tell, this paint has not been polished or maintained for DECADES! After doing a Test Spot, I found the best way, and for the most part, the only way to effectively remove all of the oxidation was to cut the paint hard using a rotary polisher with a large 8″ Lake Country Wool Cutting Pad using a very aggressive cutting compound, Dr. Beasley’s CoreCut.
People always ask which buffing pads I use, so here’s a close-up of the description on the bag. Notice the fiber, or pile, length is 1.5 inches. This is considered a LONG pile length, and in my experience, it offers three benefits:
- Makes buffing smoother and less fatiguing.
- Makes cleaning the pad on the fly with a spur faster, easier, and more effective.
- Gives you extra REACH when buffing tight areas and complicated contours.
Vintage Single Stage Paint
Here you can see the yellow pigments coming off the oxidized body panels and building up on the face of the wool pad. The compound I used is the Dr. Beasley’s NSP CoreCut, which is a hi-tech compound that uses microsphere abrasive technology and a ceramic gel for a carrying agent instead of conventional mineral oil like most traditional compounds and polishes.
There was so much paint dust on the ground surrounding the car, I swept some of it up and put it in a plastic sandwich bag for the owner.
Results After the Heavy Cutting Step
Before the paint was dull, chalky and lifeless looking. Now the paint is glossy and vibrant.
Lowering the Headlight Assemblies to Reach Hidden Paint
After buffing the paint immediately surrounding the glass headlights, I lowered the headlight assemblies to expose about an inch of paint that’s hidden when the headlights are raised. This gives me access to buff the otherwise covered area. And when looking at the below pictures, now that decades of oxidation has been removed and the paint is now shiny – you can EASLIY see all the rock chips on JUST the lids of the headlight assemblies!
Step 2: Machine Polishing – Foam Pad – Gear-Driven Orbital & Dr. Beasley’s NSP 150
No pictures for Step 2 except to show the tool, pad and product. I try to take pictures to document our projects, but sometimes, someone actually has to get in there and run the polisher and in this example, that someone was me.After cutting paint hard with a wool pad on a rotary polisher you WILL have HOLOGRAMS. No problem, this is normal, it’s just vital that you always follow ANY buffing step with a wool pad on a rotary polisher with a less aggressive polishing step using a foam pad, which unlike a fiber pad has a UNIFORM surface, and together with a quality polish you can remove the holograms.
For this, I used an 8mm gear-driven orbital polisher with a Buff and Shine EdgeGuard yellow foam polishing pad with the Dr. Beasley’s NSP 150, which is polish, not compound or a fine cut polish, but right there in the sweet spot between a compound and a fine cut polish.
After using the Shoe Polish Technique over all the body panels, I will do one more LIGHT machine polishing step using a Free Spinning, Random Orbital Polisher, a Buff and Shine foam finishing pad and the Dr. Beasley’s NSP 45, which is an ULTRA FINE cut polish.
It’s Go Time!
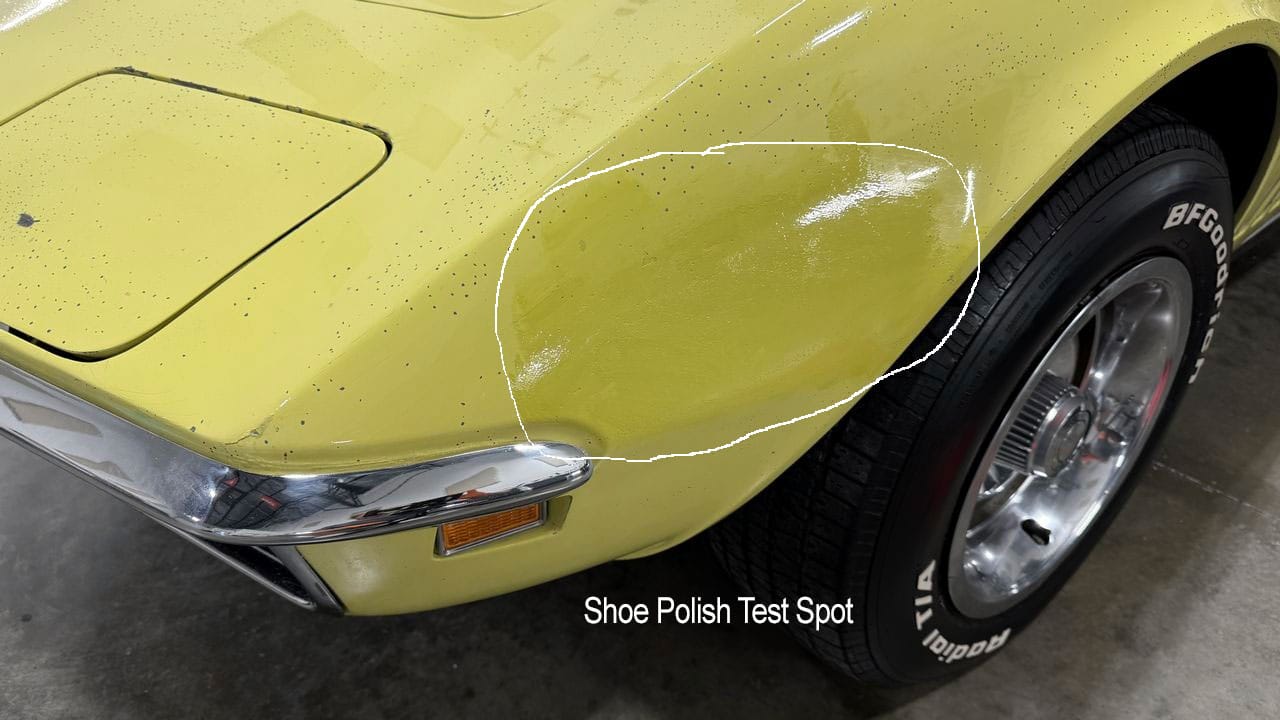
Now that the paint has been polished to a super high gloss with all the old oxidized dead paint removed, it’s time to use the Dr. ColorChip Shoe Polish Technique and make the magic happen.Shoe Polish Test Spot
Before tackling the entire Corvette, I started out testing my skill for doing the Shoe Polish Technique to the lower portion of the driver’s side front fender. Look at how BAD the rock chips are on just a SMALL section of the driver’s side front fender!
I applied the Dr. ColorChip Daytona Yellow paint to a large section on the Driver’s front fender.
See it? See the paint I smeared over the entire section of paint?
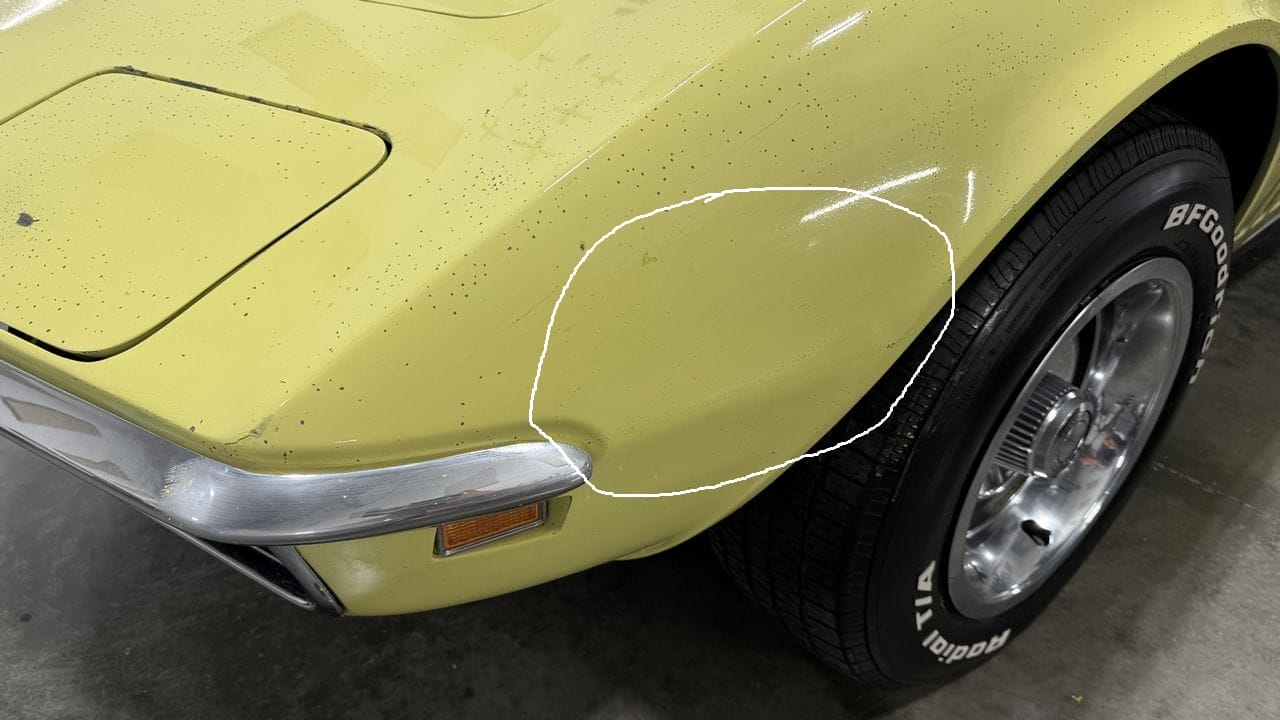
Here’s the After Results for a Small Section
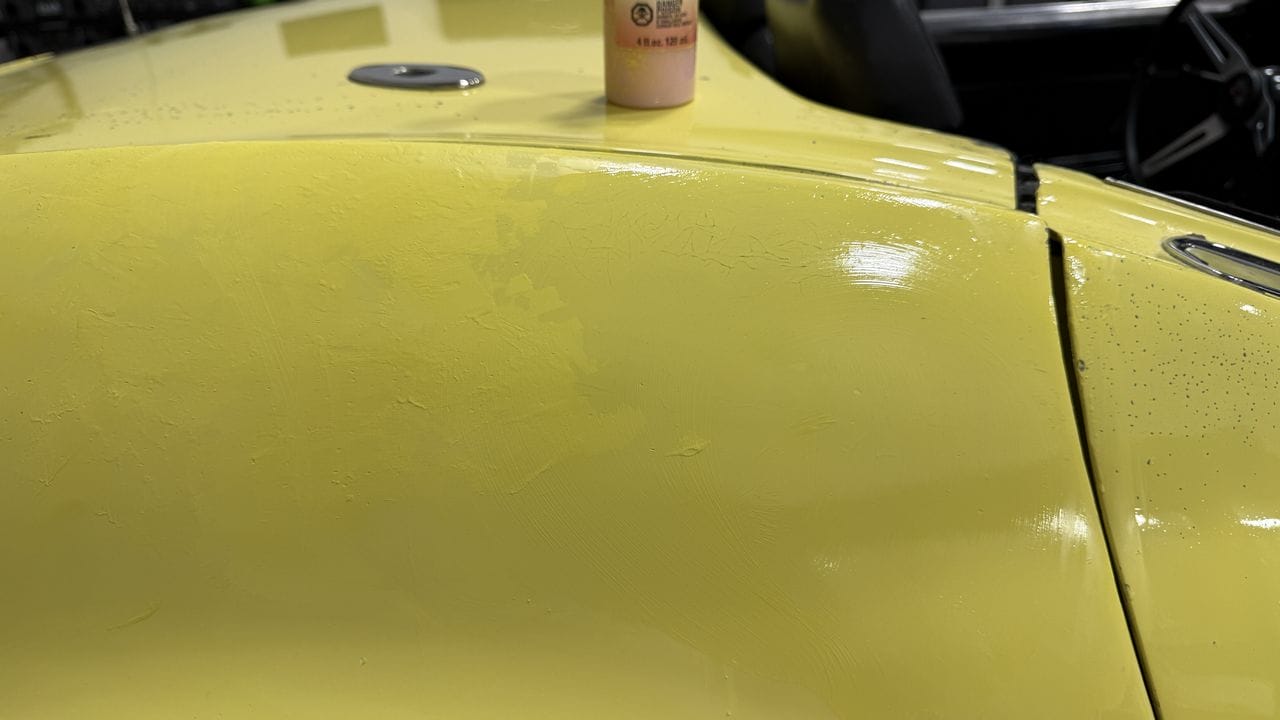
After allowing the paint to dry for a few minutes, I then used the SealAct and a wiping cloth and slowly started massaging the paint using the wiping cloth saturated with the SealAct. It is at this point you have to have a gentle touch and patience. The excess paint will come off and as long as you don’t rub aggressively, you will leave the paint behind where you want it and that’s in the rock chips.
Success!
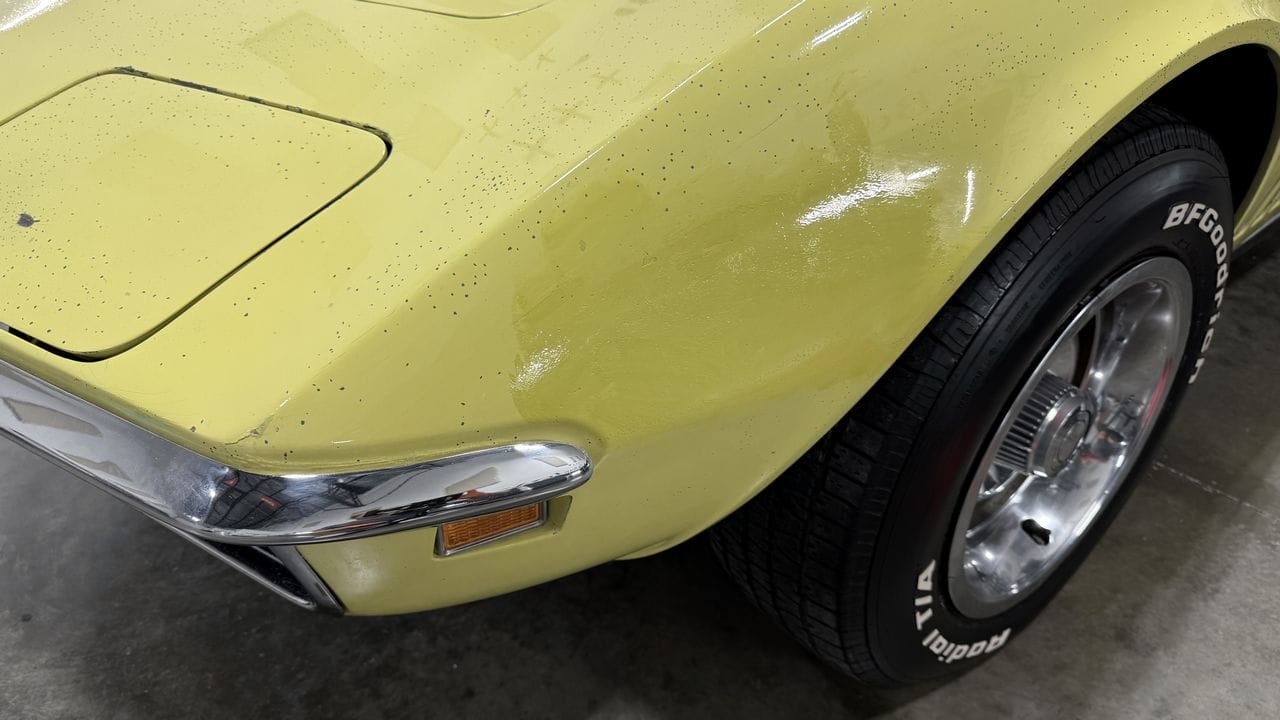
In this picture, you can see the mass of rock chips have now disappeared. Keep in mind, this was just my Test Spot to see if I could actually do the Shoe Polish Technique good enough to make the owner happy with the results. After sending him these pictures he said it looked good and to tackle the entire Corvette.
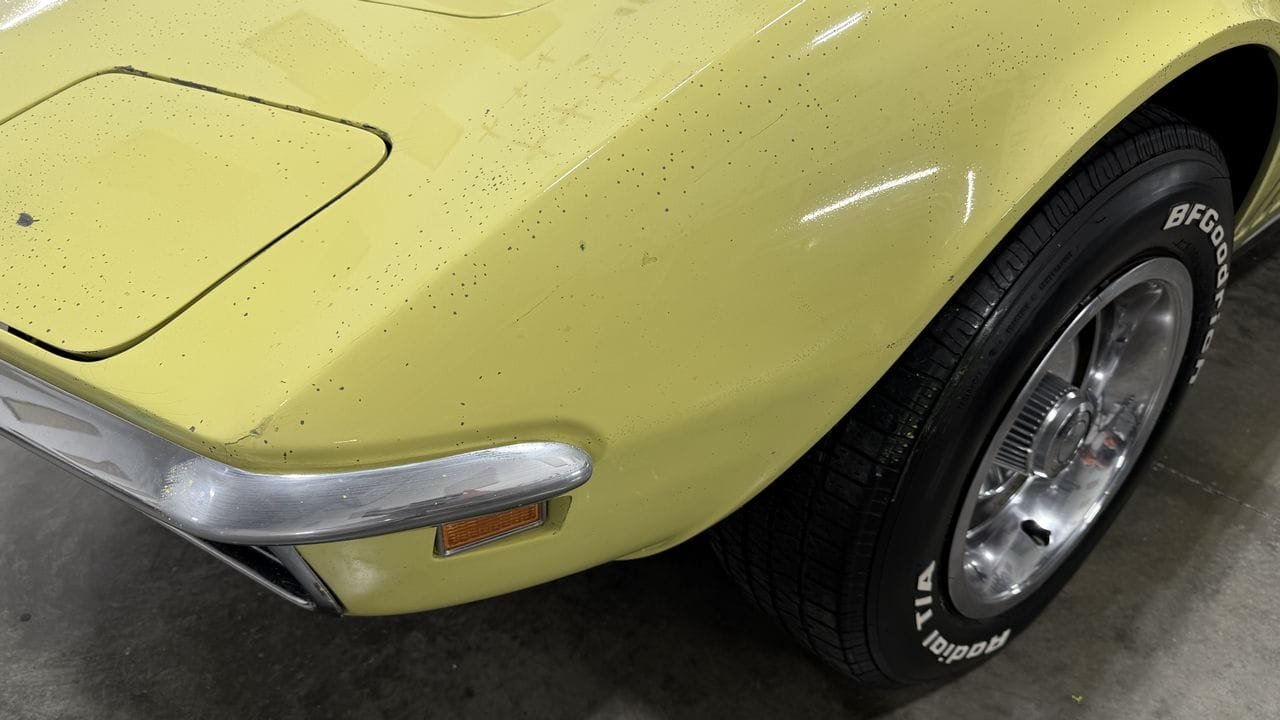
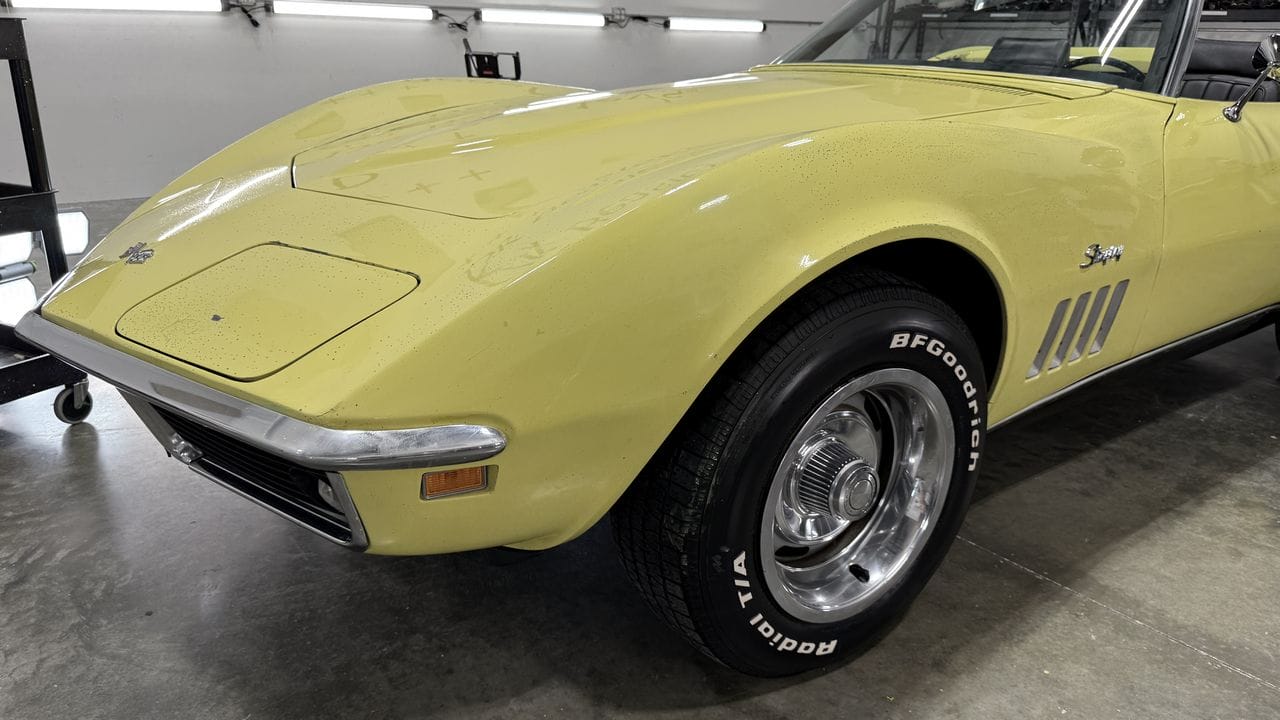
Here’s the After Results for Front Portion for Front Fender
Here’s the after picture after using the Shoe Polish Technique over the entire front portion of the driver’s side front fender. Not perfect, but not bad and I PROVED to myself that I can do the Shoe Polish Technique and this gave me the confidence to continue using the Show Polish Technique around the rest of the Corvette.
IMPORTANT
This was a huge job, tackling the entire Corvette took me approximately 23 hours broken-up over the course of a week, working just a section at a time in the evenings, after getting off work. Because my focus was on getting the job done, I didn’t take all the normal types of pictures needed to showcase the full process. But this is important – BEFORE applying any touch-up paint, it’s a good idea to first wipe the area using the Dr. ColorPrep Panel Cleaner.From the Dr. ColorChip website,
Proper surface preparation helps touch-up paint adhere to the damaged area. Dr. ColorPrep Panel Cleaner is formulated to remove wax and other surface contaminants from an automotive panel before applying Dr. ColorChip touch-up paint. Starting with a properly prepared surface helps prevent residue from interfering with paint placement and the final repair.
How to do the Shoe Polish Technique
The video does a much better job for showing the technique, but below are pictures with descriptions.
Clean the area first using the Dr. ColorChip Prep Solution before applying the paint.
Using the flat side of the squeegee – smear paint over the entire section you want to fix. For deeper and/or larger chips, wait a few minutes for the initial paint you applied to get tacky and then if you can still see DARK SPOT, (that’s the chips without enough paint in them), then apply some more paint to these areas.
NOTE: If you can see dark spots after applying the paint, AFTER you do the blending step, they will still be there. Apply enough paint to make any dark spots/rock chips disappear. If you try to apply more paint while the first layer of paint is still wet you’ll tend to move the paint around, not fill the chip in. This is why you need to wait for a few seconds for the initial schmear of paint to get tacky and then apply MORE paint over the tacky paint until the entire section has a uniform appearance.
Blending the Excess Paint Away – The Secret To How it Works
After allowing a few minutes for the paint to begin drying, shake the SealAct blending solution and pour a generous amount onto a folded, lint-free wiping cloth. Gently rub the saturated cloth over the area where you applied the touch-up paint.IMPORTANT: Use only light pressure and keep the wiping cloth as FLAT against the surface as possible.
The goal is to blend away the excess paint on the surrounding surface while leaving the paint inside the chips. Pressing too hard can push the cloth INTO the chips and remove the paint you just applied.
Work gently, keep the cloth flat, and add more SealAct as needed.
See how I’m using 4 fingers, laying flat against the wiping cloth when rubbing over the paint? It’s a small technique tip – but super important.
Initial Results
Keep in mind, after I complete the Show Polish Technique to the entire car, next I will re-polish the entire car to restore the shine and gloss. For this I’ll switch over to a super safe, 8mm free spinning, random orbital polisher using a soft foam finishing pad and an ultra fine cut polish. While these results look great, the results for the entire Corvette will look even better after the final polishing step and installing a ceramic coating.AFTER
BEFORE
And just to jog your memory, here’s how this area looked before.
Before & After Pictures in the Order I Worked Around the Corvette
In the below pictures, you’ll see paint applied to various section of the different body panels as I worked around the Corvette. Each time I let the paint set-up for 2-3 minutes before blending away the excess paint using the SealAct and a wiping cloth.
The below picture is a context picture to show you that we’re working on the driver’s door. The pictures that follow photo-document the massive amount of rock chips in the piant on the driver’s door.
Here’s paint applied to the entire driver’s side door
Look closely, there are no dark spots. Each rock chip has been filled in and covered over with paint.
Here’s After Results
And again, keep in mind, the act of rubbing the wiping cloth and the SealAct over the paint on the door took about an hour. As you rub the cloth and a solvent over the previously super glossy paint, it has a mild dulling effect. The final polishing step will restore the super high gloss appearance.
Before Section – Top of Driver’s Fender – Next to Windshield
This picture was taken BEFORE the #7 treatment followed by heavy cutting with a wool pad on a rotary polisher with the CoreCut compound and the first polishing step using the 8mm gear-driven orbital polisher with the NSP 150. The paint is NOT pretty.
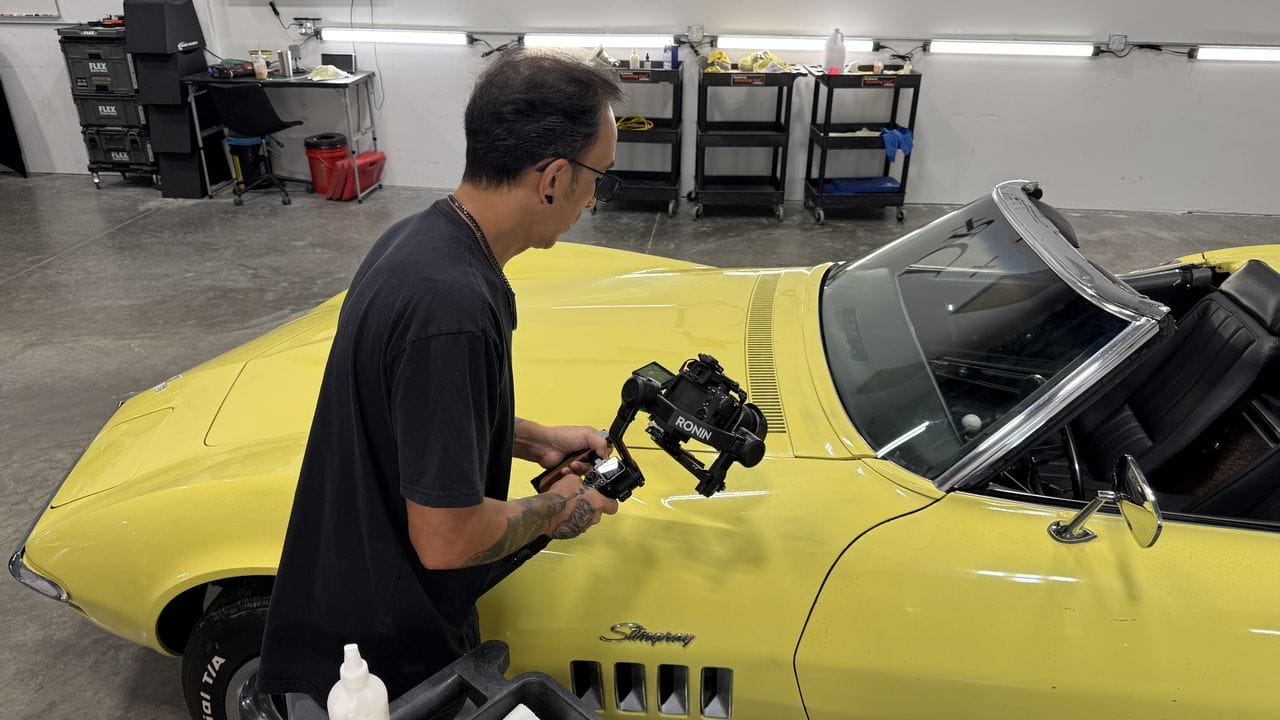
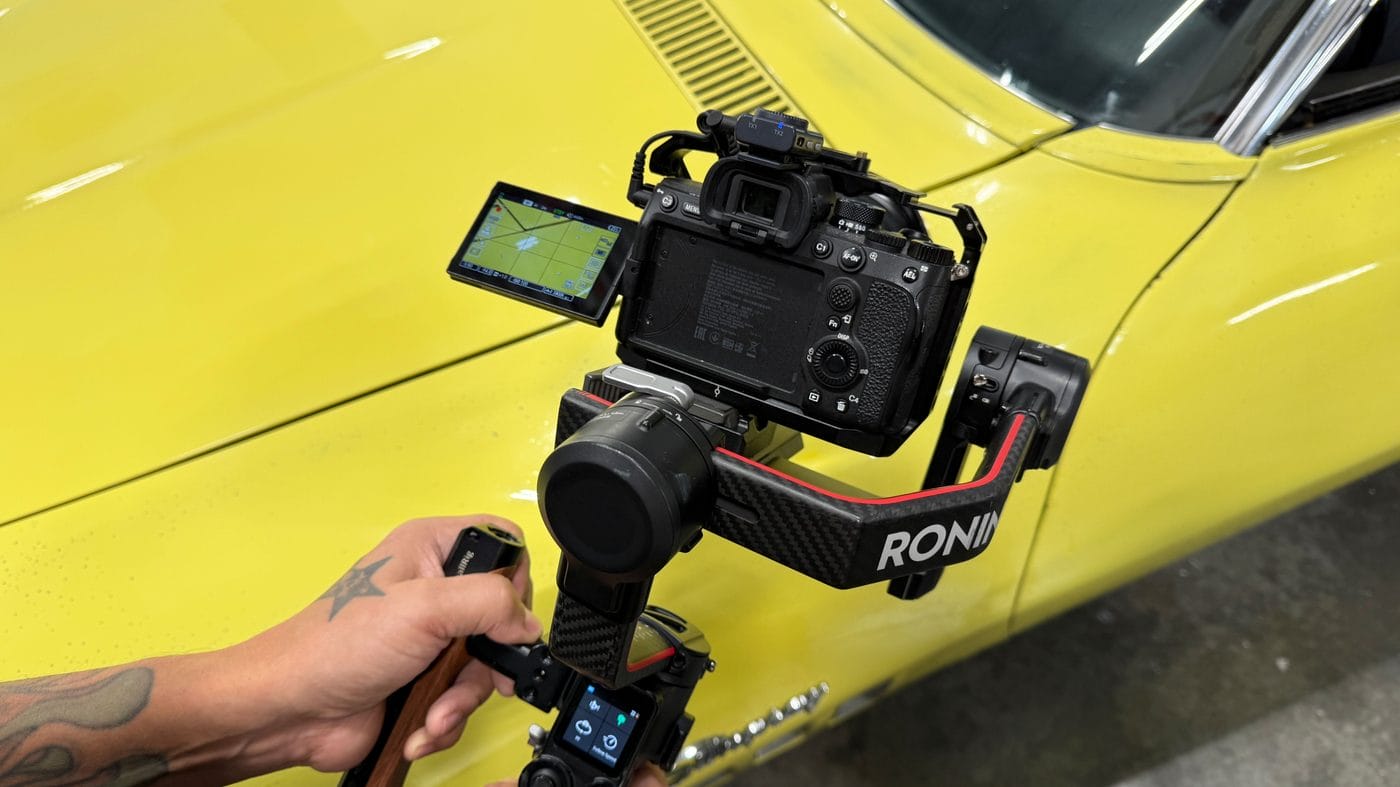
Video Guy Extrodinair – Yancy Martinez
There’s two videos for this project. One video is on the Dr. Colorchip YouTube Channel. The other video, the video where Yancy is filming the after results, is on the Dr. Beasley’s YouTube channel. Both are worth watching before you ever attempt this procedure.
Continuing around the Corvette
Looking at the lid on the headlight assemblies was shocking! But they came out great using the Shoe Polish Technique.
In the below picture, I’ve already blended away the excess paint above the headlight assembly lid and to both the right and left side of the lid. You can also see that I have applied a LOT of paint to the lid on the headlight assembly. As in a LOT of paint in order to fill in all the chips.
Here’s a close-up showing touch-up paint over the entire lid.
If you look closely, you can see sections with paint that still needs to be blended away and section of paint where the excess paint has been removed via blending with the SealAct and a wiping cloth.
Not bad considering where we started and the goal was to preserve the paint while improving the appearance. The other goal was to NOT re-paint the Corvette.
Here’s rock chips on the passenger side fender, both on the top of the fender and on the verticle side.
In the below pictures you can see where I’ve applied the touch-up paint to the affected areas.
After Results – Passenger Side and Top of Fender
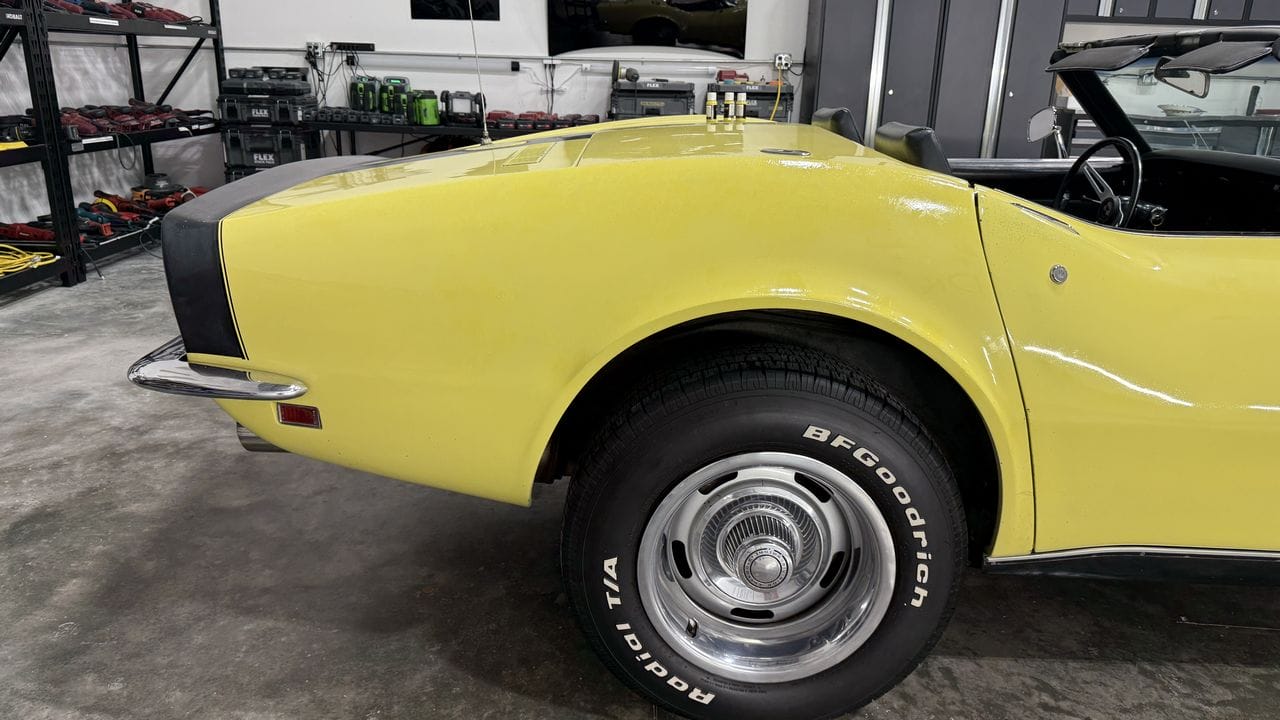
Side and Top of Rear Passenger Fender
After Results
Rear Taillight Panel
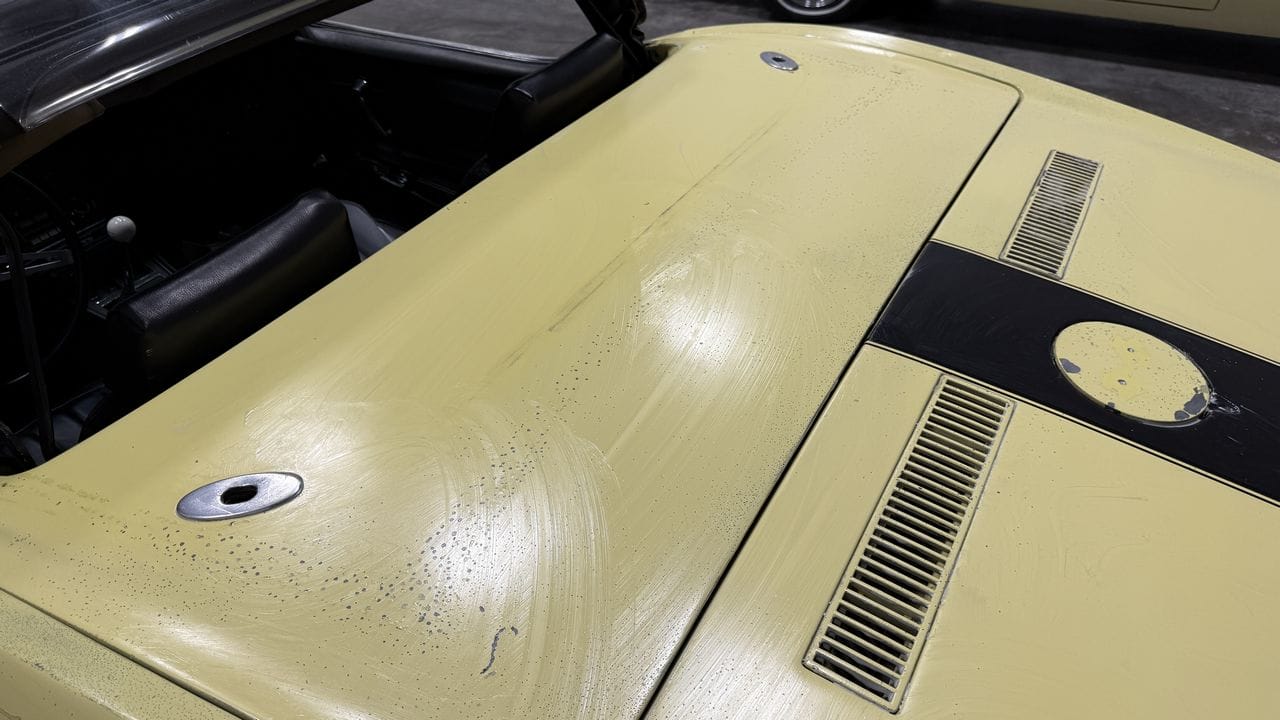
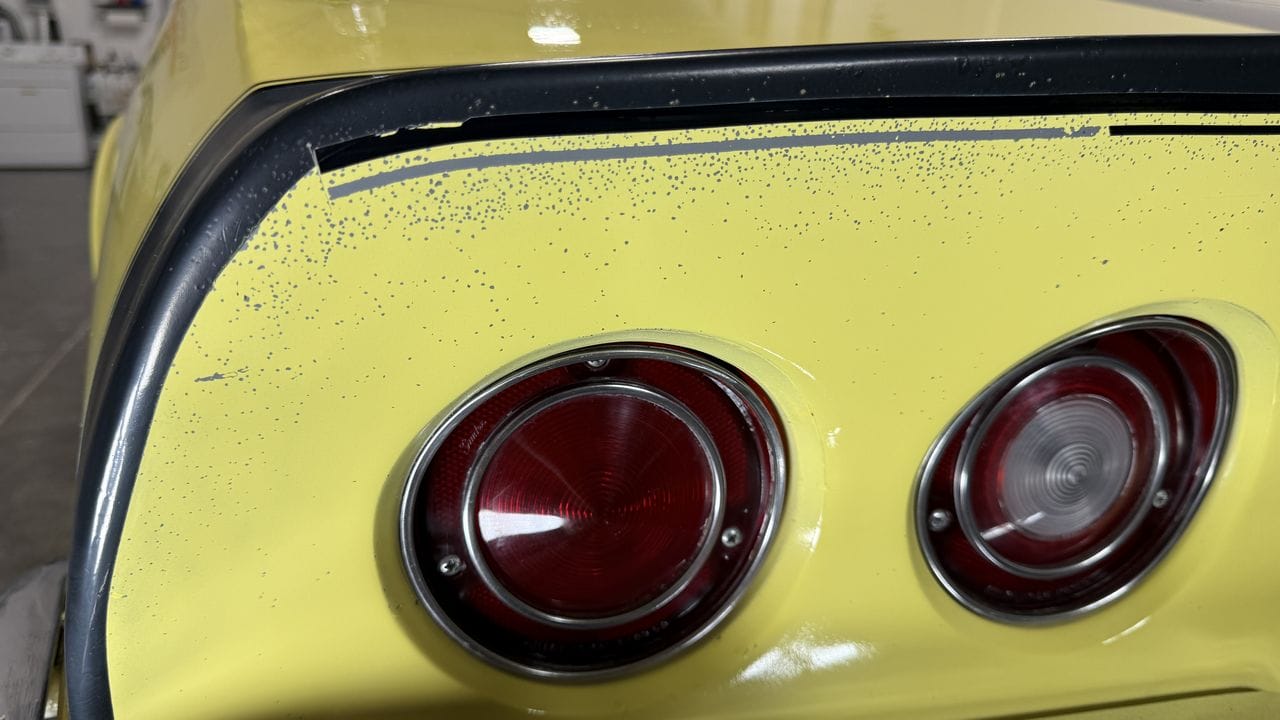
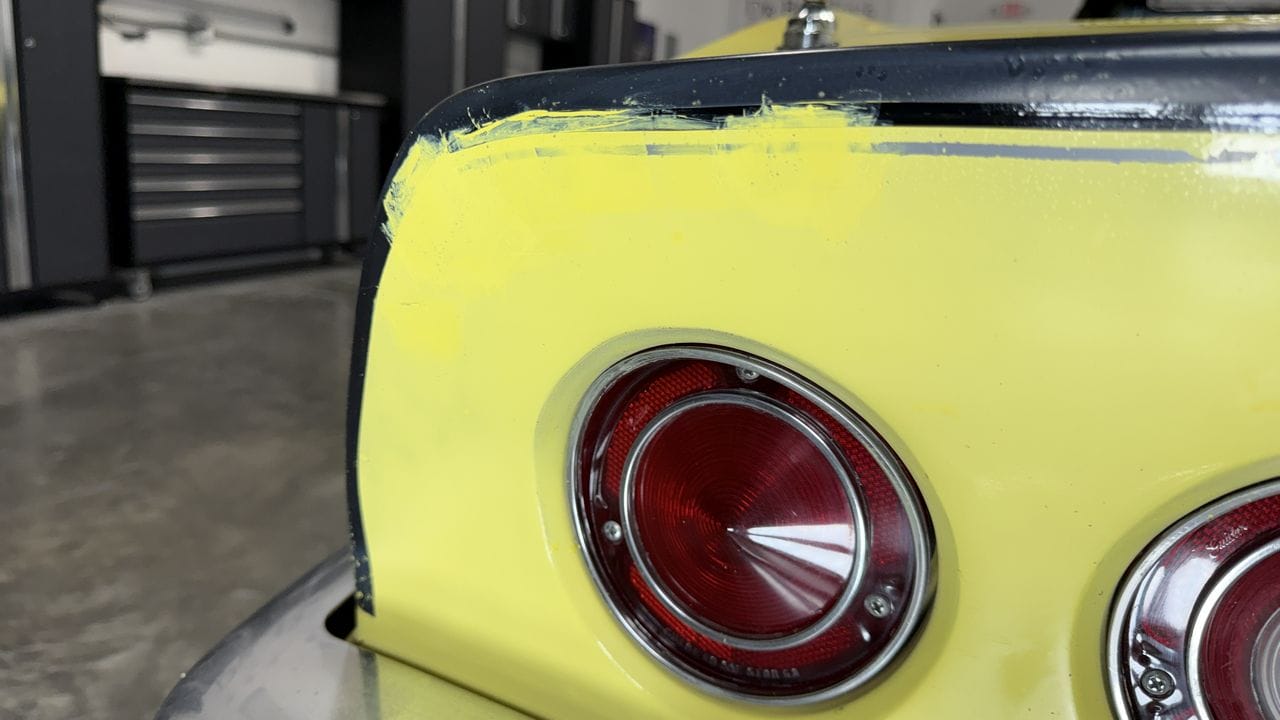
There were a lot of tiny rock chips around the top of the Rear Taillight Panel, next to the ancient pin stripping. It took me a few tries to get this area right. That’s the great thing about the Dr. ColorChip system; if your not happy with the results, simply remove all the paint using the SealAct and try again. Try again until you’re happy. Once you’re happy with the results, allow the paint to fully dry, and now it’s a permanent repair.
Pre-cleaning the area using the Dr. ColorPrep Panel Cleaner using a clean, uncontaminated piece of microfiber towel. I cut up about a half a dozen 16″ by 16″ microfiber towels into 4 pieces to use as I worked around the Corvette.
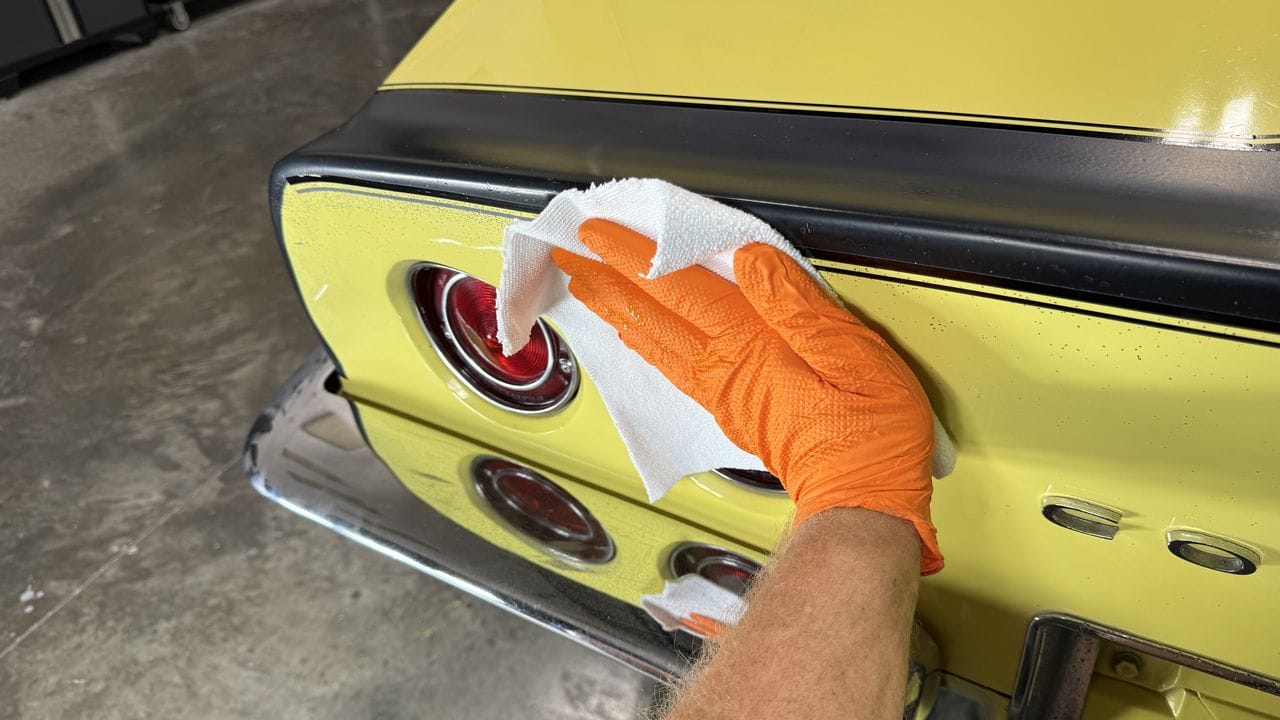
After cleaning this section, next I used a fresh, dry piece of microfiber towel to re-wipe the area to ensure all residues were removed.
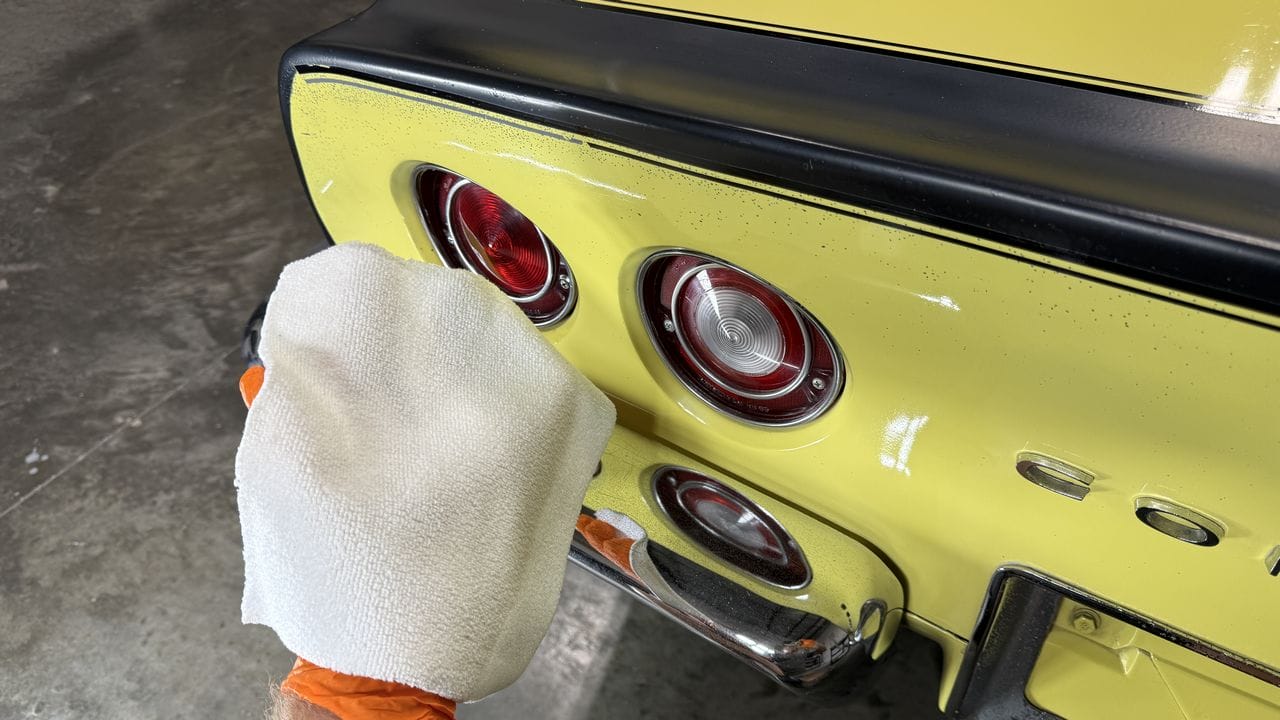
Next I placed a few drops of paint on the flat side of the beveled edge of the small, green squeegee and then with a quick flip, pressed the squeegee against the paint and shmeared the paint over the rock chips.
Adding more paint…
More schmearing…
In the picture below, I’ve applied the touch-up paint over the entire back panel. Next is blending.
If you look closely, you can see where I’ve blended away excess paint but I still more blending to do.
I’ve thrown some LIGHT onto this section to show you how I’ve removed all the excess paint and the rock chips are dissappearing.
After blending an area, if you missed any rock chips or perhaps you rubbed to hard and removed the paint out of some of the rock chips – no problem – just apply more paint and repeat the process using a GENTLE touch.
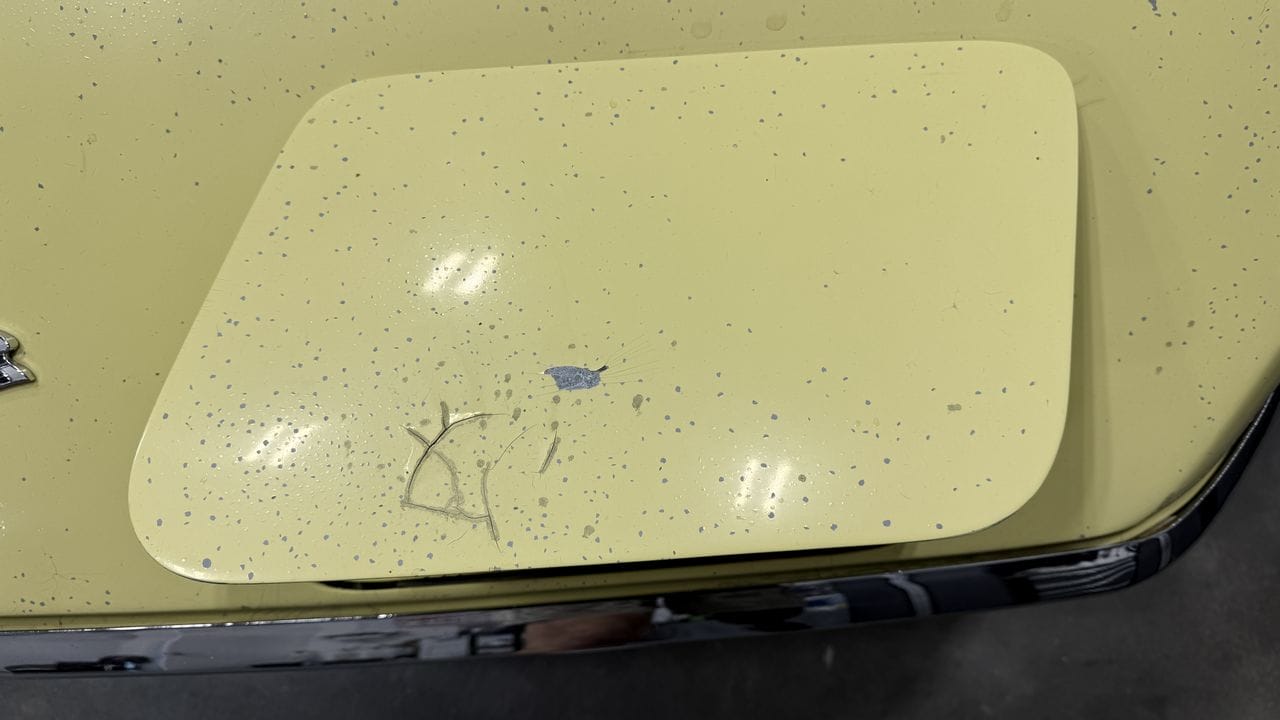
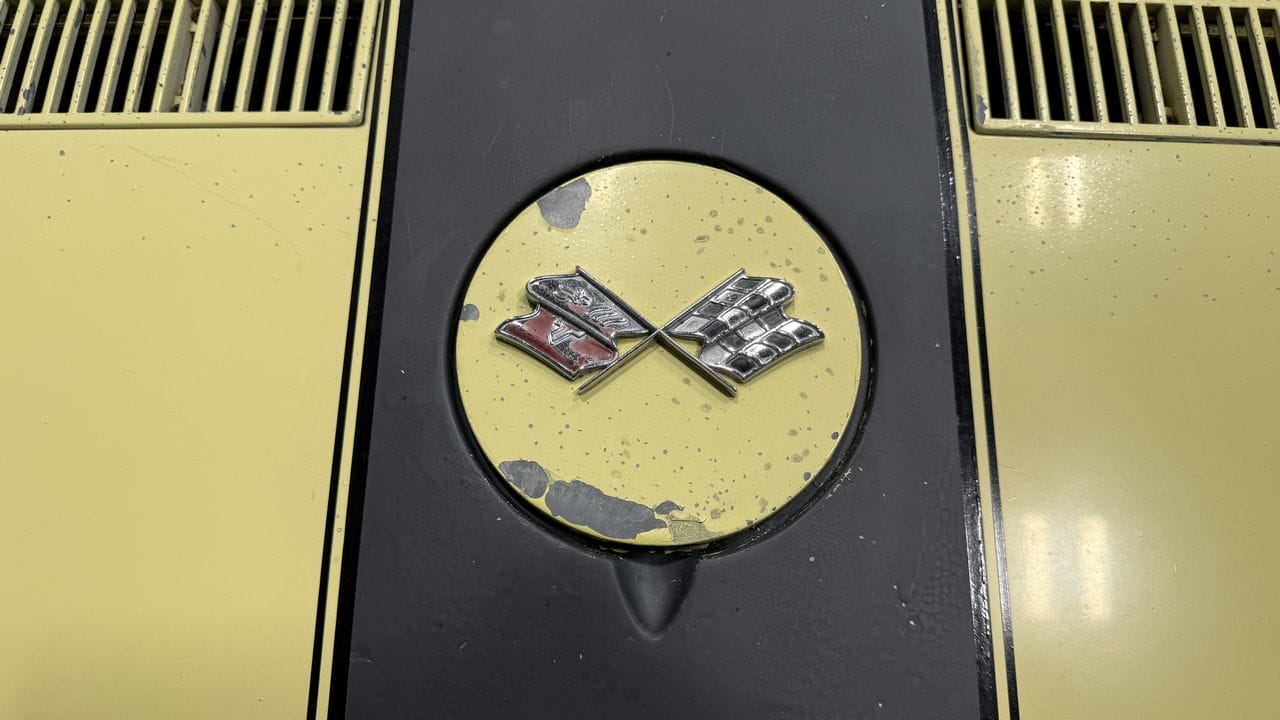
The Gas Filler Cap
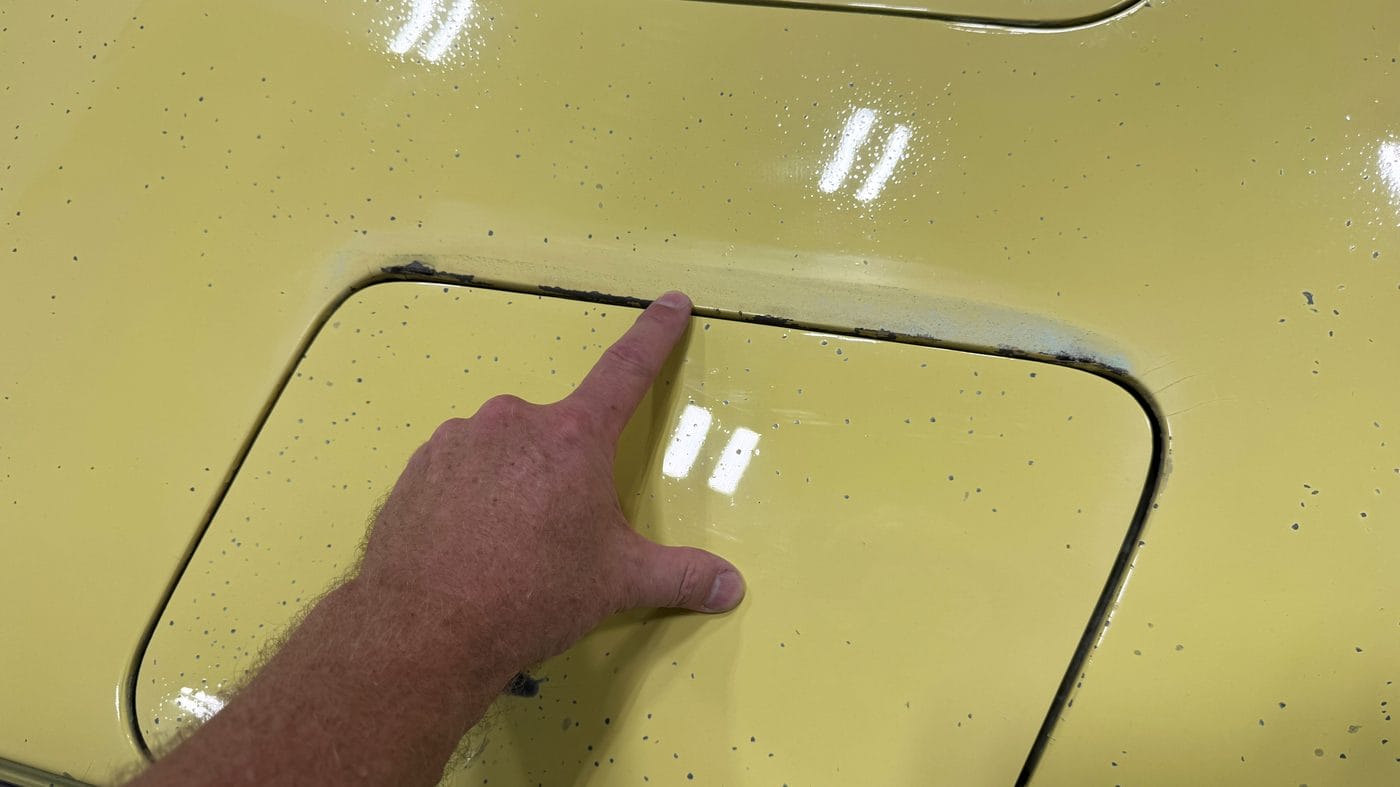
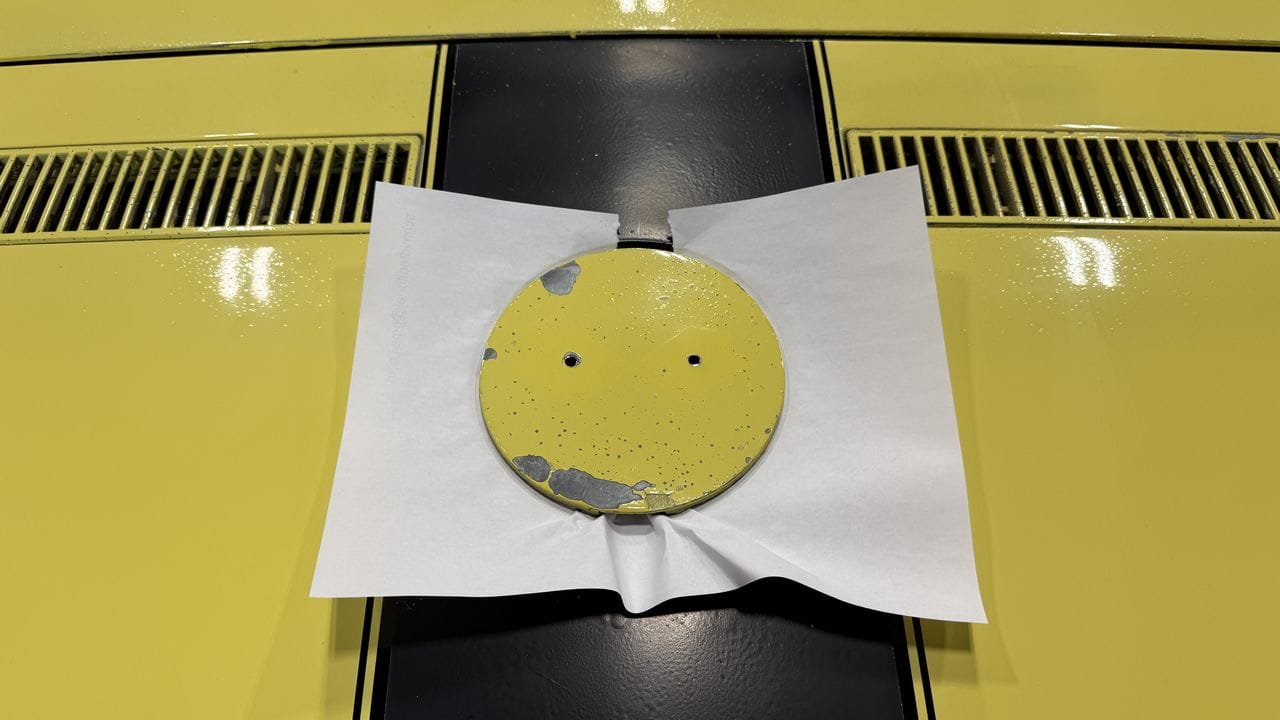
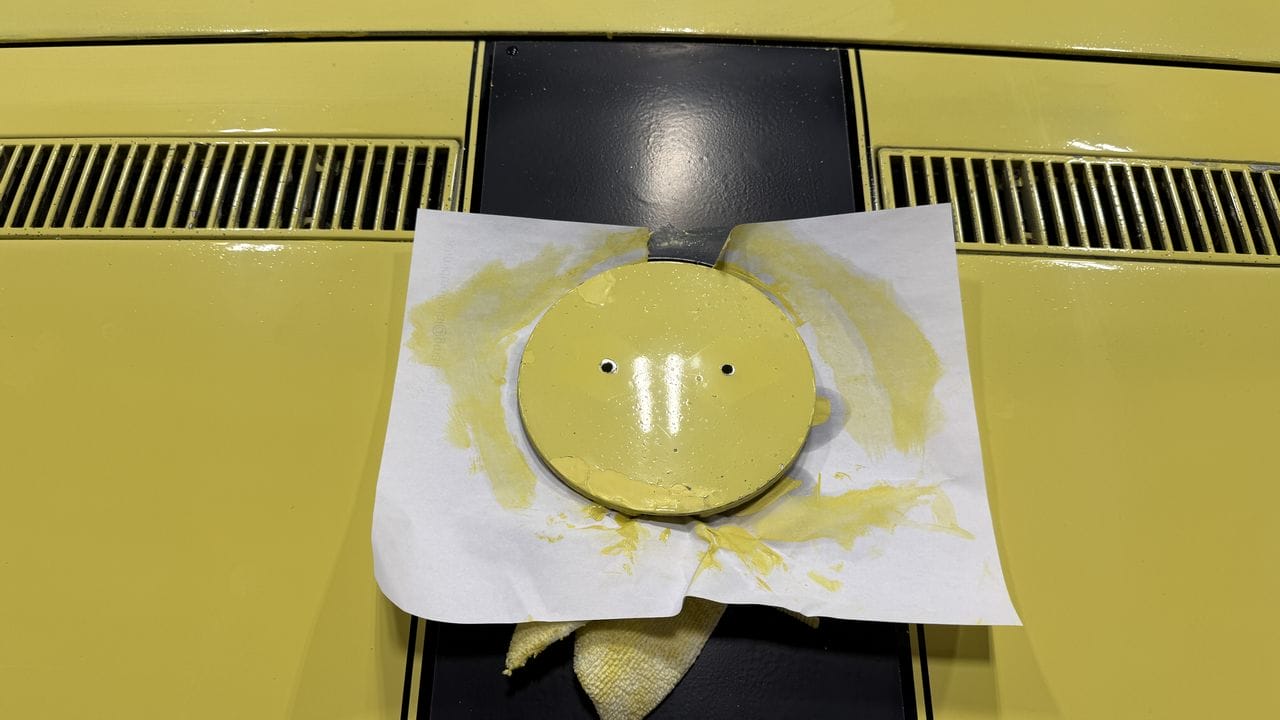
This was a real challenge and due to the excessive amounts of paint missing on this gas cap, I did my best using the same shoe polish technique. I used the squeegee to smear paint as flat to the surface as possible. I let the first application of paint dry for a few minutes and then apply more paint making sure to level the paint over the large areas of missing paint using the squeegee.
AND REMEMBER – I’m still going to re-polish the entire Corvette, which will restore the gloss and shine while evening out the overall appearance.
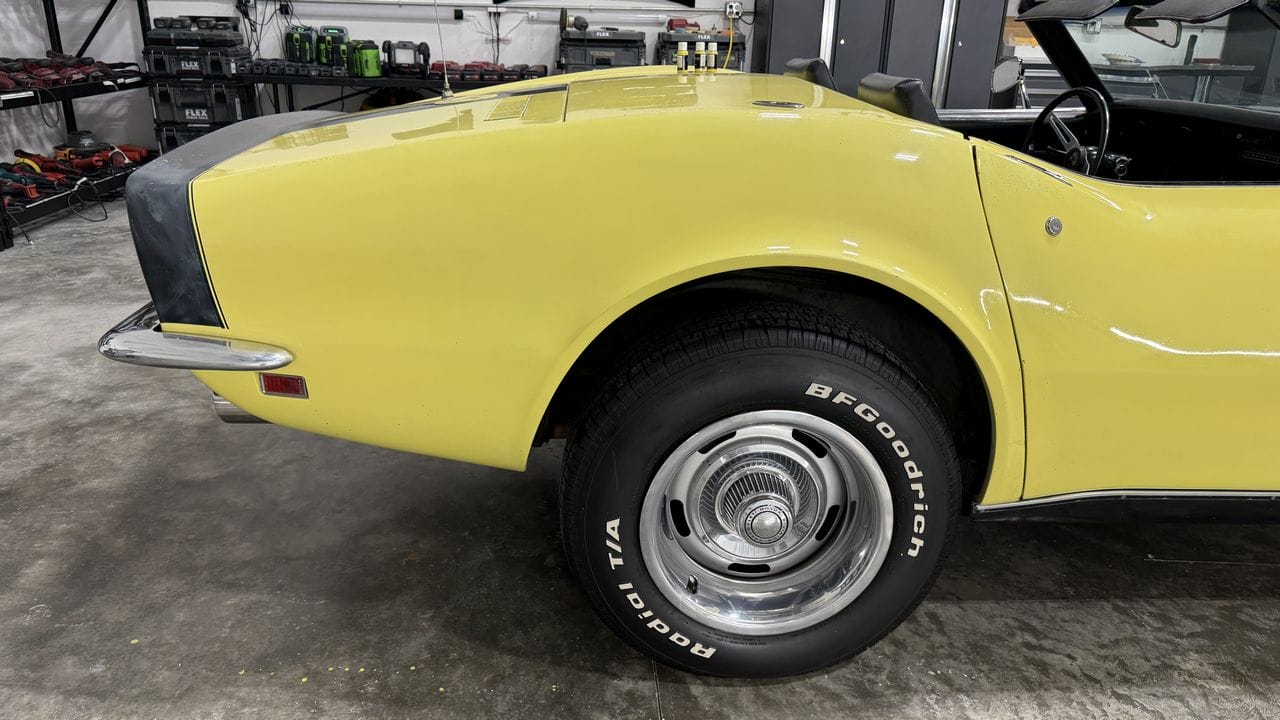
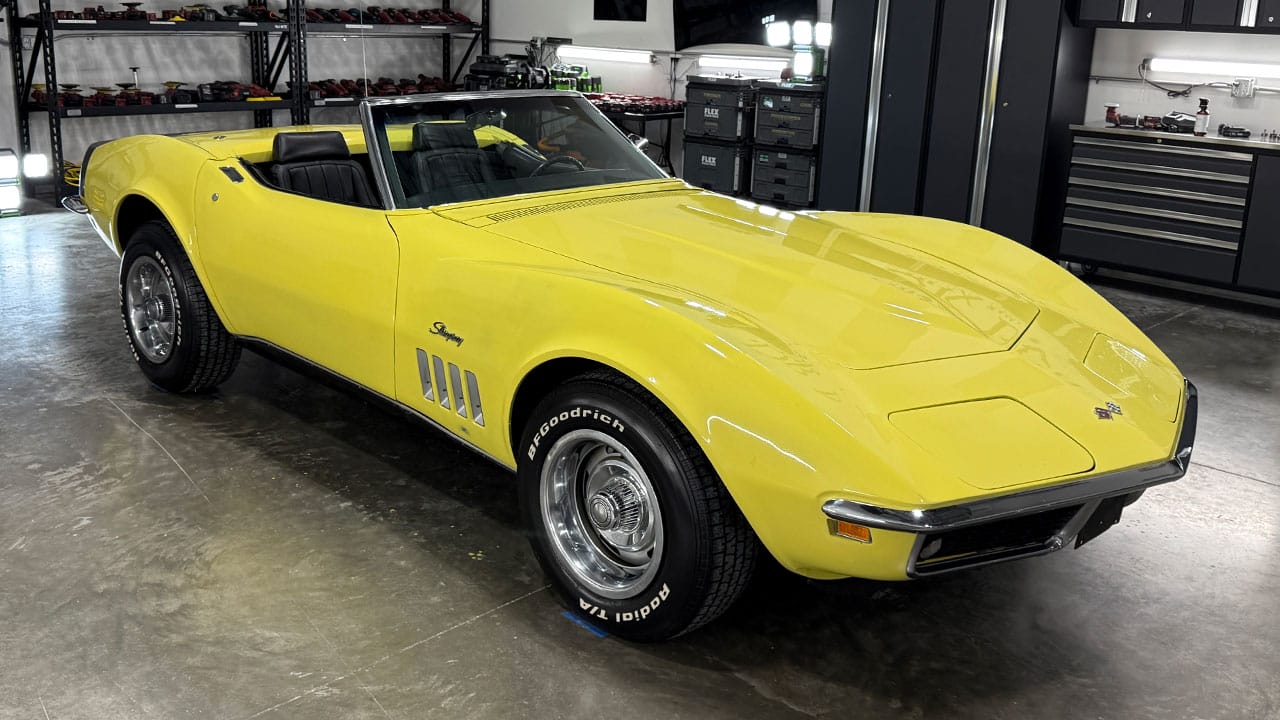
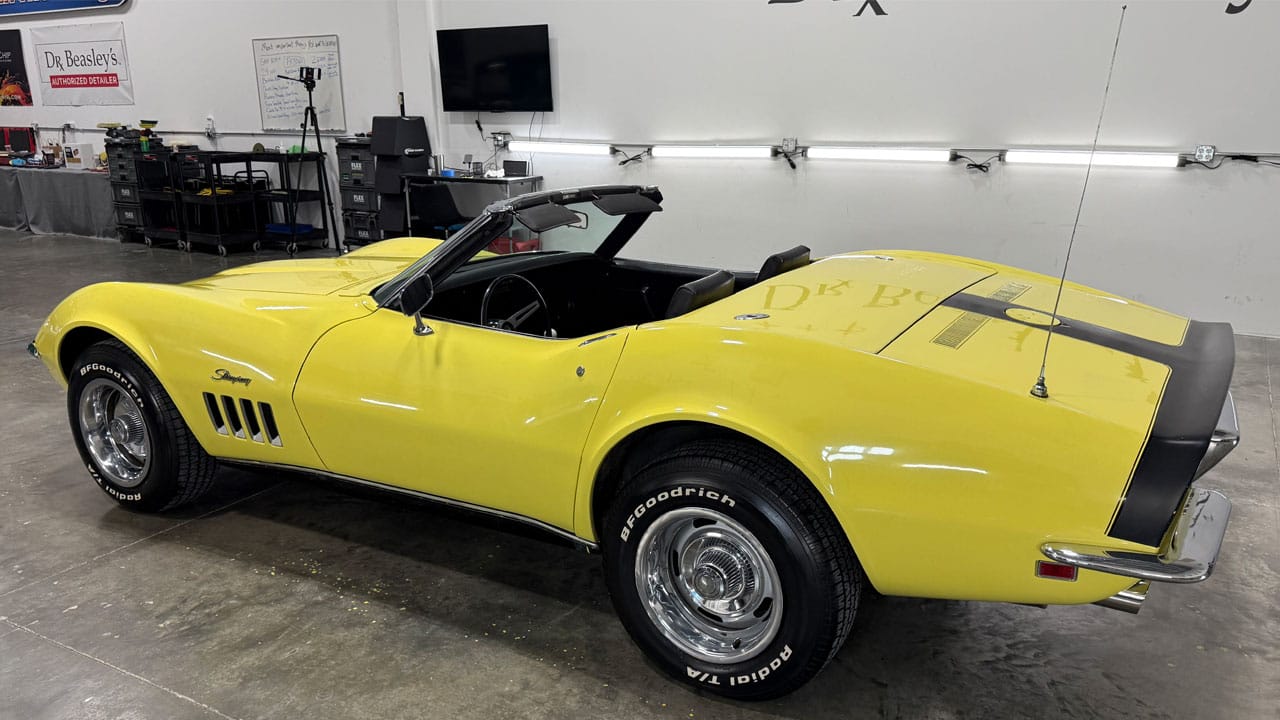
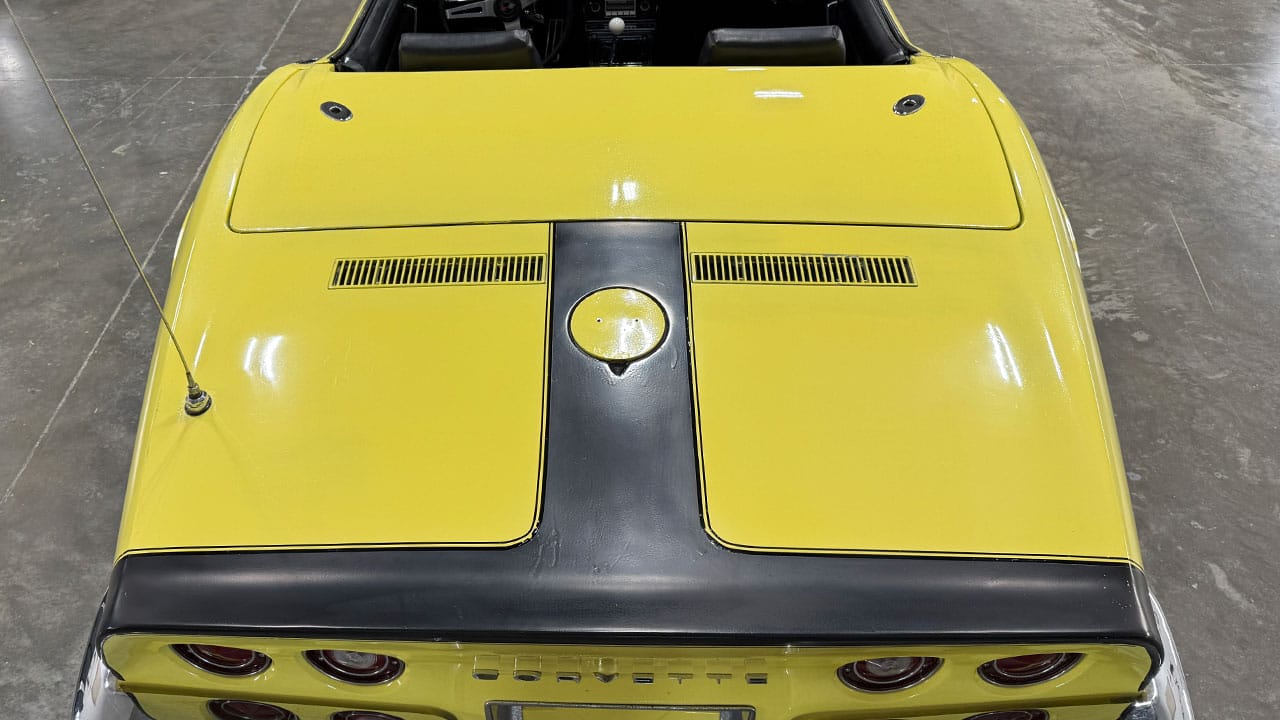
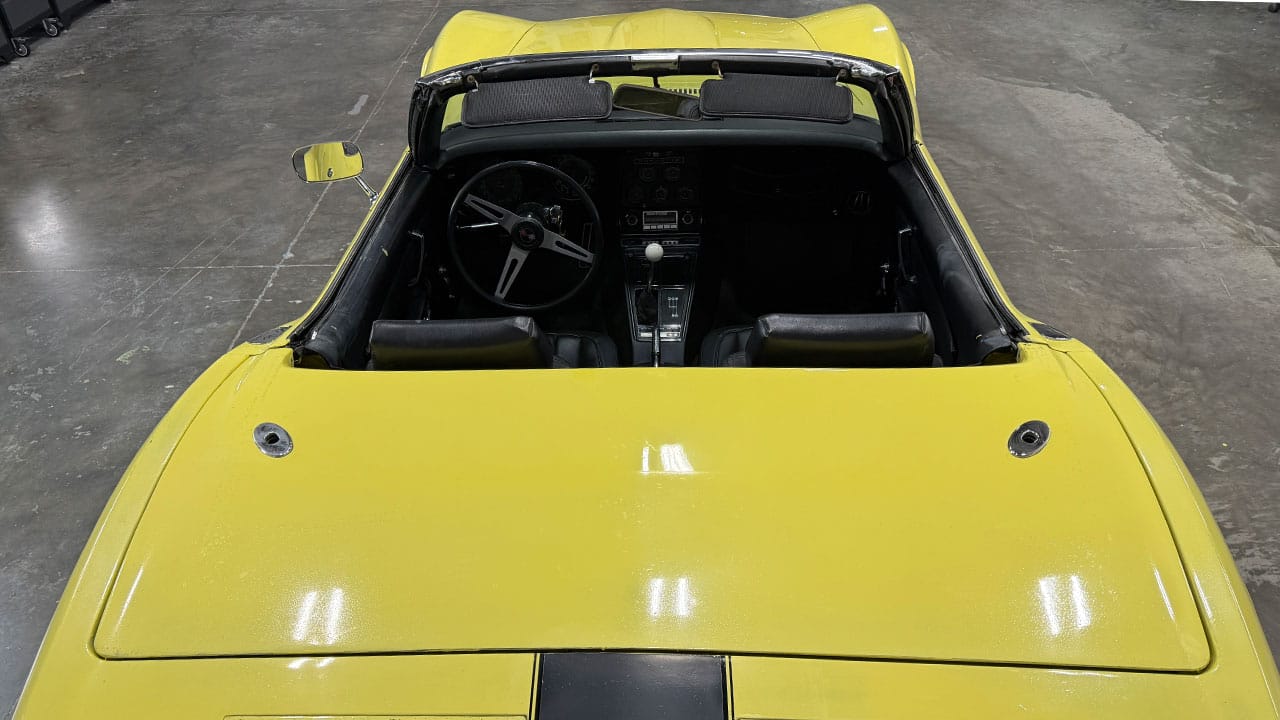
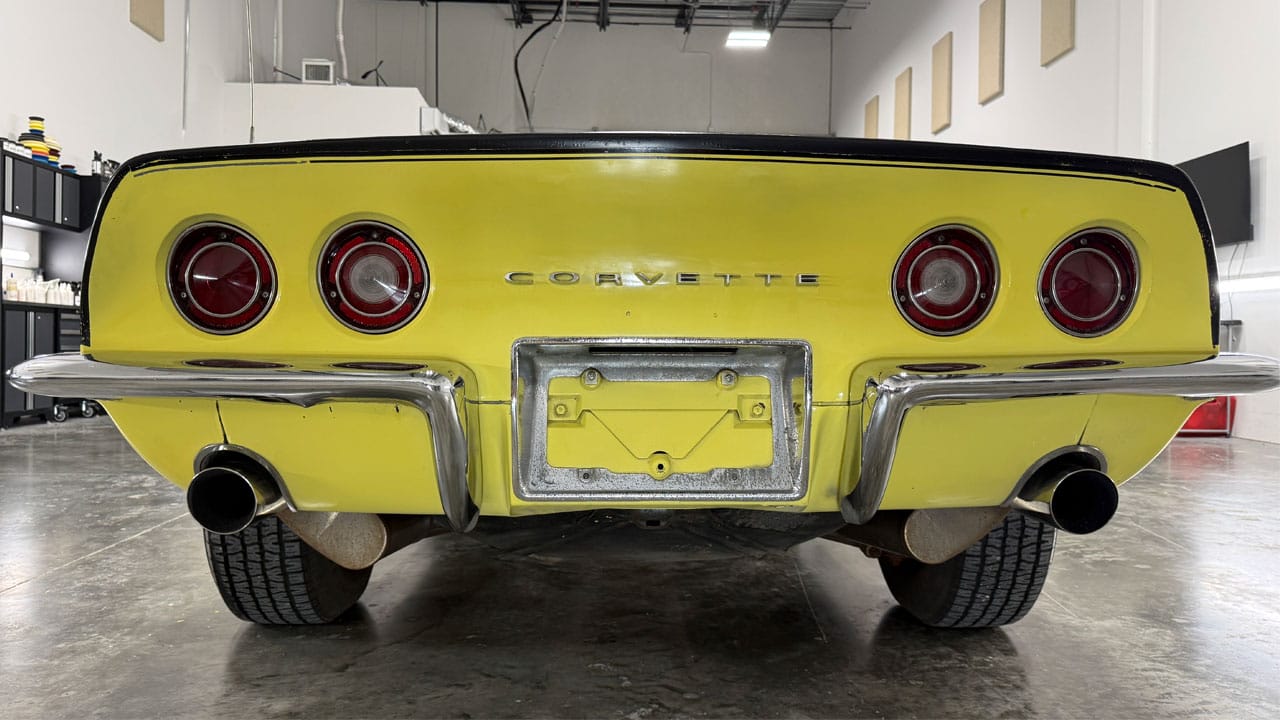
Here are the Final Results!
These pictures were taking AFTER a final machine polish using a Porter Cable 7424XP, with a 5″ Buff and Shine EdgeGuard, black foam finishing pad, Dr. Beasley’s NSP 45 Ultra Fine Cut Polish and then sealed using the Dr. Beasley’s Nano-Resin 2.0 Ceramic Coating.
Top Up!
Here’s a couple of pictures with the vinyl convertible top up.
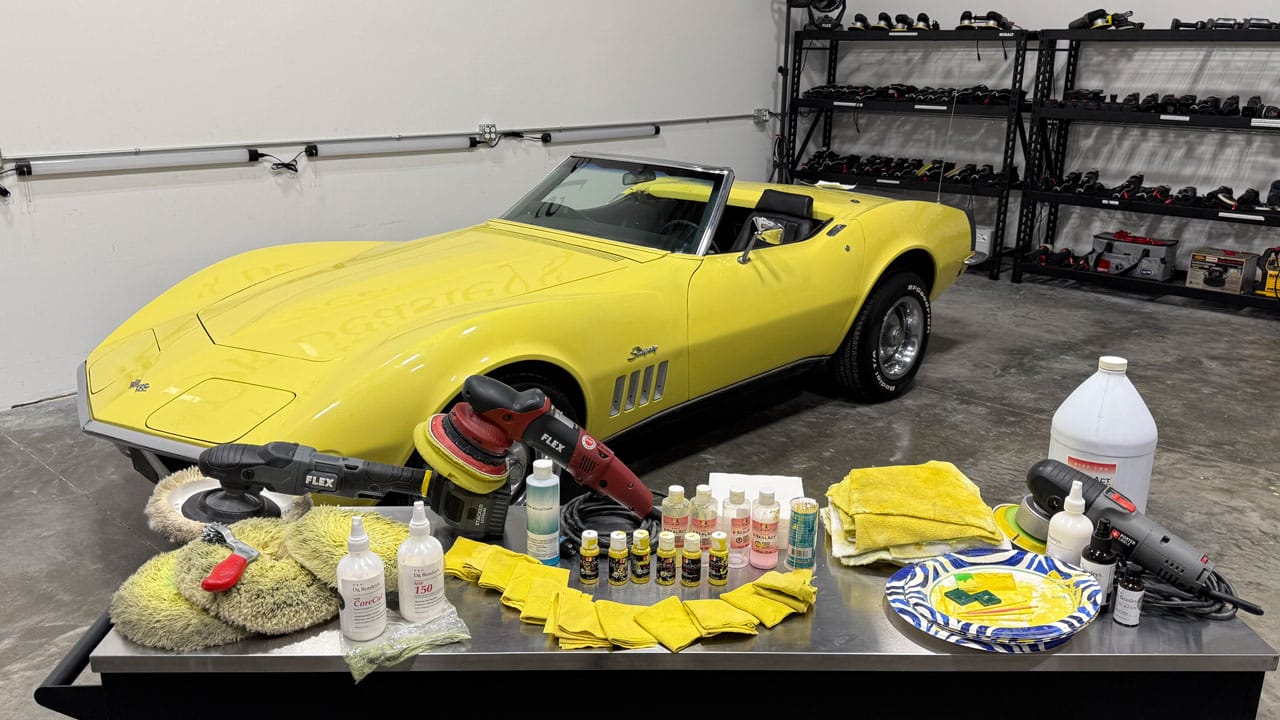
Here’s everything I used for this super cool project!
To remove decades of oxidation, swirls and scratches, I cut the paint hard using CoreCut compound with wool pads on rotary polishers. I followed this with machine polishing. For this step I switched over to the FLEX Supa BEAST, Buff and Shine EdgeGuard foam polishing pads and NSP 150.
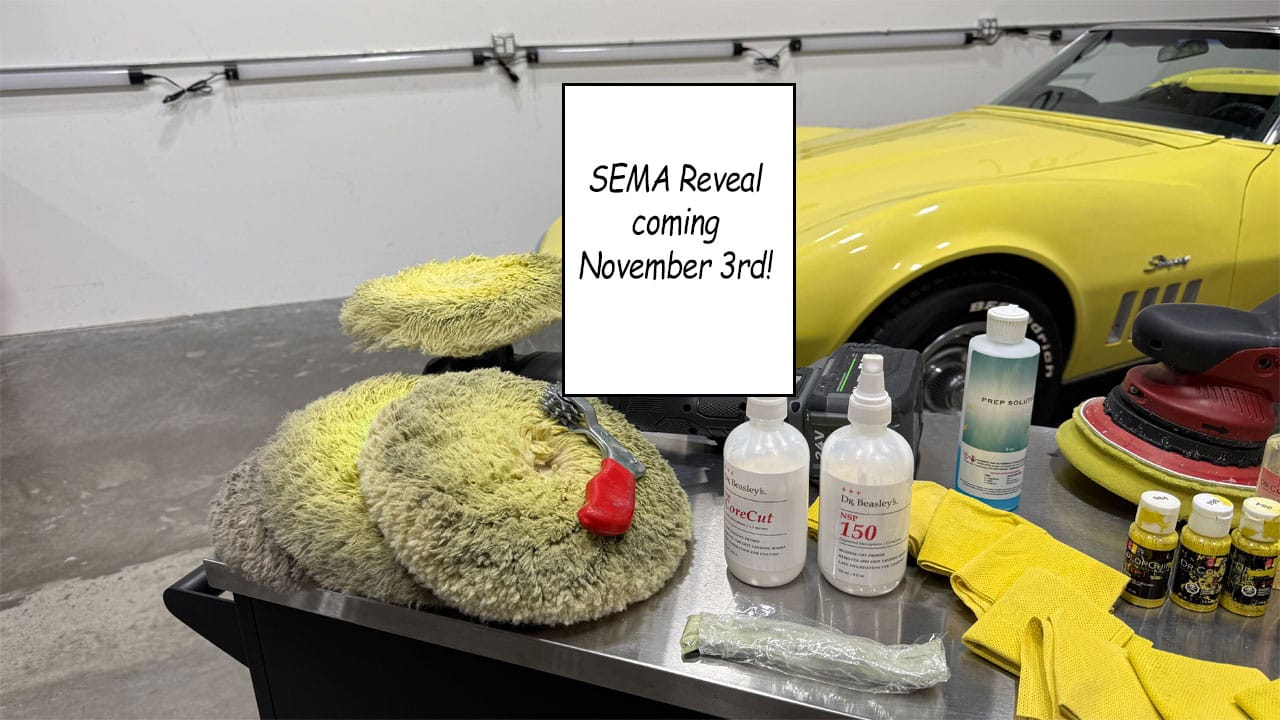
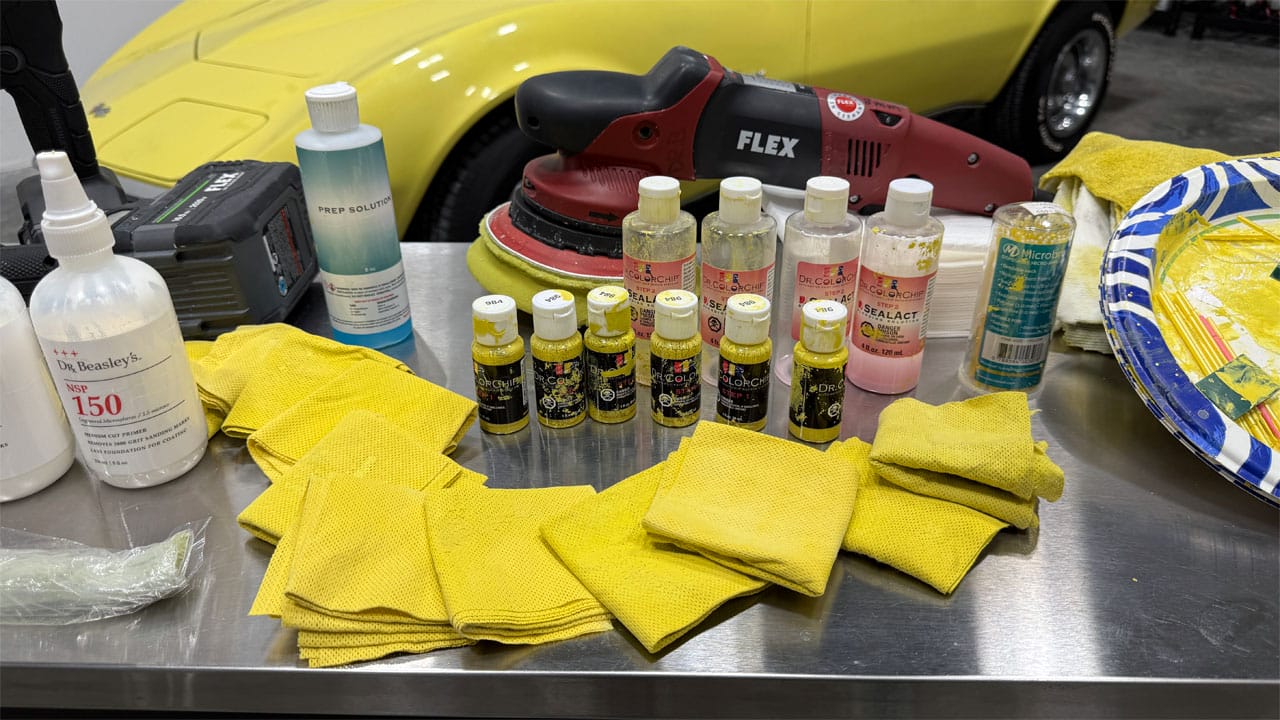
I emptied 5 bottles of Daytona Yellow touch up paint and there was only a little paint left in bottle #6. I count 12 wiping cloths, stained with removed yellow paint during the blending process. I used a lot of the SealAct.
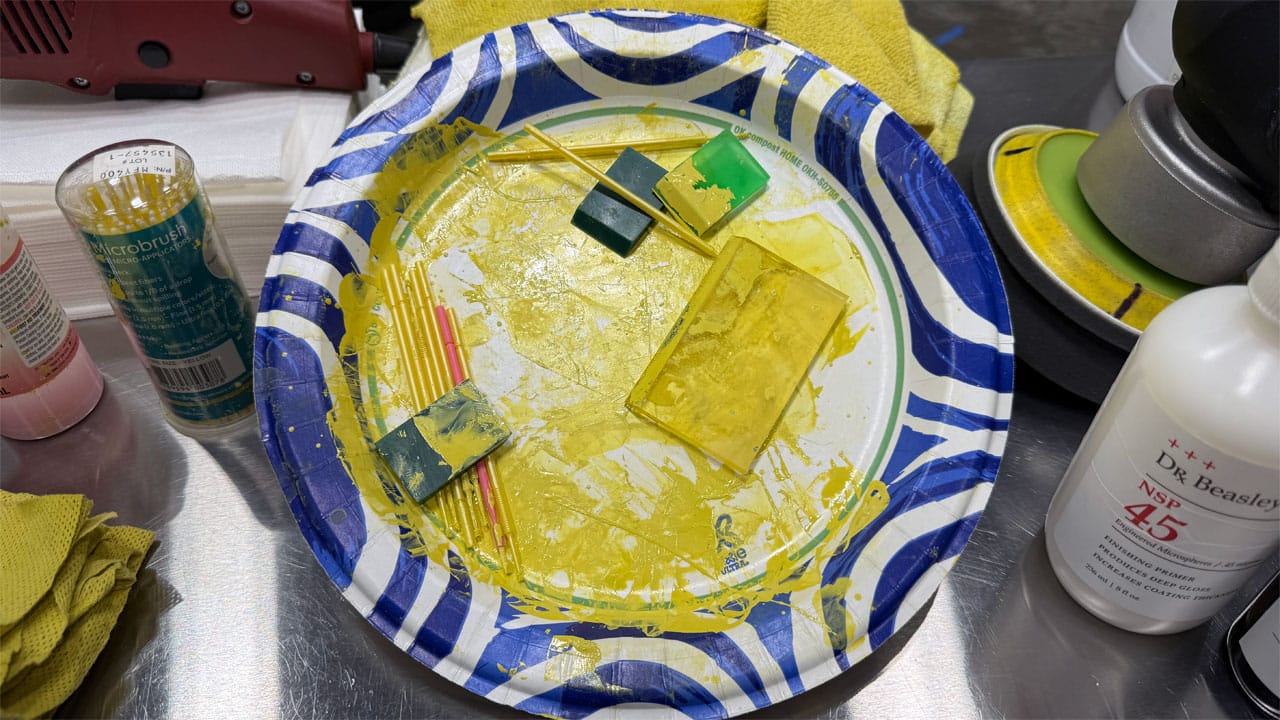
The below picture shows ONE paper plate, I probably used a half a dozen as I worked around the Corvette.
For the final paint correction step, I used a simple Porter Cable 7424XP, which is an 8mm free spinning, random orbital polisher – very NON-aggressive, which is what I needed for the final polishing step. I used this an ultra fine cut polish with a Buff and Shine foam finishing pad. Then to seal the paint, I installed the Nano-Resin 2.0 Ceramic Coating.
About the Author
If you ever watched My Classic Car with Dennis Gage, Mike Phillips was a frequent guest on the show sharing new tools, pads and products and demonstrating correct techniques for a wide-spectrum of detailing topics.
Mike was also the co-host, along with Adrienne “AJ” Janic for their TV show, Competition Ready on Velocity Channel.
Mike Phillips has been teaching car detailing since 1987. He has worked with industry powerhouse companies such as Meguiar’s, Autogeek, 3D Products International, and now Dr. Beasley’s.
He has served as host for two TV shows on car detailing:
• Competition Ready on the Velocity Channel
• Autogeek’s What’s in the Garage
He is the author of five car detailing books and one boat detailing book. Another book is in the works and set to publish in the spring of 2027.
- The Art of Polishing Paint
- The Art of Detailing
- Complete Guide to a Show Car Shine
- The RUPES BigFoot Paint Polishing System
- Flex XC 3401 VRG Dual Action Orbital Polisher
- How To Detail Boats with Marine 31
He’s been the guest detailing expert for multiple TV shows including
- My Classic Car with Dennis Gage
- Chasing Classic Cars – with Wayne Carini
- Two Guys Garage – with Bryan Fuller
- Truck U with Bruno Masel and Matt Steele
- Motorhead Garage with Sam Memolo and Dave Bowman
He has written more than 1,000 articles on the topics of auto and marine detailing. He was the Detailing Trainer for Meguiars.com from 1987-2009, as well as the Director of Training for Autogeek.com from 2009-2021. After that, he served as Global Director of Training for 3D International and currently is the Chief Education Officer/Trainer for Dr. Beasley’s.
For all his online life, he freely makes his email and cell phone number available for like-minded detailing, car and boat enthusiast with question or in need of help with their detailing projects.
Would You Like to Learn How to Machine Polish Like a Pro?
• Would you like to take your detailing skills to a higher level?
• Do you find you learn better by doing versus sitting in a chair looking at a PowerPoint presentation about car detailing?
Here at Dr. Beasley’s in sunny Stuart, Florida, we teach the most hands-on car detailing classes on planet Earth. And we prove it too. You can find write-ups on the Dr. Beasley’s Blog that photo-documents just how hands-on our classes are plus you’ll see the kinds of cars you’ll be training on.
Click the link below to find the dates, locations, topics, and prices for all upcoming detailing classes.
Upcoming Detailing Classes – Prices – Info – Topics – Locations
And if you ever have any questions, always feel free to reach out to me personally via text, phone call or email.
I hope to see you in a future detailing class!
Sincerely,
Mike Phillips
Chief Education Officer for Dr. Beasley’s
Mike@drbeasleys.com
Cell: 760-515-0444
Mike
Last edited: