Polished Aluminum advice

Mak

Member
Joined
Mar 25, 2024
Messages
39
Reaction score
30
Points
18
Location
Flagler Beach, FL
Polished Aluminum advice


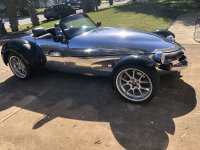
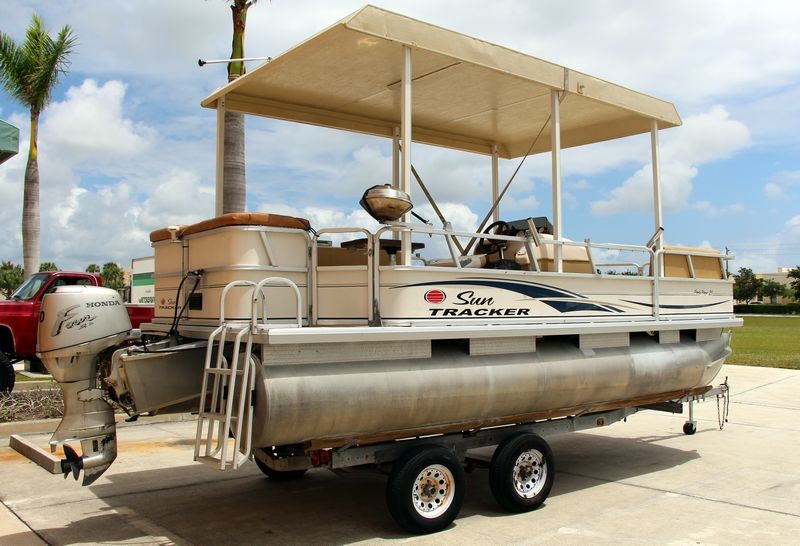
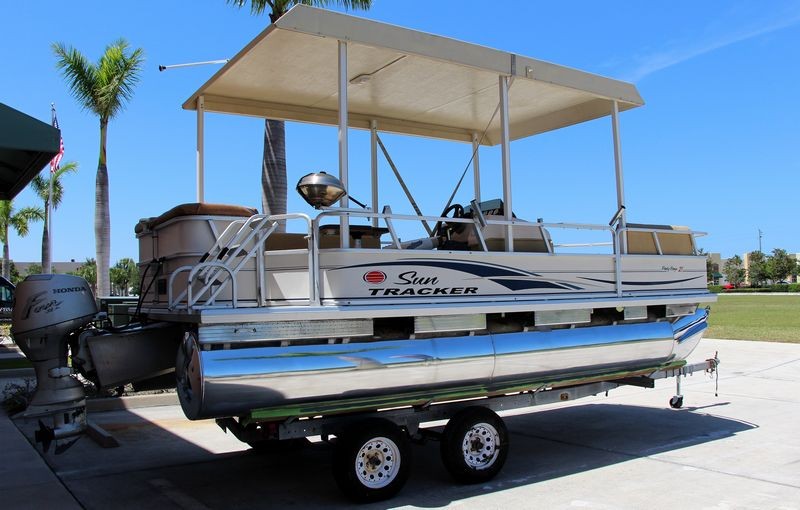
First post and looking for some help/advice with the polished aluminum body panels on my Panoz. I’ve been reading through the archives and have found a wealth of good information for my first cut and buff job on another vehicle I recently painted. However, with this bare polished aluminum, I’m still not getting the results I would like to end with.

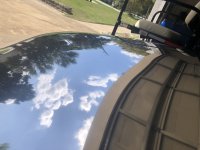
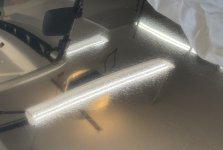
While it looks far better than it did when I started, there are still a lot of the random orbit swirls or pigtails visible close-up.

There are some scratches so deep I know I will never get them all out, but the very light consistent 3/16” curls will eventually come out with the correct work. Previous owner appears to have hit it with a rotary more than once and scarred the surface with some deeper scratches. I got most out and have brought it back as much as I can with what I’ve tried so far. I had a very difficult time getting photographs that represent what it looks like in-person and up-close.

Looks fantastic from 10’, but up close and at the right angle you can really see the RO scratch pattern. The two up-close photos where you can see the scratches actually look a lot worse than they do in real life. The magnification makes it look worse.

I started with 320 and progressed to 400, 600, 800, 1000, 1200, 1500, 2000 on a random orbit sander with 1/2” soft interface pad. I spent a lot of time with each grit and worked to be careful to remove all the sanding scratches from the previous grit. I even worked in the 800 and 1200 instead of jumping further in hopes of not missing any previous deeper scratches.

I was careful to clean the panel surface and not leave any of the previous grit residue when progressing to the next finer grit. Then I went to a wool pad using the Chemical Guys heavy metal polish. I also tried Mother’s.

I’ve used both my Flex Rotary and also my Flex 3401 RO. I’ve tried Chemical Guys Orange medium and Yellow heavy foam pads. Last thing I tried was a soft foam polishing pad, thinking it would not make any difference but it actually seems to have maybe created even more of the 1/8-3/16” swirls/scratches…

When using the Rotary or RO, I have NOT been applying pressure like in the aluminum diamond-plate polishing video done by Mr Phillips.

I assumed all that pressure was because it was already so oxidized, and I was afraid a lot of pressure would cause even more scratches. Perhaps that is a wrong assumption…

Nothing seems to be making a dent toward reducing those scratches. I suspect I either need to
  1. go back to the abrasive papers and work more with a specific range of grits, or
  2. The polishes I’m using are not the right compound to actually do any meaningful cutting, and I need to be using a different compound, or
  3. I won’t make any progress with a rotary or RO polisher and need to be using a grinder with one of the buffing wheels and cutting compound bars.
I would really like to be able to get this done with my Flex 3401 RO. It’s the easiest to use and control without getting the holograms and striping I was getting with the Flex rotary. Just not sure what I’m doing wrong… Would appreciate some advice from those of you with aluminum polishing experience.
Thanks
 

Attachments

  • IMG_0335.jpeg
    IMG_0335.jpeg
    2.9 MB · Views: 4
  • IMG_0711.jpeg
    IMG_0711.jpeg
    1.3 MB · Views: 4
  • IMG_0713.jpeg
    IMG_0713.jpeg
    1.8 MB · Views: 4
  • IMG_4203.jpeg
    IMG_4203.jpeg
    1.5 MB · Views: 3
  • IMG_4204.jpeg
    IMG_4204.jpeg
    559 KB · Views: 4
  • IMG_4208.jpeg
    IMG_4208.jpeg
    1.5 MB · Views: 4
The only time I've done a complete sand and buff on aluminum is when I machine sanded and then buffed out an aluminum pontoon boat for a book I wrote on boat detailing a few years ago.


Before

full


After

full


My standard for finish quality when I sand ANYTHING is 100% sanding mark removal. This is a much tougher standard than most people think and much tougher than I see day-to-day from other people's work.


We started with 1000 grit Mirka and machine sanded using the FLEX 3401 and then finished using 4000 grit Mirka with the FLEX 3401.

We then used 7.5" twisted wool pads on the FLEX 3401 to remove our sanding marks. Followed by foam polishing pads on the FLEX 3401 followed by foam polishing or finishing pads on the Porter Cable.

It's been to long to remember everything about this project but knowing myself, if I could have did the first sanding mark removal process using a wool pad on a rotary polisher - I would have. The fact that I used an 8mm gear-driven orbital with a wool pad probably means,

I tested removing sanding marks using a wool pad on a rotary and it likely worked better and faster BUT left wool pad holograms in the aluminum. Thus the reason I used the BEAST instead, although my first preference would have been for rotary.

Unlike car paint or even gelcoat, aluminum is NOT forgiving. You need to nail each step of the process perfect as subsequent steps will not clean-up or fix defects lefy by previous step.


To me, it sounds like you're NOT getting the sanding marks out with your first compounding step. Do a Test Spot using a wool pad on the BEAST. I know we used Lake Country traditional 4-ply wool pads. And when used on a FLEX BEAST - you "can" overheat the backing and blowup the pads. So be mindful of heat.

I do NOT know that other "fiber" pads would alos work - you woul have to experiment. But keep in mind I'm always teaching others that like microfiber pads over foam for car paint,

Fibers are a form of abrasive

This is a double sided sword. They help to cut but the also leave behind their own scratches. They are abrasives. So experiment with a fiber pad that cuts sanding marks out of aluminum and leaves the less swirls, scouring or holograms. Then move to the next step.


:)
 
  • Like
Reactions: Mak
When using the Rotary or RO, I have NOT been applying pressure like in the aluminum diamond-plate polishing video done by Mr Phillips.

I'm guessing you're referencing this video,


And YES - I was pushing HARD on the wool pad and the rotary polisher because the diamond plate aluminum was SEVERLY oxidized.


Mike
 
  • Like
Reactions: Mak
Nothing seems to be making a dent toward reducing those scratches. I suspect I either need to
  1. go back to the abrasive papers and work more with a specific range of grits, or
  2. The polishes I’m using are not the right compound to actually do any meaningful cutting, and I need to be using a different compound, or
  3. I won’t make any progress with a rotary or RO polisher and need to be using a grinder with one of the buffing wheels and cutting compound bars.

I would try a fiber pad for the first machine polishing step.

As for the brands of metal polishes, I was let down by Chemical Guys the first time I used anything they make that uses abrasive technology. And in my opinion and experience, the MOST important factor when polishing ANYTHING is the abrasive technology.

I've had good luck with Mothers products over the years.

I would look for a REAL manufacturer of metal polishes and see what you can find for both compound and polish. Always keep in mind, so much of what we all see for sale is being sold to us by marketing companies relabeling an actual manufacturer's products.

I know Renegade makes their own products and my friend Russel likes the Busch brand.
Mike
 
  • Like
Reactions: Mak
The only time I've done a complete sand and buff on aluminum is when I machine sanded and then buffed out an aluminum pontoon boat for a book I wrote on boat detailing a few years ago.

Before

After


My standard for finish quality when I sand ANYTHING is 100% sanding mark removal. This is a much tougher standard than most people think and much tougher than I see day-to-day from other people's work.

We started with 1000 grit Mirka and machine sanded using the FLEX 3401 and then finished using 4000 grit Mirka with the FLEX 3401.

We then used 7.5" twisted wool pads on the FLEX 3401 to remove our sanding marks. Followed by foam polishing pads on the FLEX 3401 followed by foam polishing or finishing pads on the Porter Cable.

It's been to long to remember everything about this project but knowing myself, if I could have did the first sanding mark removal process using a wool pad on a rotary polisher - I would have. The fact that I used an 8mm gear-driven orbital with a wool pad probably means,

I tested removing sanding marks using a wool pad on a rotary and it likely worked better and faster BUT left wool pad holograms in the aluminum. Thus the reason I used the BEAST instead, although my first preference would have been for rotary.

Unlike car paint or even gelcoat, aluminum is NOT forgiving. You need to nail each step of the process perfect as subsequent steps will not clean-up or fix defects lefy by previous step.

To me, it sounds like you're NOT getting the sanding marks out with your first compounding step. Do a Test Spot using a wool pad on the BEAST. I know we used Lake Country traditional 4-ply wool pads. And when used on a FLEX BEAST - you "can" overheat the backing and blowup the pads. So be mindful of heat.

I do NOT know that other "fiber" pads would alos work - you woul have to experiment. But keep in mind I'm always teaching others that like microfiber pads over foam for car paint,

Fibers are a form of abrasive

This is a double sided sword. They help to cut but the also leave behind their own scratches. They are abrasives. So experiment with a fiber pad that cuts sanding marks out of aluminum and leaves the less swirls, scouring or holograms. Then move to the next step.
thanks very much for the detailed response, information and advice. Much appreciated.
I do have and used the Lake Country wool pads. I definitely had a hologram problem when I used the rotary, but figured it was due to my inexperience. Now that I think about it though, I need to go back and try it again on a small section and see if it removes the RO swirls at least. If it does then at least I will have a little more info to consider. I also need to tape-off a small section and go back with the wool pad and 3401 to see if that makes any progress toward removing the RO scratch pattern. Having a well defined border from the tape will help me identify if there are any changes.

I think I read or saw in your video that you don’t sell a metal buffing compound... Is that correct? Is there a particular compound you recommend I try or should the Chemical Guys Heavy or Mother‘s or any of the others I have due the trick with the pad actually doing most of the cutting?

I’ve got 2500 Buflex and Trizact 8000 up at my shop which I plan to use on the cut and buff for my F100 I painted. I can always bring back some of those discs to try later next month if I don’t get anywhere with the wool pads. Although if I get nowhere with the wool pads I think I probably need to drop back to 800 or 1000 and progress through the grits again. Hopefully not…
thank you again.
 
I would try a fiber pad for the first machine polishing step.

As for the brands of metal polishes, I was let down by Chemical Guys the first time I used anything they make that uses abrasive technology. And in my opinion and experience, the MOST important factor when polishing ANYTHING is the abrasive technology.

I've had good luck with Mothers products over the years.

I would look for a REAL manufacturer of metal polishes and see what you can find for both compound and polish. Always keep in mind, so much of what we all see for sale is being sold to us by marketing companies relabeling an actual manufacturer's products.

I know Renegade makes their own products and my friend Russel likes the Busch brand.
Mike
Oops. Just saw this. Disregard my compound question in the previous post.
ill try the Mother‘s again and I have some California Purple. NuShine is a brand I have seen in some other videos and they seem to actually make several abrasive levels to progress through…. I’ll look into the other brands you recommend too. There is some good info on both those sites and the Renegade looks like it may be what the Doctor ordered…
thank you very much.
i wish i had seen your video before i cleaned my pads in my LC pad cleaner. Its going to take a a whole day to get all that black residue out of all the nooks and crannies…:cautious:
 
Last edited:
i wish i had seen your video before i cleaned my pads in my LC pad cleaner. Its going to take a a whole day to get all that black residue out of all the nooks and crannies…:cautious:

Here's my advise. Once you use any pad for polishing aluminum - dedicate it to only be for aluminum polishing in the future. Then, NEVER wash these pads - simply spur and store clean.

Here's a brand-new article and video on how to clean wool pads. After interacting on this thread, I wish I would have included what I wrote above about only spurring wool pads used for aluminum in the video.


How to Clean Wool Buffing Pads
How-to-Clean-Wool-Pads.jpg


Here's the video for this article,


Mike
 
  • Like
Reactions: Mak
Here's my advise. Once you use any pad for polishing aluminum - dedicate it to only be for aluminum polishing in the future. Then, NEVER wash these pads - simply spur and store clean.

Here's a brand-new article and video on how to clean wool pads. After interacting on this thread, I wish I would have included what I wrote above about only spurring wool pads used for aluminum in the video.


How to Clean Wool Buffing Pads
How-to-Clean-Wool-Pads.jpg


Here's the video for this article,


Mike
Saved to watch later tonight. Thanks
yeah, no doubt any of these pads I’ve used on aluminum can‘t ever be used on anything else…
 
I do have and used the Lake Country wool pads. I definitely had a hologram problem when I used the rotary, but figured it was due to my inexperience.

The holograms have nothing to do with experience, it's simply the fact that fibers are abrasives. With a rotary you're creating holograms and they can be deep. With an orbital you're creating micro-marring.

Orbital less aggressive than rotary.

Orbital micro-marring is normally less deep than rotary holograms.

When polishing aluminum - the trick is dialing in a process that removes the sanding marks 100% while leaving the easiest or most shallow process marks to remove with the next step.


Now that I think about it though, I need to go back and try it again on a small section and see if it removes the RO swirls at least. If it does then at least I will have a little more info to consider. I also need to tape-off a small section and go back with the wool pad and 3401 to see if that makes any progress toward removing the RO scratch pattern. Having a well-defined border from the tape will help me identify if there are any changes.

Good plan and agree - using a tapeline will make it easier to inspect and determine before and after results.


I think I read or saw in your video that you don’t sell a metal buffing compound... Is that correct?

I tested the Dr. Beasley's NSP 150 Primer a few months ago when buffing the aluminum wheels on a 1978 Bronco and a 1978 AMC Pacer, (with slotted mags). I found it worked really well as an aluminum polish. I should have followed both projects with re-polishing with the less aggressive NSP 45 to create a more clear and more brilliant shine - but alas - I didn't and that's only because it would simply be another thing to do when the NSP 150 produced acceptable results.

So to answer your question - at this time, the answer is "no" we don't sell a dedicated aluminum polish. It is interesting that the spherical abrasive technology used in the NSP products also works for aluminum.

It also works for buffing out clear plastics. See this article,

1964 Amphicar – Paintwork, Glass & Plastic Correction

AmphicarPlastic005.jpg


Is there a particular compound you recommend I try or should the Chemical Guys Heavy or Mother‘s or any of the others I have due the trick with the pad actually doing most of the cutting?

Besides what I already shared, I'm not up to speed on the latest or best liquid or paste aluminum polishes. I've polished a LOT of aluminum in my life - it's one of my least favorite types of work to do. :)


I’ve got 2500 Buflex and Trizact 8000 up at my shop which I plan to use on the cut and buff for my F100 I painted. I can always bring back some of those discs to try later next month if I don’t get anywhere with the wool pads. Although if I get nowhere with the wool pads I think I probably need to drop back to 800 or 1000 and progress through the grits again. Hopefully not…

I'm a big fan of Eagle Abrasives by KOVAX sanding discs and sheets. I'm teaching a dry sanding class in Chicago using these tools on a 1960 Chevy Impala in a few weeks. I've never used the 3M Trizact 8000 but read only positive things about it. I've always been able to do anything I wanted to do using 3M Trizact 3000 and 5000 - after these on car paint, as long as you're using great abrasive technology and know how to use a rotary polisher - it's all downhill. :)


thank you again.

No problemo - in-between typing on this forum, I've been packing around 40 polishers plus all the paint correction and sanding supplies to ship to Chicago for the upcoming 5-day class.


Mike
 
  • Like
Reactions: Mak
Well, just an update for anyone that might be interested.
I taped off a small section and attacked it again with the Flex Rotary and a LC wool pad. Used Mother’s compound this time. Moved consistently slow and with more than 50% overlap. Three horizontal passes alternating with vertical passes.
All I succeeded in doing was making it shinier and introducing the hologram and striping effect once again… the Random Oribit scratch pattern remained.
Moved the wool pad back to the Beast and hit it once again. That removed the striping/holograms but those swirls remain.
Next step will be to order some of the Renegade heavy cut compound that sounds like it will be more of a cutting compound with a significant “grit” in comparison to the polishes I’ve tried thus far. Unfortunately that will be next month after I get back from our place in N Ga. Hopefully I’ll have success up there with my first “cut and buff” on my old F100 I painted last Fall.
 
Well, just an update for anyone that might be interested.
I taped off a small section and attacked it again with the Flex Rotary and a LC wool pad. Used Mother’s compound this time. Moved consistently slow and with more than 50% overlap. Three horizontal passes alternating with vertical passes.
All I succeeded in doing was making it shinier and introducing the hologram and striping effect once again… the Random Oribit scratch pattern remained.

Hmm... might have to resand any sanding currently remainin sanding marks and refine.

Aluminum is not forgiving like car paint. Anytime you're sanding, ANY PLACE that's been sanded with one grit, MUST be re-sanded using the next grit and perfectly refined. This same things hapens with car paint and gelcoat, but often times you can get out the deeper sanding marks that were not refined by buffing longer or using a more aggressive pad, product or tool. No so with aluminum.

In my car and boat detailing classes, this is a topic I STRESS to the students before we start.


Moved the wool pad back to the Beast and hit it once again. That removed the striping/holograms but those swirls remain.
Next step will be to order some of the Renegade heavy cut compound that sounds like it will be more of a cutting compound with a significant “grit” in comparison to the polishes I’ve tried thus far. Unfortunately that will be next month after I get back from our place in N Ga. Hopefully I’ll have success up there with my first “cut and buff” on my old F100 I painted last Fall.

Following. And thanks for sharing the project and the follow-ups. If you need some help sharing pictures, text or email them to me and I can make the magic happen on the forum.


Mike
 
  • Like
Reactions: Mak
Back
Top